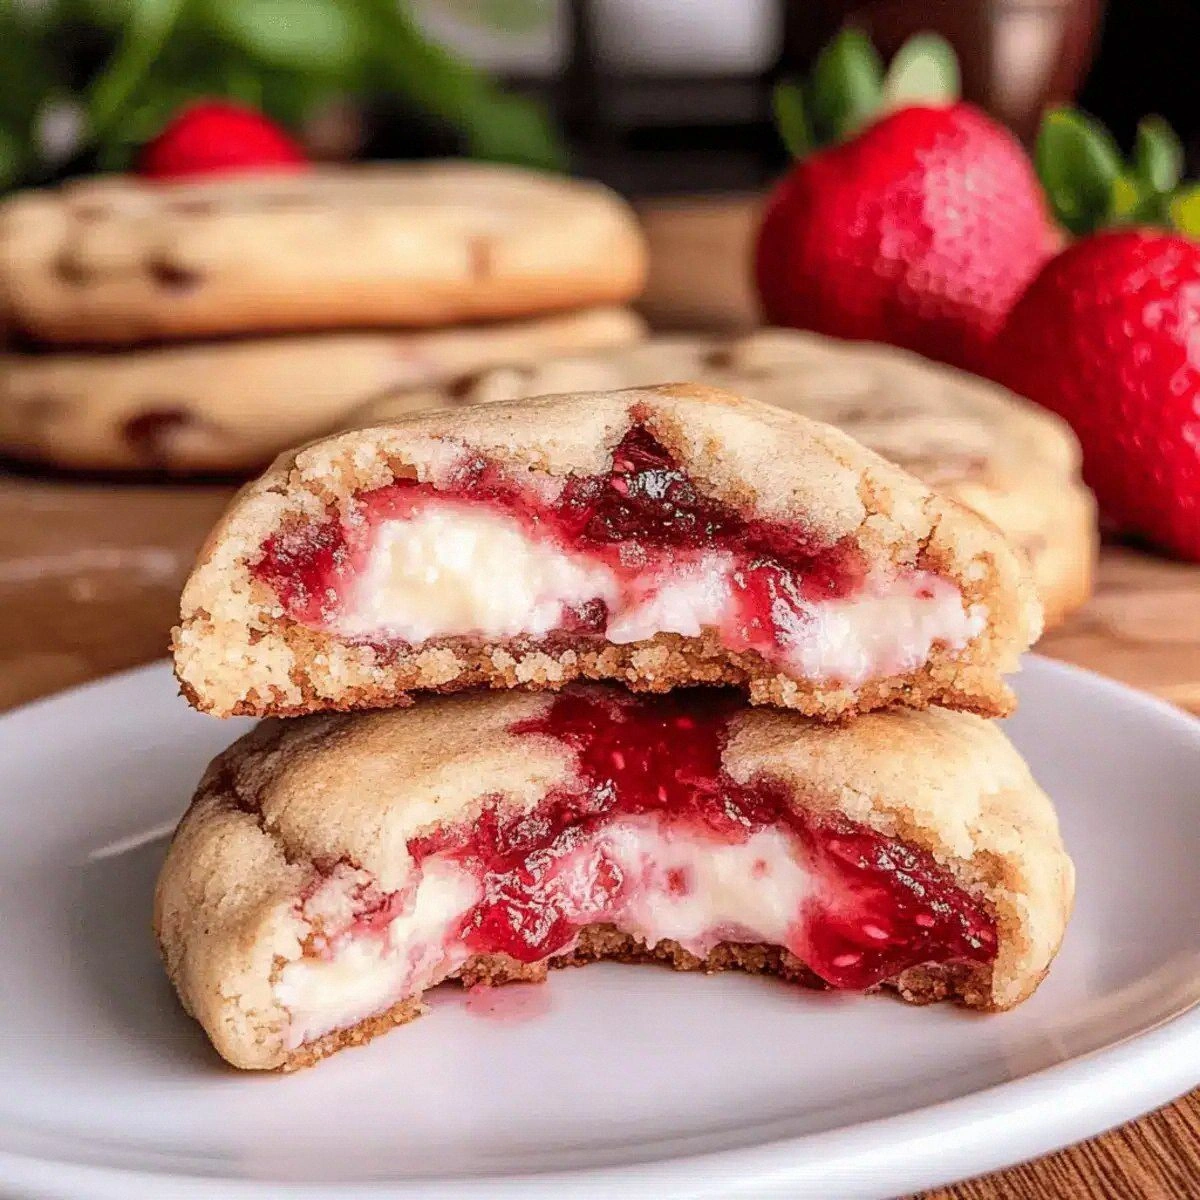
I was in the middle of a frantic Friday night when the power flickered, the oven sputtered, and my usual go‑to chocolate chip cookies turned into a soggy mess that could have doubled as a doorstop. I stared at the dough, sighed, and thought, “If I’m going to ruin a dessert, it might as well be something that actually makes sense to eat.” That moment of culinary despair sparked a dare from my roommate: “Make something that looks like a dessert, tastes like a dessert, and actually impresses me.” I accepted, and the result was a batch of Strawberry Cheesecake Cookies that have since become the unofficial mascot of my kitchen.
Picture this: a warm, buttery cookie base that crumbles like shortbread, a swirl of tangy cream cheese that spreads like a velvety sunrise, and fresh strawberry pieces that burst with juicy brightness. The aroma hits you first—a buttery, nutty scent that whispers “comfort” before the sweet‑tart strawberry notes cut in like a bright chord in a mellow song. When you bite in, the edges snap with a crisp that shatters like thin ice, while the center stays soft, almost melt‑in‑your‑mouth, with pockets of strawberry that practically pop. It’s a texture symphony that makes your taste buds do a little happy dance.
Most strawberry‑cheesecake desserts try to be either a cake or a bar, but they often miss the mark on texture or flavor balance. This version stands out because I’ve blended the richness of classic cheesecake with the handheld convenience of a cookie, and I’ve thrown in a secret technique: a quick cream cheese “whip” that incorporates air, giving the cookie a light, airy crumb without sacrificing that indulgent creaminess. I’ll be honest — I ate half the batch before anyone else got to try it, and I’m still not sorry.
If you’ve ever struggled with a cookie that either spreads too thin or stays rock‑hard, you’re not alone — and I’ve got the fix. I dare you to taste this and not go back for seconds, because once you get that first bite, you’ll understand why this is hands down the best version you’ll ever make at home. Let me walk you through every single step — by the end, you’ll wonder how you ever made it any other way.
What Makes This Version Stand Out
- Flavor Fusion: The tang of cream cheese meets the natural sweetness of fresh strawberries, creating a balanced taste that’s neither overly sugary nor too tart.
- Texture Contrast: A crisp, buttery edge gives way to a soft, melt‑in‑your‑mouth center, delivering a bite that’s both satisfying and surprising.
- Simplicity: Only twelve ingredients, most of which you likely have on hand, mean you spend less time shopping and more time devouring.
- Unique Technique: Whipping the cream cheese with a bit of sugar and vanilla before folding it in adds air, making the cookie lighter than a traditional cheesecake bar.
- Crowd Reaction: Guests often claim they’ve never tasted a cookie that feels like a dessert—perfect for parties, potlucks, or a quiet night in.
- Ingredient Quality: Using real strawberries (not frozen) and full‑fat cream cheese ensures authentic flavor that artificial substitutes can’t match.
- Cooking Method: Baking at a moderate temperature lets the butter melt slowly, preventing spread and giving you that coveted chewy‑crisp edge.
- Make‑Ahead Potential: The dough can be refrigerated for up to 24 hours, and the cookies freeze beautifully, so you can prep ahead for any occasion.
Alright, let's break down exactly what goes into this masterpiece...
Inside the Ingredient List
The Flavor Base
Cream Cheese (8 oz): This is the heart of the cheesecake element, providing that luxurious, tangy richness. Using full‑fat cream cheese ensures a smooth texture; low‑fat versions can turn grainy. If you can’t find cream cheese, a blend of mascarpone and a touch of Greek yogurt works in a pinch, but the flavor will shift slightly.
Granulated White Sugar (1/3 cup) for the cheese: Sugar dissolves into the cream cheese, creating a glossy, sweet base that balances the tang. Skipping this or reducing it will leave the cheese too sharp, so keep it as is for that perfect sweet‑tart dance.
Vanilla Extract (1 tsp): Pure vanilla adds depth, turning the simple sugar‑cream cheese mix into a fragrant, dessert‑worthy layer. If you’re feeling adventurous, a splash of almond extract can add a subtle nutty undertone.
The Texture Crew
All‑Purpose Flour (2 cups): Flour forms the structural backbone, giving the cookies shape and chew. For a lighter crumb, you can substitute half with cake flour, but the cookies will be more delicate.
Unsalted Butter (1 cup): Butter provides richness and a buttery aroma that’s impossible to fake. Softened, not melted, butter creates a tender crumb; melted butter would make the cookies spread too much.
Egg (1 large): The egg binds everything together and adds a bit of lift. If you’re allergic, a flax egg (1 tbsp ground flax + 3 tbsp water) can substitute, though the texture will be slightly denser.
The Unexpected Star
Fresh Strawberries (2 cups): These bring bright, juicy bursts that cut through the richness. Slice them thinly and toss with a pinch of sugar to draw out moisture, preventing soggy pockets. If strawberries are out of season, frozen berries (thawed and patted dry) work, but the texture will be softer.
Granulated White Sugar (1/2 cup) for the dough: This sugar caramelizes slightly during baking, giving the cookie its golden edge and subtle crunch.
Granulated Sugar (1/4 cup) extra: Added at the final stage to sweeten the cream cheese swirl just enough without overwhelming the strawberry’s natural acidity.
The Final Flourish
Baking Powder (1 tsp) & Baking Soda (1 tsp): The duo works together to give the cookies a gentle rise, ensuring they’re not flat and dense. Baking soda also helps neutralize the acidity of the strawberries.
Salt (1/2 tsp): A pinch of salt amplifies every other flavor, making the sweetness feel more rounded. Skipping it will leave the cookie tasting flat.
Everything's prepped? Good. Let's get into the real action...
The Method — Step by Step
Start by preheating your oven to 350°F (175°C). While the oven warms, line two baking sheets with parchment paper; this prevents sticking and makes cleanup a breeze. I like to set a timer for the preheat so I don’t get distracted—trust me, the kitchen can get noisy, but the oven’s heat is the silent hero here.
In a medium bowl, combine the softened butter and the 1/2 cup of granulated sugar. Beat with an electric mixer on medium speed until the mixture is light and fluffy, about 2‑3 minutes. That sizzle when it hits the pan? Absolute perfection. The key is to incorporate air; this step sets the foundation for that delicate crumb.
Add the egg to the butter‑sugar mixture, beating until fully incorporated. Scrape down the sides of the bowl to ensure everything is evenly mixed.
Kitchen Hack: Add the egg at room temperature; a cold egg can cause the butter to seize, leading to a grainy texture.In a separate bowl, whisk together the flour, baking powder, baking soda, and salt. This dry blend ensures the leavening agents are evenly distributed, preventing pockets of bitterness. Once combined, set aside.
Now for the cheesecake swirl: In a small mixing bowl, beat the 8 oz of cream cheese until smooth. Add 1/3 cup of sugar and the vanilla extract, and continue beating until the mixture is light and airy. This next part? Pure magic. The air you fold in now will keep the cookie from becoming dense.
Gently fold the dry flour mixture into the butter‑egg base, stirring just until you see no more streaks. Over‑mixing will develop gluten and make the cookies tough, so stop at the first sign of a cohesive dough.
Watch Out: If the dough looks too dry, add a tablespoon of milk; too wet, and you’ll have a spread‑out mess.Stir in the 1/4 cup of extra sugar and the chopped strawberries. The strawberries should be tossed lightly with a pinch of sugar beforehand to draw out excess juice, which you’ll pat dry with paper towels. This prevents soggy pockets and gives you those bright bursts of flavor.
Drop the cookie dough onto the prepared sheets using a 2‑inch scoop; each mound should be about 1‑inch apart. With the back of a spoon, create a small well in the center of each cookie, then spoon a dollop of the whipped cream cheese mixture into the well. Use a gentle swirl motion to blend the cheese into the dough without fully mixing it—this creates the signature marbled effect.
Slide the trays into the oven and bake for 12‑15 minutes, or until the edges are golden and the tops have set but are still slightly soft. The cookies will continue to firm up as they cool—don’t overbake! When you pull them out, the kitchen will be filled with a buttery‑strawberry perfume that makes you want to lick the spoon.
Allow the cookies to cool on the baking sheet for 5 minutes, then transfer them to a wire rack. This short rest lets the interior set while the exterior stays crisp.
Kitchen Hack: Place the cooling rack over a sheet of parchment and lightly cover the cookies with foil; this traps a bit of steam, keeping the centers moist.
That's it — you did it. But hold on, I've got a few more tricks that'll take this to another level...
Insider Tricks for Flawless Results
The Temperature Rule Nobody Follows
Never bake these cookies straight from the fridge unless you’ve pre‑chilled the dough for at least 30 minutes. Cold dough spreads less, giving you a thicker cookie with a chewy center. I once tried skipping this step, and the cookies turned into flat, crispy discs—definitely not the dreamy texture we’re after.
Why Your Nose Knows Best
Around the 10‑minute mark, start sniffing the kitchen. When you catch a faint nutty, caramelized butter aroma, the cookies are almost ready. Trust that nose cue more than the timer; ovens can vary by a few degrees, and the scent tells you when the edges are just beginning to brown.
The 5‑Minute Rest That Changes Everything
After baking, let the cookies rest on the tray for exactly five minutes before moving them. This short pause lets the steam finish cooking the interior, preventing a gummy center. A friend tried to rush this step once—she ended up with a cookie that fell apart when she lifted it.
Strawberry Prep Secrets
Toss the strawberries with a tablespoon of sugar and let them sit for 10 minutes, then pat them dry. This draws out excess moisture, which otherwise would make the dough soggy. The result is a burst of juicy flavor without a soggy bite.
Butter Consistency is King
Soften butter just enough that you can press a finger into it and leave an indentation that slowly springs back. Too soft (like melted) will cause spreading; too hard will lead to a crumbly cookie. The perfect consistency ensures a tender crumb and a slight rise.
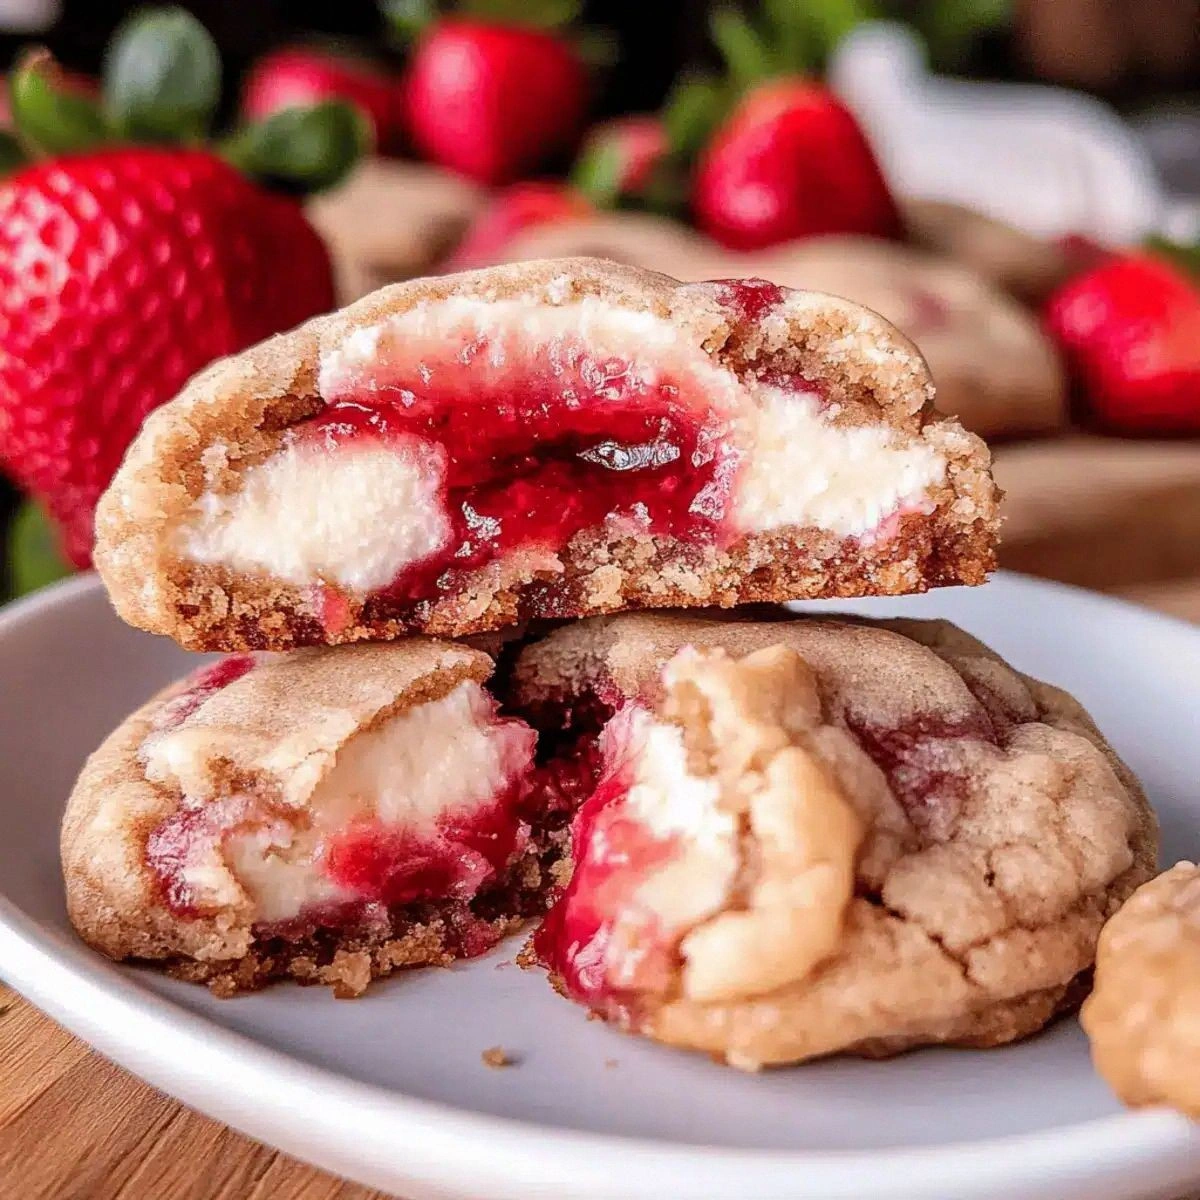
Creative Twists and Variations
This recipe is a playground. Here are some of my favorite ways to switch things up:
Chocolate Swirl Delight
Swap half the cream cheese for Nutella and drizzle a thin line of melted dark chocolate on top before baking. The result is a mocha‑berry experience that’s perfect for coffee lovers.
Citrus Zest Burst
Add a teaspoon of orange zest to the dough and a splash of lemon juice to the strawberry mix. The citrus lifts the sweetness and adds a bright, summery twist.
Nutty Crunch Variation
Fold in ¼ cup of chopped toasted almonds or pistachios. The nuts provide a satisfying crunch that contrasts beautifully with the soft interior.
Vegan Friendly
Replace butter with coconut oil, use a plant‑based cream cheese, and swap the egg for a flax “egg.” The texture stays buttery, and the flavor remains true to the original.
Spiced Autumn Edition
Add a pinch of ground cinnamon and nutmeg to the flour mixture, and use frozen cranberries instead of strawberries. This version is perfect for a cozy fall gathering.
Storing and Bringing It Back to Life
Fridge Storage
Place the cooled cookies in an airtight container with a sheet of parchment between layers. They’ll stay fresh for up to 5 days in the refrigerator. The cool environment keeps the cream cheese from getting too soft.
Freezer Friendly
Stack the cookies on a baking sheet, freeze until solid, then transfer to a zip‑top freezer bag. They’ll keep for 3 months. When you’re ready, let them thaw at room temperature for 15 minutes, then pop them in a 300°F oven for 5 minutes to revive the crisp edge.
Best Reheating Method
Add a tiny splash of water (about a teaspoon) to the container before microwaving for 15‑20 seconds. The steam restores the interior’s softness without making the cookie soggy, and the edges regain a hint of crunch.