I still remember the first time I tried to make stained glass cookies. It was a snowy December afternoon, and I was armed with nothing but a vague memory of seeing them in a bakery window and a dangerous amount of confidence. The dough cracked, the candy melted into a volcanic mess, and my kitchen looked like a unicorn had exploded. But when I pulled that misshapen, slightly burnt cookie from the oven and held it up to the light, something magical happened. The candy centers had melted into jewel-toned windows that caught the winter light like tiny cathedral panes. I was hooked. Fast forward through three more attempts, two emergency trips to the store, and one very patient dog who ate my failures, and I've cracked the code to making stained glass cookies that look like they belong in a Parisian patisserie.
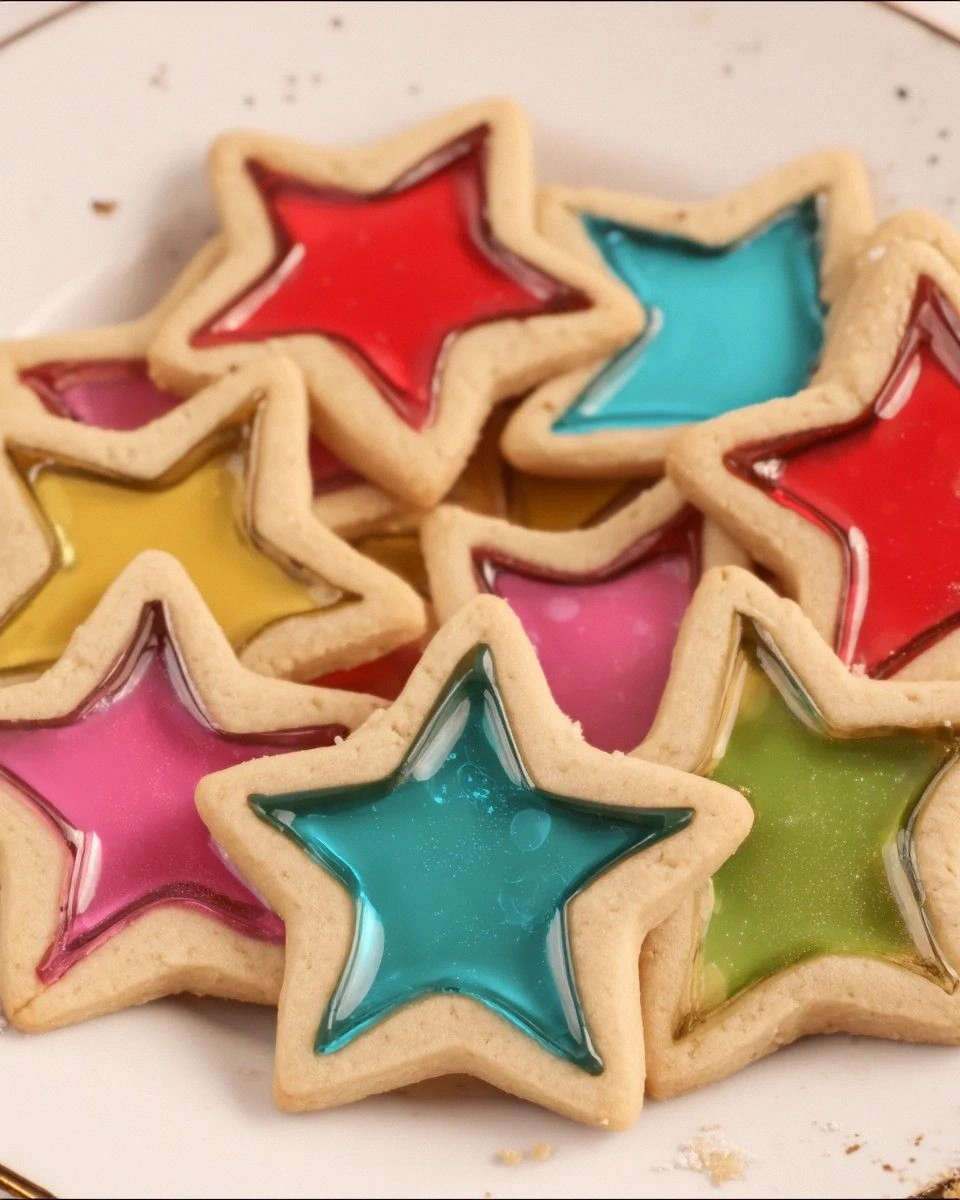
These aren't just pretty faces, though. Each cookie is a perfect balance of buttery, crisp dough and a center of melted hard candy that shatters like sugar glass between your teeth. The edges are golden and slightly caramelized, while the centers stay smooth and glossy, catching the light in a way that makes everyone stop and stare. I dare you to set these out at a party and not watch them disappear faster than you can say "edible art."
Picture yourself pulling a tray of these from the oven, the candy centers still bubbling like tiny lava lakes, the whole kitchen smelling like a candy factory collided with a bakery. Your friends will think you spent hours on them, but here's the secret: once you know the technique, these are actually easier than regular sugar cookies. No royal icing to pipe, no intricate decorating — just pure, stunning color that does all the work for you. The trick lies in three tiny details that most recipes completely miss, and I'm about to spill every single one.
Let me walk you through every single step — by the end, you'll wonder how you ever made it any other way.
What Makes This Version Stand Out
Buttery Perfection: This dough uses a higher ratio of butter to flour than most recipes, creating cookies that melt on your tongue while still holding their shape. The edges crisp to golden perfection while staying tender inside, giving you that satisfying snap when you bite through the candy center.
Candy Chemistry: Most recipes just tell you to crush hard candy and hope for the best. We use a specific temperature range and candy type that creates clear, glass-like centers without bubbles or clouding. The result looks like real stained glass, not like someone melted a lollipop on your cookie.
Zero Spread Guarantee: Through chilling the dough and using a touch of cornstarch, these cookies hold their cut-out shapes perfectly. No more wondering if your stars will look like blobs or if your hearts will morph into unrecognizable blobs in the oven.
Make-Ahead Magic: The dough keeps beautifully in the fridge for up to a week, and the baked cookies stay crisp for two weeks in an airtight container. This means you can make them ahead for holidays without any last-minute stress.
Color That Lasts: The candy centers maintain their vibrant color for weeks, unlike some versions that fade or turn cloudy. We use a specific brand and technique that keeps them looking like jewels even days later.
Crowd Psychology: There's something about translucent candy that makes people lose their minds. I've seen grown adults fight over the last cookie like it's the last slice of pizza at 2 AM. These don't just taste good — they create memories.
Texture Symphony: The contrast between the crisp cookie and the smooth candy center creates a textural experience that's genuinely addictive. It's like eating two desserts in one, with each bite giving you something new to love.
Ingredient Integrity: Using real vanilla bean paste instead of extract, European-style butter, and pure cane sugar might seem like overkill, but the flavor difference is immediately obvious. These taste like the cookies your grandmother would make if she went to culinary school in France.
Inside the Ingredient List
The Flavor Foundation
European-style butter is non-negotiable here. With its higher fat content and lower water percentage, it creates cookies that are richer and more tender than anything you've tasted. The butter should be cold but pliable — think the texture of modeling clay rather than rock hard from the fridge. When you cream it with the sugar, you're not just mixing; you're creating tiny air pockets that will expand in the oven, giving your cookies lift without making them cakey.
Vanilla bean paste might seem like a luxury, but it's the difference between cookies that taste "pretty good" and cookies that make people close their eyes when they bite into them. The tiny flecks of vanilla bean add visual interest to the dough, and the concentrated flavor gives depth that extract just can't match. If you absolutely must substitute, use half the amount of vanilla extract and add a pinch of vanilla powder for those characteristic specks.
The Texture Crew
All-purpose flour forms the backbone, but we use a specific technique called "reverse creaming" that coats the flour in butter before adding liquid. This prevents gluten development, keeping your cookies tender instead of tough. The protein content matters too — look for flour with 10-11% protein for the perfect balance of structure and tenderness.
Cornstarch is your secret weapon against spreading. Just two tablespoons per cup of flour creates a more tender crumb and helps the cookies hold their shape. It's like insurance against cookie blob syndrome. Don't skip this — regular flour alone won't give you the same results no matter how long you chill the dough.
The Candy Core
Jolly Ranchers are the gold standard for stained glass cookies. They melt smoothly, stay clear, and come in vibrant colors that don't fade during baking. Avoid cheaper hard candies — they often contain wax that creates cloudy, unappetizing centers. Crush them to a fine powder for even melting, but don't stress about a few larger pieces. They create interesting texture variations in the finished cookie.
The color combinations are where you can really play artist. Red and green for Christmas, blues and purples for Hanukkah, pastels for Easter, or a rainbow for Pride. Just avoid mixing complementary colors (red and green, blue and orange, purple and yellow) in the same cookie unless you want brown centers. Trust me on this one — I learned the hard way and ended up with cookies that looked like muddy puddles.
The Unexpected Star
A tiny pinch of cream of tartar does something magical here. It stabilizes the egg whites in the dough, prevents the candy from crystallizing, and gives the cookies a subtle tang that balances the sweetness. You won't taste it directly, but you'll notice something is missing if you leave it out. It's like the bass line in a song — you don't hum it, but you'd miss it if it disappeared.
The Method — Step by Step
- Start by creaming your butter and sugar for exactly three minutes. Set a timer — this isn't negotiable. The mixture should turn pale yellow and fluffy, like lemon-colored clouds. If you under-cream, your cookies will be dense. Over-cream, and they'll spread like gossip at a family reunion. You're looking for the sweet spot where the sugar has dissolved into the butter but the mixture hasn't started to separate.
- Add your egg and vanilla bean paste, but here's the key: crack the egg into a separate bowl first. Nothing ruins cookies faster than a bit of shell or a bad egg. Beat everything together for just 30 seconds — enough to combine but not so much that you're whipping air into the egg. The mixture will look curdled at first, but keep mixing and it'll come together into a smooth, creamy base that smells like vanilla ice cream.
- Whisk together your dry ingredients in a separate bowl. This isn't just about combining — it's about evenly distributing the cornstarch, salt, and cream of tartar so every bite tastes the same. Use a whisk, not a spoon. The whisk aerates the flour, preventing dense spots that could make your cookies tough. Sift if you're feeling fancy, but honestly, a good whisk does the job just fine.
- Add the dry ingredients all at once and mix on low speed just until the flour disappears. This is where most people mess up — they keep mixing until the dough looks smooth, but by then it's overworked. Stop when you still see a few streaks of flour. The dough will come together when you wrap it for chilling. Think of it like making biscuits: gentle is the name of the game.
- Divide the dough in half, flatten each half into a disk, and wrap in plastic wrap. Here's where patience pays off: chill for at least two hours, but overnight is even better. The dough will firm up, the flavors will meld, and your cookies will hold their shape like little soldiers. If you're in a rush, you can speed-chill in the freezer for 30 minutes, but the texture won't be quite as perfect.
- Roll out your dough between two sheets of parchment paper to exactly 1/4 inch thick. This isn't the time to eyeball it — use rulers or those fancy rolling pins with rings. Too thin and the candy will melt through. Too thick and you'll have cookie sandwiches instead of stained glass. Peel off the top sheet of parchment, cut out your shapes, then remove the excess dough, leaving the cookies on the bottom sheet.
- Now for the fun part: crushing your candy. Unwrap a single color at a time into a heavy zip-top bag, squeeze out the air, and go to town with a rolling pin. You want mostly fine powder with some pea-sized pieces for texture. Mix colors in separate bowls if you're doing multiple cookies. The candy dust will get everywhere, so maybe don't wear black while doing this step.
- Transfer the parchment with your cut cookies to a baking sheet. Spoon the crushed candy into the centers, filling them about 3/4 full. The candy will melt and spread, so resist the urge to overfill. If you're doing multiple colors in one cookie, use a toothpick to swirl them gently. Don't mix too much or you'll end up with muddy brown centers.
- Bake at 350°F for 8-10 minutes, but here's the thing: every oven is different. Start checking at 7 minutes. The cookies are done when the edges are just starting to turn golden and the candy is completely melted and bubbling like tiny lava lakes. The candy will still look liquid when you pull them out — that's perfect. It will set as it cools, creating that glossy, glass-like finish.
That's it — you did it. But hold on, I've got a few more tricks that'll take this to another level...
Insider Tricks for Flawless Results
The Temperature Rule Nobody Follows
Room temperature ingredients aren't just a suggestion — they're the difference between cookies that look like they came from a bakery and ones that look like a preschool art project. Your butter should be cool enough to hold its shape but soft enough to leave an indentation when you press it. Eggs should sit out for 30 minutes before using. Cold eggs will cause the butter to seize up, creating little chunks that won't incorporate properly. If you forget (and we all do), submerge the eggs in warm water for 10 minutes while you prep everything else.
Why Your Nose Knows Best
Don't trust the timer alone — your nose is your most reliable kitchen tool. When the cookies are perfectly done, your kitchen will smell like butter and caramel with just a hint of vanilla. If you smell burning sugar, you've gone too far. The candy centers should smell sweet and fruity, not burnt. I once had a batch that looked perfect but smelled like a candy factory fire. They tasted like disappointment and regret. Trust your senses over any recipe timing.
The 5-Minute Rest That Changes Everything
After you pull the cookies from the oven, let them sit undisturbed for exactly five minutes. Not four, not six — five. This is when the candy centers set up and the cookies firm enough to move without breaking. Set a timer and walk away. I know it's tempting to poke them or lift one to check the bottom, but resist. Those five minutes are crucial for the candy to transform from liquid to that perfect, glass-like finish.
The Storage Secret
Here's something most recipes never mention: store these in a single layer. The candy centers will stick to each other if stacked, creating a cookie block that's impossible to separate without breaking. Use parchment paper between layers if you must stack, but honestly, these look so beautiful spread out on a platter that you should show them off anyway. And keep them away from humidity — the candy will start to get sticky faster than you'd think.
Creative Twists and Variations
This recipe is a playground. Here are some of my favorite ways to switch things up:
Winter Wonderland
Use only white Jolly Ranchers with a hint of edible silver glitter for cookies that look like frozen windows. Add a drop of peppermint extract to the dough for a subtle mint flavor that makes these taste like candy canes. They're stunning on a dark blue plate and perfect for winter weddings or New Year's Eve parties.
Boho Rainbow
Mix every color together for a psychedelic effect, but here's the trick: use only analogous colors together in each cookie. Blues and purples in one, reds and oranges in another. The result looks like tie-dye but without the muddy brown that happens when you mix everything together. Kids go absolutely wild for these.
Sophisticated Monochrome
Choose one color family — say, different shades of blue — and use only those. The effect is surprisingly elegant, like real stained glass. Navy, royal blue, and light blue together create depth and interest without looking like a rainbow exploded. These are my go-to for dinner parties where I want to look fancy but not try-hard.
Spiced Autumn
Add cinnamon, ginger, and a pinch of nutmeg to the dough, then use only red and orange candies. The spices complement the fruit flavors in the candy, creating cookies that taste like autumn in candy form. They're like the cookie version of those spiced cider mixes, but actually good.
Lemon Drop Surprise
Substitute lemon extract for vanilla and use yellow and green candies. The citrus in the dough plays beautifully with the fruit flavors, creating cookies that taste like summer. Add some lemon zest for extra punch, but go easy — too much and the acid will affect how the candy melts.
Midnight Galaxy
Use purple, blue, and black candies with a touch of edible gold stars. The dark colors create a galaxy effect that's perfect for space-themed parties or when you want to feel like you're eating cookies from the future. They're surprisingly dramatic and always get gasps when people see them.
Storing and Bringing It Back to Life
Fridge Storage
These cookies hate the fridge. The humidity turns the candy centers sticky and cloudy, and the butter in the dough can pick up weird fridge flavors. Store them at room temperature in an airtight container for up to two weeks. If your kitchen is particularly humid, add a packet of food-safe silica gel to the container to absorb moisture. They'll stay crisp and the candy will stay glossy.
Freezer Friendly
The unbaked dough freezes beautifully for up to three months. Wrap it tightly in plastic wrap, then in foil, and label with the date. Thaw overnight in the fridge before rolling and cutting. Baked cookies can be frozen too, but here's the thing: the candy centers might get cloudy. They'll still taste great, but they won't have that stunning glass-like appearance. If looks matter, freeze the dough instead.
Best Reheating Method
These don't reheat well — the candy centers will melt and then reset in weird ways. If you must refresh them, place them in a 300°F oven for just 3-4 minutes. Any longer and you'll risk the candy bubbling up and creating a mess. Honestly, they're best at room temperature, where the contrast between crisp cookie and smooth candy is at its peak.