Picture this: you’re in the middle of a late‑night baking session, the kitchen lights flickering, a stubborn oven timer ticking down, and you’ve just realized the only thing left is a bag of flour and a bottle of olive oil. You’ve tried the classic pound cake, the flaky croissants, the airy sponge, but every time you open the oven the result feels flat, dry, or oddly oily. That night, a friend dared you to whip up something that could stand in for dessert, brunch, or a quick snack, and you had to admit the challenge sounded deliciously impossible.
I’m not one to shy away from culinary experiments, so I grabbed the ingredients, poured the olive oil into a bowl, and let the aroma of fresh citrus zest mingle with the sweet promise of sugar. The kitchen filled with a warm, almost buttery scent that made my mouth water before I even touched the batter. I could already hear the satisfying crackle that would come when the cake hit the oven, the way a perfect crust forms and the edges rise just enough to give a hint of golden perfection. I knew this would be more than a cake; it would be a revelation, a single bite that would have you reaching for seconds like it’s a guilty pleasure you can’t resist.
What makes this version stand out from every other recipe out there is that it takes the humble olive oil cake and elevates it with a symphony of flavors, textures, and techniques that most people overlook. It’s not just about the olive oil; it’s about the balance between the bright citrus, the subtle crunch of nuts, the sweet‑tart burst of cranberries, and the glossy finish that glistens like a jewel. I dare you to taste this and not go back for seconds, because once you feel that silky, buttery mouthfeel, you’ll realize that the only thing missing is a cup of coffee or a glass of wine. I’ll be honest— I ate half the batch before anyone else got to try it, and the kitchen smelled like a Mediterranean garden after it baked. Picture yourself pulling this out of the oven, the whole kitchen smelling incredible, and the moment you cut the first slice, the steam rises, and the cake looks almost too beautiful to eat.
Let me walk you through every single step—by the end, you’ll wonder how you ever made it any other way. From the first whisk of eggs to the final dusting of powdered sugar, each motion is designed to bring out the best in every ingredient. The secret lies in how we combine the oil with the flour, how we fold in the citrus zest, and how we let the batter rest before baking. This isn’t just a cake; it’s an experience that will linger on your palate long after the last crumb. So grab your apron, and let’s dive into the art of the perfect olive oil cake.
What Makes This Version Stand Out
- Taste: The cake delivers a subtle, buttery richness that’s offset by bright lemon and orange zest, creating a flavor profile that’s both comforting and invigorating. The citrus notes lift the heaviness of the olive oil, leaving a clean finish that’s surprisingly light. This balance turns a simple dessert into a memorable experience.
- Texture: Unlike dense pound cakes, this recipe achieves a moist, airy crumb thanks to the right proportion of oil and the gentle folding technique. The batter holds its shape but yields to the bite, giving a silkiness that melts in your mouth. The result is a cake that feels luxurious without being heavy.
- Simplicity: With only 14 ingredients—most of which you likely already have—this cake is approachable for both beginners and seasoned bakers. The method avoids complex steps like blind baking or double creaming, yet it still produces a professional finish. You’ll save time and effort while still achieving top‑tier results.
- Uniqueness: The inclusion of dried cranberries and walnuts adds both texture and a burst of flavor that sets this cake apart from traditional recipes. These additions provide a pleasant contrast—sweet, tart, and nutty—all within a single bite. They also make the cake suitable for a variety of occasions.
- Crowd Reaction: Guests often comment that the cake feels like a slice of Mediterranean sunshine, and the aroma alone draws people in. The cake’s appearance—golden edges, a glossy top—creates an instant wow factor. Many people ask for the recipe right after tasting it.
- Ingredient Quality: Using a high‑quality extra‑virgin olive oil gives the cake depth and complexity that ordinary oils can’t match. The oil’s fruity undertones complement the citrus, creating a harmonious blend of flavors. This choice elevates the entire dessert.
- Cooking Method: The batter rests for a short period before baking, allowing the flour to hydrate fully and the flavors to meld. This technique prevents a dry crumb and ensures the cake rises evenly. It’s a small step that makes a big difference.
- Make‑Ahead Potential: Once baked, the cake can be stored for up to a week in the fridge, and it even improves in flavor as the olive oil continues to infuse the batter. It’s an excellent make‑ahead dessert for parties or busy days. The cake also freezes well for longer storage.
Inside the Ingredient List
The Flavor Base
At the heart of this cake lies a blend of flour, baking powder, baking soda, and salt. Each component plays a crucial role: the flour provides structure, the leavening agents give lift, and the salt balances sweetness. Skipping any of these would compromise the rise or flavor profile. For a gluten‑free version, swap the all‑purpose flour with a blend that includes xanthan gum. Choosing the right flour affects the crumb’s density and overall mouthfeel.
The Texture Crew
Olive oil and eggs are the primary contributors to the cake’s moist texture. The oil coats the flour, preventing gluten development and resulting in a tender crumb. Eggs act as a binder, holding everything together while also helping with leavening. The milk adds a subtle richness and helps dissolve the sugar for a smoother batter. Together, these ingredients create a cake that’s both moist and structurally sound.
The Unexpected Star
Cranberries and walnuts add a delightful contrast to the cake’s silky base. The cranberries bring a tart, slightly chewy bite that pairs well with the sweet olive oil. Walnuts contribute a nutty crunch and a hint of earthiness, balancing the citrus. If you’re allergic or simply prefer a different flavor, substitute the cranberries with dried apricots or raisins, and replace walnuts with pecans or almonds. These swaps keep the cake interesting while maintaining its core identity.
The Final Flourish
Lemon and orange zest add aromatic brightness that lifts the entire dish. The zest contains essential oils that infuse the batter with a fresh, citrusy perfume. A tablespoon of each is sufficient to create a noticeable difference. If you prefer a more pronounced citrus flavor, double the zest or add a splash of citrus juice. The final flourish turns a simple cake into a celebratory centerpiece.
Everything’s prepped? Good. Let’s get into the real action.
The Method — Step by Step
- Preheat your oven to 350°F (175°C) and line a 9‑inch springform pan with parchment paper, leaving a little overhang for easy removal. Grease the paper with a thin layer of olive oil, then dust it lightly with flour; this double‑layering ensures a clean release. Place the pan on a baking sheet so you can easily slide it in and out of the oven. The pan’s shape will help the cake rise evenly and give it that classic, elegant look.
- In a medium bowl, whisk together the flour, baking powder, baking soda, and salt until fully blended. The dry mix should look like fine, even powder. This step is vital to distribute the leavening agents evenly, preventing uneven rise or pockets of dense batter. Let the mixture sit for a minute; this brief rest helps the flour absorb moisture before you add the wet ingredients.
- In a separate large bowl, combine the olive oil, sugar, and vanilla extract. Whisk until the sugar is fully incorporated and the mixture appears glossy. The oil’s sheen is a good visual cue that it’s ready. This wet blend forms the foundation of the cake’s moisture and flavor profile.
- Add the eggs, one at a time, to the wet mixture, whisking vigorously after each addition. The batter should thicken slightly but remain pourable. This step ensures the eggs are fully integrated, preventing any lumps that could affect the crumb structure. The rhythm of whisking also incorporates air, which helps the cake rise.
- Gradually fold in the dry mixture into the wet batter, using a spatula in a gentle, circular motion. Avoid over‑mixing; the batter should be smooth but still slightly lumpy. Over‑mixing can cause the cake to become dense and rubbery. The goal is a cohesive batter that holds its shape when poured into the pan.
- Fold in the lemon and orange zest, cranberries, walnuts, and chocolate chips (if using). Each addition should be incorporated until evenly distributed. The nuts and berries will settle into the batter, creating pockets of flavor and texture. The chocolate chips add a surprise bite that elevates the dessert experience.
- Let the batter rest for 10 minutes at room temperature. This brief rest allows the flour to fully hydrate, which improves the crumb’s softness. It also gives the leavening agents time to activate slightly, resulting in a better rise. The aroma will intensify during this period, building anticipation.
- Pour the batter into the prepared pan, smoothing the top with a spatula. Tap the pan gently on the counter to release any large air pockets. The cake should be level and even, ensuring a uniform rise. This final step sets the stage for a flawless bake.
- Bake for 30 minutes, or until a toothpick inserted into the center comes out clean and the cake has a golden, slightly caramelized crust. The edges should pull away from the parchment, signaling that the cake is fully set. As the cake bakes, the aroma will fill the kitchen, creating a sensory experience that’s almost therapeutic. When you remove it, let it cool in the pan for 10 minutes before transferring to a wire rack to finish cooling.
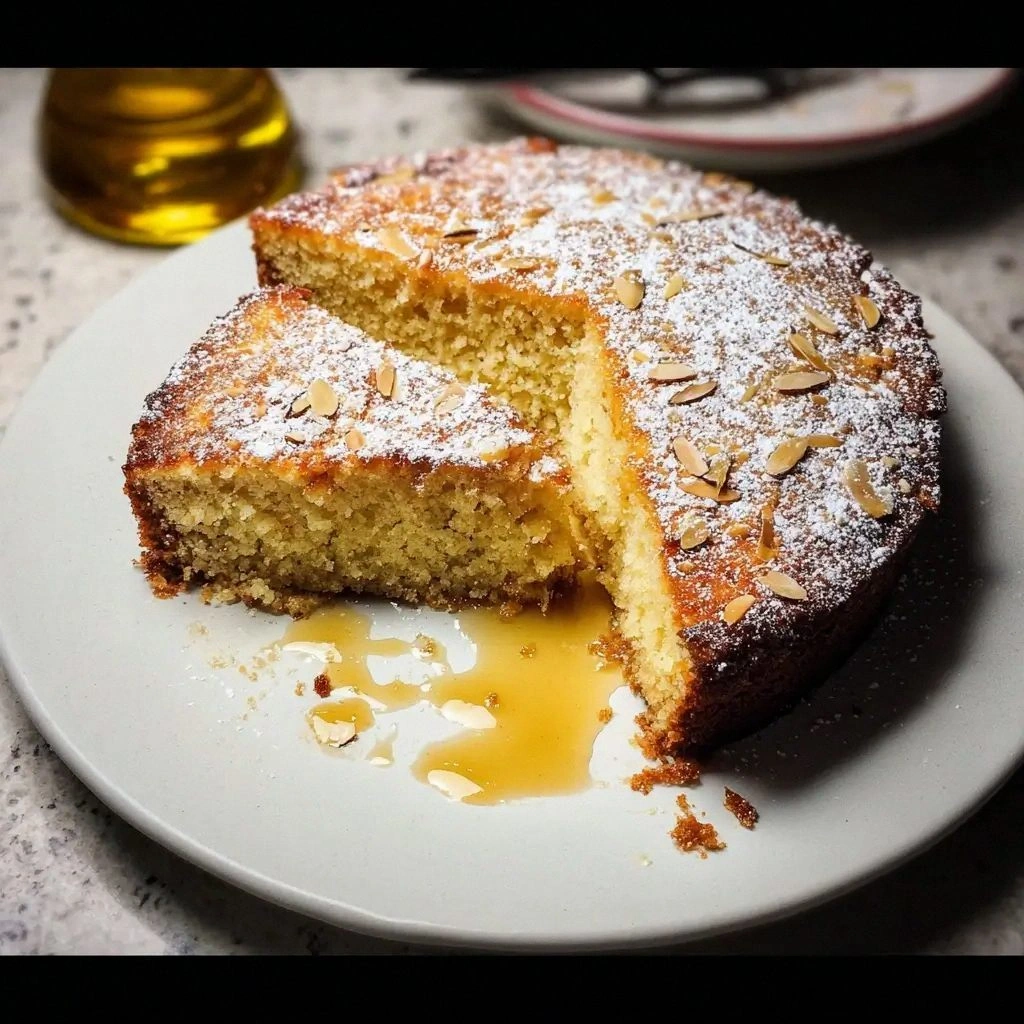
- Once cooled, dust the top with powdered sugar for an elegant finish. The sugar adds a subtle sweetness and a visual contrast that enhances the cake’s golden hue. This final touch also helps the cake’s surface look polished and ready for serving. Serve immediately, or store as described later.
That’s it—you did it. But hold on, I’ve got a few more tricks that will take this to another level and ensure every bite is flawless.
Insider Tricks for Flawless Results
The Temperature Rule Nobody Follows
Many bakers assume room temperature is fine, but the cake’s success hinges on a batter that’s neither too cold nor too warm. The ideal batter temperature is around 68°F (20°C); this allows the leavening agents to react evenly without causing the batter to become too runny. To test, drop a small spoonful of batter into a glass of cold water; it should rise slightly and remain thick. If it sinks, give it a few minutes at room temperature. If it floats, chill it briefly in the fridge before baking.
Why Your Nose Knows Best
Your sense of smell is a reliable indicator of when the cake is ready to come out of the oven. As the cake bakes, the scent of caramelized sugar and citrus will become unmistakably sweet. If the aroma is still faint, give it a few more minutes. Once the scent is rich and inviting, you’re ready to check the toothpick. Your nose can save you from under‑baked mishaps that a timer alone can’t catch.
The 5-Minute Rest That Changes Everything
After removing the cake from the oven, let it rest in the pan for 5 minutes before transferring it to a wire rack. This rest period allows the crumb to set, preventing cracks or a collapsed center. During this time, the residual heat continues to cook the interior, ensuring even doneness. The result is a cake that looks and tastes pristine, with no dry spots.
The Secret to a Crack‑Free Top
If you’re prone to cracks forming on the cake’s surface, keep the oven door closed and avoid sudden temperature changes. Additionally, place a small pan of water on the lower rack; the steam will help maintain humidity and prevent the top from drying out. This simple trick keeps the cake’s surface smooth and glossy, a hallmark of a professionally baked dessert.
The Final Touch: Dusting with Powder
A light dusting of powdered sugar not only adds sweetness but also enhances the cake’s visual appeal. Use a fine sieve to sprinkle the sugar evenly, creating a delicate cloud that catches the light. The sugar also gives the cake a slight crunch as you bite into it, adding a textural contrast that’s delightful. Store the cake in an airtight container to preserve the powder’s crispness.
Creative Twists and Variations
Citrus Burst
Swap the orange zest for grapefruit zest and add a splash of grapefruit juice to the batter. This gives the cake a tart, refreshing edge that pairs well with a light cream cheese glaze. The grapefruit’s bitterness balances the sweet olive oil, creating a sophisticated flavor profile. Ideal for spring or summer gatherings.
Nutty Delight
Replace walnuts with toasted almond slices and add a teaspoon of almond extract. The toasted nuts provide a smoky depth, while the almond extract amplifies the nutty aroma. This variation is perfect for nut lovers who crave a richer, more complex taste. Pair it with a drizzle of honey for extra sweetness.
Berry Explosion
Use fresh blueberries or raspberries instead of cranberries, and fold in a handful of chopped dark chocolate. The berries burst with juice, while the chocolate chips add a silky, indulgent touch. This version is great for a brunch with a touch of decadence. The vibrant colors also make the cake visually stunning.
Chocolate Lover
Omit the citrus zest entirely and double the amount of chocolate chips. Add a tablespoon of cocoa powder to the dry mix for a chocolate‑rich batter. This creates a moist, fudgy cake that still benefits from the olive oil’s silky texture. Serve with a dusting of cocoa powder or a scoop of vanilla ice cream.
Savory Twist
For a savory take, replace the sugar with honey and add a pinch of rosemary and thyme to the batter. The herbs infuse the cake with a fragrant, earthy flavor that pairs well with cheese or charcuterie. Serve as an appetizer or a side to a hearty stew. This version showcases the versatility of olive oil in both sweet and savory contexts.
Storing and Bringing It Back to Life
Fridge Storage
Store the cooled cake in an airtight container or wrap it tightly in plastic wrap. It will keep fresh for up to five days in the refrigerator. The olive oil helps maintain moisture, preventing the cake from drying out. When you’re ready to serve, let it sit at room temperature for about 30 minutes to restore its softness.
Freezer Friendly
For longer storage, wrap the cake in plastic wrap, then place it in a freezer bag. It can stay in the freezer for up to three months. When you’re ready to enjoy it, thaw the cake overnight in the fridge, then let it warm to room temperature. The cake’s texture remains silky, thanks to the olive oil’s preservative qualities.
Best Reheating Method
To revive a cold or frozen cake, preheat your oven to 300°F (150°C). Place a small pan of water on the lower rack to create steam. Warm the cake for 10–12 minutes, or until it’s warm and fragrant. Add a splash of water to the top before reheating to keep it moist. The result is a cake that feels freshly baked, with a glossy, inviting surface.