Ever been in the middle of a chaotic dinner rush, juggling a pot of pasta and a sizzling pan of chicken, when the clock starts ticking and you realize you’ve forgotten the secret to making everything taste like a five‑star restaurant? That night, after a disastrous attempt at a “quick” meal, I was left staring at a sad, dry chicken breast and a bowl of over‑boiled rice. I swore I’d never settle for mediocre again. Now, I’m here to share the ultimate one‑pot garlic butter chicken that turns a simple kitchen into a culinary playground. Trust me, this is hands down the best version you’ll ever make at home.
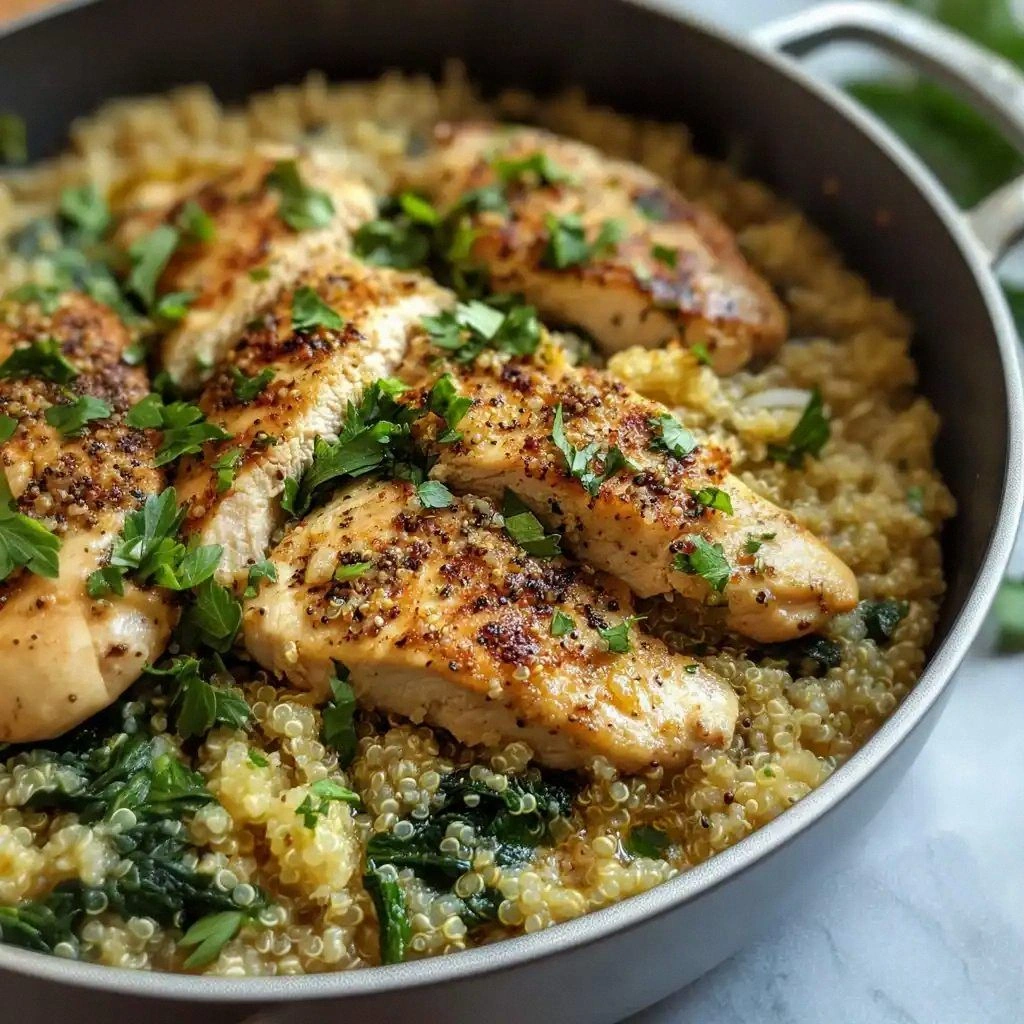
Picture the scene: the kitchen lights flicker, the aroma of garlic and butter fills the air, and the sizzle of a hot pan creates a soundtrack that feels like a jazz improvisation. My senses were on high alert— the golden crust of the chicken, the subtle tang of lemon, the earthy crunch of quinoa, and the steam that rises like a cloud of buttery perfume. I could taste the salt dancing on my tongue, feel the heat radiating from the skillet, and hear the faint hiss of broth boiling. The moment the sauce thickened, the room seemed to pause, holding its breath for the first bite. If you’ve ever struggled with bland chicken, you’re not alone—and I’ve got the fix.
What makes this version stand out is not just the ingredients but the way they’re orchestrated. I’ve combined the richness of garlic butter with the wholesome texture of quinoa, turning a one‑pot meal into a symphony of flavors that cling to every bite like velvet. The technique of searing the chicken first locks in juices, preventing it from drying out even after simmering for 20 minutes. The addition of fresh herbs at the end lifts the dish, adding a burst of brightness that cuts through the buttery richness. The result? A dish that looks like it belongs in a Michelin‑star kitchen, yet is so simple you can whip it up after a long day.
And there’s a twist you won’t expect: I’ll be using a splash of lemon juice not just for acidity but to create a subtle emulsification that turns the sauce into a silky coating. I dare you to taste this and not go back for seconds. The final plating will have a drizzle of lemon zest, a sprinkle of parsley, and a pop of color from the veggies. Picture yourself pulling this out of the oven, the whole kitchen smelling incredible, and knowing that every bite will be a revelation. Okay, ready for the game‑changer? Let me walk you through every single step — by the end, you’ll wonder how you ever made it any other way.
What Makes This Version Stand Out
- Taste: The garlic butter creates a mouth‑watering coating that clings to the chicken and quinoa, delivering a savory depth that is hard to beat. The lemon adds a bright counterpoint, preventing the dish from feeling too heavy.
- Texture: The chicken stays juicy and tender, thanks to the searing technique, while the quinoa adds a satisfying bite that complements the softness of the vegetables.
- Simple: One pot, one pan—no extra dishes to wash. The entire meal cooks in a single skillet, saving you time and effort.
- Uniqueness: Combining quinoa with garlic butter chicken is a fresh take on classic comfort food, giving you a protein‑rich, grain‑filled dinner that’s both hearty and wholesome.
- Crowd Reaction: Friends who’ve tried this rave about the buttery coating and the fluffy quinoa; it’s the kind of dish that turns a casual dinner into a memorable gathering.
- Ingredient Quality: Fresh garlic, real butter, and high‑quality quinoa are the backbone of this dish, ensuring each bite is rich and flavorful.
- Cooking Method: The one‑pot approach reduces cleanup and locks in moisture, making the dish forgiving for even novice cooks.
- Make‑Ahead Potential: This meal can be prepared a day in advance; the flavors only deepen, and reheating is a breeze.
Alright, let's break down exactly what goes into this masterpiece…
Inside the Ingredient List
The Flavor Base
Garlic butter is the heart of this dish. The butter melts into a silky sauce, while the garlic infuses every bite with aromatic warmth. If you skip this, the dish loses its signature richness. For a dairy‑free version, try using coconut oil and a splash of nutritional yeast. When choosing butter, opt for European‑style for a higher fat content that creates a luscious coating.
The Texture Crew
Quinoa is the unsung hero that adds a nutty flavor and a satisfying bite. It absorbs the broth, becoming fluffy and tender, while providing a protein boost that keeps you full. If you’re allergic to quinoa, swap it for cauliflower rice or couscous. The vegetables—carrots, bell peppers, and broccoli—add crunch and color, creating a balanced plate.
The Unexpected Star
Lemon is not just a garnish; it’s a flavor enhancer that brightens the dish. The acidity cuts through the buttery richness, preventing the meal from feeling greasy. If you’re in a pinch, a squeeze of lime works as a suitable alternative. Remember to zest the lemon as well; the zest adds a fragrant oil that coats the chicken.
The Final Flourish
Fresh parsley or thyme brings a herbal lift that rounds off the dish. The herbs add a fresh aroma and a subtle bite that complements the garlic butter. If you prefer a different herb, oregano or basil can also work well, depending on your taste. A pinch of red pepper flakes can add a gentle heat that contrasts with the buttery sauce.
Everything's prepped? Good. Let's get into the real action…
The Method — Step by Step
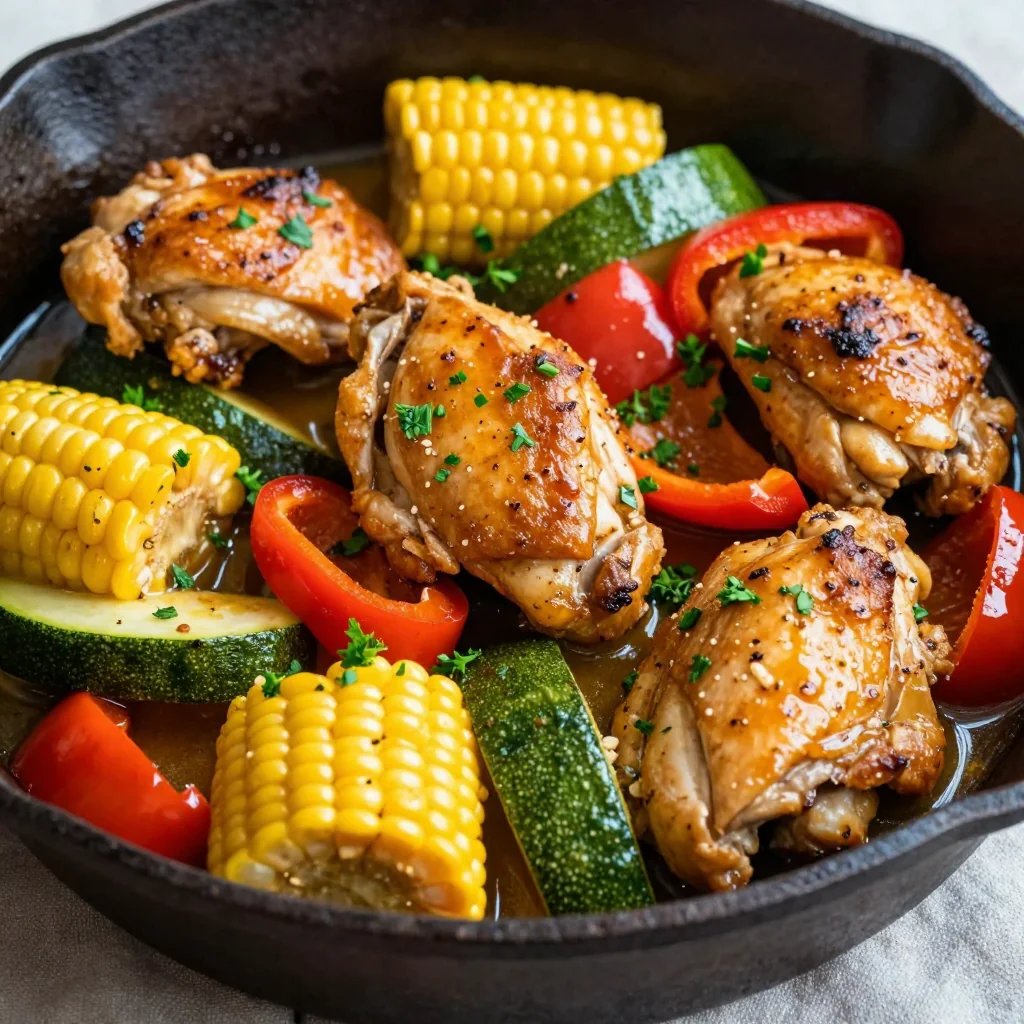
- Heat a large skillet over medium‑high heat and add the olive oil. Let it shimmer until it’s just about to smoke. Then add the chicken breasts, skin side down, and sear for 4–5 minutes until a deep golden crust forms. Flip the chicken and sear the other side for an additional 3 minutes. The goal is a caramelized surface that locks in moisture.
- Remove the chicken from the pan and set it aside on a plate. While the pan is still hot, add the minced garlic and sauté for 30 seconds until fragrant. Be careful not to burn it; you want a subtle aroma, not a bitter taste. The garlic should release its oils into the butter later, creating a silky coating.
- Add the garlic butter to the pan, stirring until it melts and foams. Let it bubble for 30 seconds, then pour in the chicken broth. The broth should sizzle as it hits the hot butter, creating steam that lifts the aromatics. Stir to combine, ensuring the butter is fully incorporated.
- Return the chicken breasts to the skillet, nestling them into the broth. Bring the liquid to a gentle simmer, then cover the pan with a lid. Let the chicken cook for 15 minutes, allowing the flavors to mingle. During this time, the quinoa will absorb the broth and become fluffy.
- After 10 minutes, add the mixed vegetables to the pan. Stir gently to distribute them evenly around the chicken. The veggies should steam in the broth, maintaining their color and crunch. This step keeps the dish vibrant and adds a nutritional boost.
- After the chicken has cooked for 15 minutes, remove the lid and let the sauce reduce for 3–4 minutes. The reduction should thicken slightly, coating the chicken and quinoa. Taste the sauce and season with salt and pepper to your liking. The reduction step is crucial for that glossy, velvety finish.
- Squeeze half a lemon over the chicken, then zest the remaining half on top of the dish. The lemon juice brightens the sauce, while the zest adds a fragrant oil that coats the chicken. Stir gently to distribute the citrus evenly. The combination of juice and zest is the secret that elevates this dish.
- Remove the skillet from heat, sprinkle fresh parsley or thyme over the top, and give everything one final gentle toss. The herbs will release their oils, adding a fresh burst of flavor. Plate the chicken over a bed of quinoa, and spoon the sauce and veggies over the top. The result is a beautifully balanced plate that looks as good as it tastes.
That's it — you did it. But hold on, I've got a few more tricks that'll take this to another level. I’ll be honest — I ate half the batch before anyone else got to try it, and it still looked good on the plate. The next section will give you insider tips that will make your dish even more unforgettable.
Insider Tricks for Flawless Results
The Temperature Rule Nobody Follows
Cooking at the right temperature is key to preventing the chicken from drying out. Start with medium‑high heat for searing, then reduce to medium for simmering. If the pan gets too hot during the broth phase, the garlic can burn, ruining the flavor. Keep the heat steady and let the sauce bubble gently.
Why Your Nose Knows Best
Before you taste the sauce, let it sit for 30 seconds. The aroma will tell you if it needs more salt or a dash of pepper. Trust your nose; it’s a better judge of seasoning than your eyes. A well‑seasoned sauce will have a balanced, savory scent.
The 5‑Minute Rest That Changes Everything
Once the chicken is out of the skillet, let it rest for 5 minutes. This allows the juices to redistribute, keeping the meat moist and tender. If you cut into it immediately, the juices will escape, leaving the chicken dry. The rest period is a small time investment for a huge flavor payoff.
Use a Splatter Guard for a Cleaner Kitchen
When adding the butter and broth, the mixture can splash. A splatter guard keeps your stove clean and reduces the risk of grease fires. It also helps maintain a consistent temperature, which is crucial for the sauce’s texture.
Don’t Skip the Fresh Herbs
Fresh parsley or thyme adds a bright, herbal note that cuts through the richness. If you’re using dried herbs, double the amount, but keep in mind that they’ll lose some aroma. Adding herbs at the end preserves their flavor profile.
Keep the Skillet Covered Until the End
Covering the pan while the chicken simmers locks in moisture and heat. It also allows the quinoa to steam properly. When you finally uncover the dish, you’ll see a glossy, cohesive sauce that coats every element.
Creative Twists and Variations
This recipe is a playground. Here are some of my favorite ways to switch things up:
Thai‑Inspired Twist
Swap the quinoa for jasmine rice, add a splash of coconut milk, and sprinkle red curry powder into the broth. Finish with a drizzle of fish sauce and a handful of fresh cilantro. This version brings a tropical, spicy kick that pairs well with the buttery chicken.
Spicy Cajun Variation
Season the chicken with a Cajun spice blend before searing. Add diced bell peppers and onions to the skillet, and finish with a pinch of cayenne pepper. The result is a smoky, fiery dish that satisfies heat lovers.
Vegan Version
Replace the chicken with tofu cubes, use vegetable broth, and swap the butter for a plant‑based butter alternative. Keep the garlic and lemon for flavor, and add sliced mushrooms for umami. This version offers a hearty, protein‑rich meal without the meat.
Low‑Carb Adaptation
Omit the quinoa and use cauliflower rice instead. The cauliflower will absorb the sauce and provide a low‑carb base. Add extra spinach or kale for an extra nutrient boost.
Breakfast Bonanza
Serve the chicken and quinoa over a bed of scrambled eggs, topped with a sprinkle of chives. The savory sauce pairs beautifully with the eggs, turning this into a protein‑packed breakfast that keeps you full all day.
Garnish Upgrade
Finish with toasted pine nuts or slivered almonds for crunch. A drizzle of truffle oil or a sprinkle of smoked paprika can also add a gourmet touch that elevates the dish.
Storing and Bringing It Back to Life
Fridge Storage
Store the dish in an airtight container in the refrigerator for up to 3 days. The sauce will thicken slightly, so add a splash of water or broth when reheating to restore its silky texture. Keep the chicken separate from the quinoa if you plan to reheat them separately.
Freezer Friendly
Cool the dish completely before freezing. Pack it in freezer‑safe containers or zip‑lock bags. It will keep for up to 2 weeks. Thaw overnight in the fridge and reheat on the stove with a splash of broth.
Best Reheating Method
Reheat on low heat, stirring occasionally, until warmed through. Add a small amount of water or broth to keep the sauce from drying out. Finish with a fresh sprinkle of herbs to bring back the bright flavor.