I was halfway through a batch of cookie dough, the kitchen smelling of butter and chocolate, when I realized I had run out of chocolate chips. I stared at the empty container, a silent scream echoing in the countertop. That moment felt like a culinary cliffhanger, a recipe gone wrong before it even began. But it was that frustration that sparked a wild idea: what if I could turn the remaining ingredients into something spectacular without an oven? I pulled out a can of sweetened condensed milk, a handful of caramel bits, and a block of butter, and the rest of the night became a quest for the ultimate fudge ball. I dare you to taste this and not go back for seconds.
The air thickened with the buttery sweetness of caramel, the faint metallic tang of sea salt, and a hint of vanilla that promised depth. My ears caught the gentle hiss as chocolate began to melt into a glossy river, a sound that felt like a secret lullaby for dessert lovers. My fingers tingled against the warm mixture, the texture shifting from solid to silky in seconds. The sight of the caramel bits glistening like tiny golden stars in the sauce was a visual treat that made my eyes widen with anticipation. I could almost taste the first bite, a perfect balance of sweet and salty, creamy and crunchy, all rolled into one bite-sized marvel.
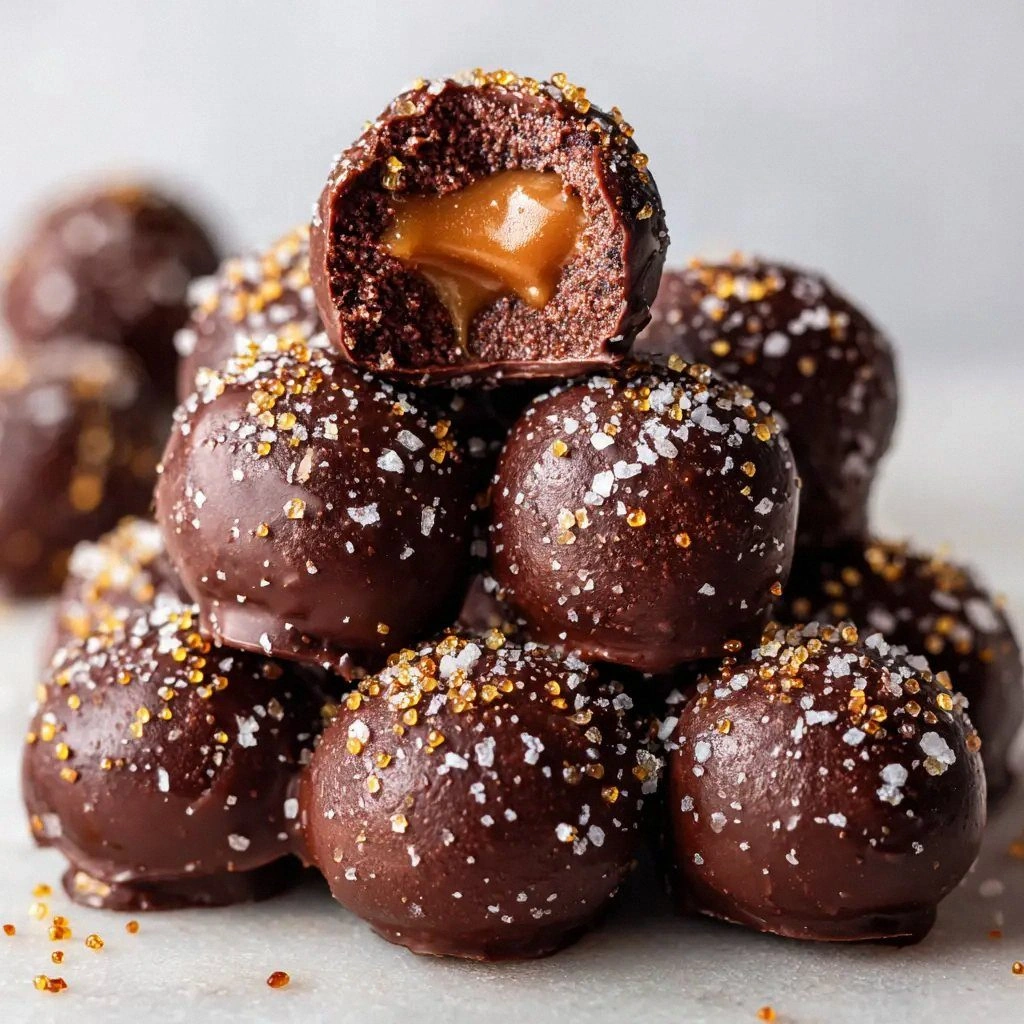
What makes this version stand out is not just the flavors, but the philosophy behind it: no oven, no fuss, pure indulgence. The recipe is a marriage of convenience and decadence, turning pantry staples into a showstopper that can be whipped up in minutes. It’s a testament to the power of simple techniques—melting, mixing, rolling—to create something that feels like it belonged in a gourmet kitchen. The result is a fudge ball that is both chewy and crisp, with caramel pockets that burst with every bite. This is hands down the best version you'll ever make at home, and I’ve got the proof in every bite.
I’ve spent countless nights experimenting with fudge, always finding myself stuck on the same dilemma: how to get a firm yet melt‑in‑your‑mouth texture without baking. The breakthrough came when I realized that the secret lay in the ratio of condensed milk to chocolate and the timing of the butter’s melt. This version uses a precise balance that locks in the right moisture, giving you a fudge that holds its shape but still feels luxurious. The next part? Pure magic. Stay with me here—this is worth it.
Picture yourself pulling these fudge balls out of the fridge, the whole kitchen smelling incredible, and watching them shine under a gentle drizzle of melted chocolate. The anticipation builds as you hand a ball to a friend, and their eyes widen in delight. I’ll be honest— I ate half the batch before anyone else got to try it. Most recipes get this completely wrong. Here’s what actually works. And now, let’s walk through every single step—by the end, you’ll wonder how you ever made it any other way.
What Makes This Version Stand Out
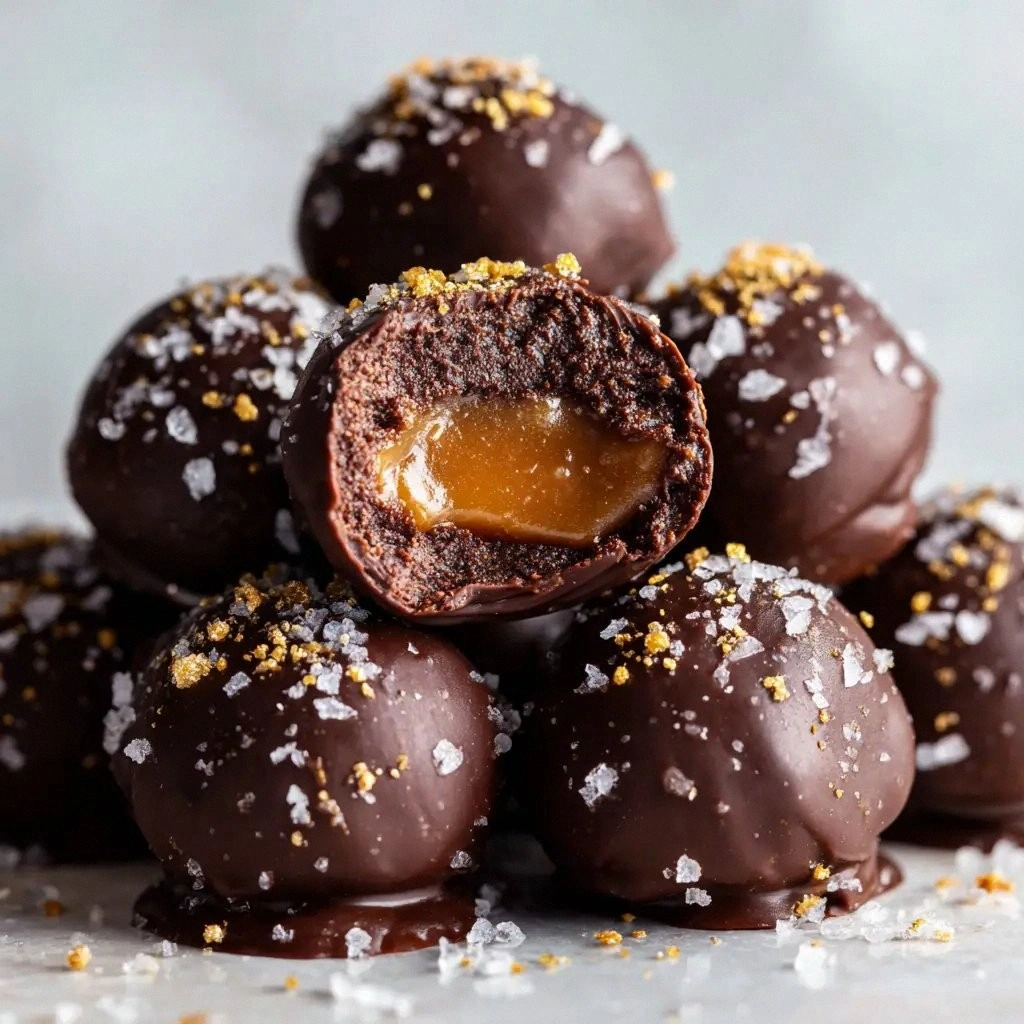
- Texture: The fudge has a unique duality—chewy on the inside with a crisp caramel shell that snaps like a candy. This contrast keeps the palate engaged and prevents the classic soggy mess that often plagues homemade fudge.
- Flavor: The caramel bits add a deep, buttery sweetness that balances the semi‑sweet chocolate. A pinch of flaky sea salt lifts the flavors, creating a harmonious dance that lingers on the tongue.
- Convenience: No oven, no timer, no waiting. All you need is a pot, a spoon, and a few minutes of patience. The recipe is perfect for last‑minute dessert cravings or when you want something special without the kitchen chaos.
- Versatility: Swap out the caramel bits for crunchy nuts, dried fruit, or even a sprinkle of chili powder for a spicy kick. The base is flexible, allowing you to tailor the flavor profile to any occasion.
- Make‑ahead Potential: These fudge balls keep well in the fridge for up to a week and freeze nicely for later indulgence. They’re a great option for parties, potlucks, or a quick pick‑me‑up during a hectic day.
- Visual Appeal: The glossy chocolate coating, speckled with caramel, makes for a stunning presentation that elevates any dessert table. The balls look as good as they taste.
Alright, let's break down exactly what goes into this masterpiece...
Inside the Ingredient List
The Flavor Base
The 12 ounces of semi‑sweet chocolate chips form the backbone of the fudge. They provide the rich, bittersweet undertone that balances the caramel’s sweetness. If you prefer a darker chocolate, feel free to swap in dark chocolate chips; the result will be slightly more robust, but the caramel will still shine through. The chocolate’s cocoa content is critical—too low and the fudge will taste like candy, too high and it may become too bitter.
The Texture Crew
Sweetened condensed milk is the binder that turns the mixture into a cohesive whole. It’s the reason the fudge holds its shape without baking. The 1/4 cup of unsalted butter adds a silky mouthfeel and helps the chocolate melt evenly. If you’re dairy‑free, a tablespoon of coconut oil can serve as a substitute, though the flavor will shift slightly. The butter also helps to create a glossy finish on the surface of the balls.
The Unexpected Star
Caramel bits or soft caramels are the secret weapon that gives each ball its signature burst of sweetness. They’re pre‑made, so you don’t have to cook caramel from scratch—time‑saving and foolproof. The bits also add a subtle crunch that contrasts with the fudge’s softness. If you want a smoother texture, crush the caramels into smaller pieces or use a candy melt.
The Final Flourish
Vanilla extract and flaky sea salt are the finishing touches that elevate the flavor profile. The vanilla brings warmth and depth, while the sea salt acts as a flavor enhancer, making the caramel pop. A teaspoon of vanilla is enough to infuse the mixture without overpowering the chocolate. The flaky sea salt should be added in small increments; too much will dominate the delicate balance.
Everything's prepped? Good. Let's get into the real action...
The Method — Step by Step
- First, melt the chocolate chips in a heat‑proof bowl over a pot of simmering water. Stir constantly until the mixture is smooth and glossy. The chocolate should be just hot enough to coat your spoon, but not so hot that it burns. This step is critical—any lumps will ruin the texture. The gentle heat keeps the chocolate from seizing, ensuring a silky finish.
- While the chocolate is melting, add the butter to a separate saucepan and let it melt over low heat. Once the butter is fully liquefied, pour it into the melted chocolate, stirring until the mixture is homogeneous. The butter’s fat content will help the chocolate emulsify, creating a richer mouthfeel. Be careful not to let the butter boil; a steady, gentle melt is key.
- Next, pour in the sweetened condensed milk and stir until the mixture is thick and smooth. The milk’s natural sugars caramelize slightly, adding depth to the flavor. Keep the heat low—any sudden spikes will cause the mixture to thicken too quickly and become difficult to work with. The consistency should be thick enough to hold its shape when scooped.
- Add the vanilla extract and flaky sea salt, mixing thoroughly. The vanilla should be evenly distributed; a clump of vanilla will create an uneven flavor burst. The sea salt should be added in small increments—taste as you go to avoid over‑salting. This is the moment of truth: the aroma should be sweet, buttery, and slightly nutty.
- Fold in the caramel bits, ensuring they are evenly distributed throughout the mixture. The caramel should be slightly melted, so it can coat the chocolate. If you prefer a crunchy texture, keep the caramel slightly intact. The mixture should now have a glossy sheen with visible caramel specks.
- Let the mixture cool to room temperature for about 10 minutes, or until it’s thick enough to scoop but not so hard that it won’t roll. This cooling period is essential for setting the fudge’s texture. If the mixture cools too quickly, the fudge may become too firm and lose its melt‑in‑your‑mouth quality.
- Using a tablespoon, scoop portions of the mixture onto a parchment‑lined tray. Roll each portion between your hands until it forms a smooth ball. The balls should be uniform in size so they set evenly. If the mixture is too sticky, lightly oil your hands with a neutral oil to prevent sticking.
- Place the formed balls in the refrigerator for at least 30 minutes to set. The cold will firm up the fudge, making it easier to handle. If you’re in a hurry, you can pop them in the freezer for 10 minutes; just be careful not to over‑freeze.
- Optional: Melt a small amount of chocolate in a double boiler and drizzle it over the cooled balls for an extra glossy finish. This step adds a decadent look and a slight chocolate bite. Let the drizzle set before serving.
- Serve immediately or store in an airtight container in the fridge. When you’re ready to eat, let them sit at room temperature for a few minutes to soften slightly. This final touch ensures the fudge is at its most luscious.
That's it — you did it. But hold on, I've got a few more tricks that'll take this to another level...
Insider Tricks for Flawless Results
The Temperature Rule Nobody Follows
Temperature is everything when melting chocolate. Too hot, and the chocolate will seize; too cool, and it won’t coat evenly. The ideal range is 110–115°F (43–46°C). Use a kitchen thermometer to keep it in check. A quick tip: place the bowl in a pot of cold water to cool the mixture faster if it starts to overheat.
Why Your Nose Knows Best
Smell is a powerful cue for readiness. When the mixture emits a rich, buttery aroma, it’s close to perfect. If the scent is too sweet or too chocolatey, adjust by adding a pinch of salt or more vanilla. Your nose can tell you when the fudge is just right.
The 5-Minute Rest That Changes Everything
After the mixture cools to room temperature, give it a 5-minute rest before scooping. This short pause allows the fats to set slightly, making the mixture easier to roll. A friend once skipped this step and the fudge turned out gummy—lesson learned!
Keep It Moist, Not Dry
If your fudge starts to dry out, add a splash of milk or a pinch of butter to rehydrate it. The key is to add just enough to soften the texture without diluting the flavor. A small drizzle of vanilla can also help maintain moisture.
The Perfect Drizzle
When drizzling melted chocolate over the set balls, use a fork or a spoon to create a controlled stream. This technique ensures an even coat and a polished look. The drizzle also adds a subtle chocolate bite that balances the caramel.
Creative Twists and Variations
This recipe is a playground. Here are some of my favorite ways to switch things up:
Nutty Crunch
Replace the caramel bits with chopped pecans or walnuts. The nutty flavor pairs beautifully with the chocolate, creating a crunchy texture that adds a new dimension. The nuts also provide a pleasant contrast to the smoothness of the fudge.
Spicy Surprise
Add a pinch of cayenne pepper or a dash of chili powder to the mixture. The heat will cut through the sweetness and bring a bold, fiery kick. This variation is perfect for guests who love a little spice in their desserts.
Minty Fresh
Stir in a teaspoon of peppermint extract for a refreshing twist. The mint pairs well with chocolate and caramel, giving the fudge a cool aftertaste. It’s a great choice for summer parties or holiday celebrations.
Coffee Infusion
Blend in a tablespoon of instant espresso powder to give the fudge a subtle coffee undertone. The bitterness of the espresso balances the sweetness, creating a sophisticated flavor profile. Coffee lovers will appreciate this depth.
Almond Delight
Use almond butter instead of butter for a nutty flavor and a creamy texture. The almond butter adds a subtle sweetness that complements the caramel and chocolate. It also adds a nutritional boost with healthy fats.
Coconut Craze
Swap the butter for coconut oil and add shredded coconut to the mixture. The coconut gives a tropical twist that pairs wonderfully with the caramel. The final product will have a chewy, slightly chewy texture.
Storing and Bringing It Back to Life
Fridge Storage
Store the fudge balls in an airtight container in the refrigerator for up to one week. The cool environment keeps the fudge firm without drying it out. When you’re ready to serve, let the balls sit at room temperature for 5 minutes to soften slightly.
Freezer Friendly
For longer storage, wrap each ball individually in plastic wrap and place them in a freezer bag. They will keep well for up to three months. Thaw in the fridge overnight and let them sit at room temperature for 10 minutes before serving.
Best Reheating Method
If your fudge has become too hard, reheat gently in a microwave at 30-second intervals, stirring between each burst. A tiny splash of water before reheating will steam the fudge back to a silky texture. Avoid overheating, or the fudge will melt into a mess.