Picture this: you’re in the middle of a busy Friday night, the kitchen is a chaotic swirl of bowls and pans, and you’re craving something sweet that can double as a showstopper. I was juggling a last‑minute dinner party, a toddler’s snack, and a stubborn batch of cookies that had turned into a sticky mess. That moment of panic sparked a daring experiment—what if I could turn the classic salted caramel tart into a buttery almond masterpiece that would have everyone begging for seconds? I grabbed the pantry, pulled out a handful of ingredients, and set out to craft a dessert that would make my taste buds do a happy dance.
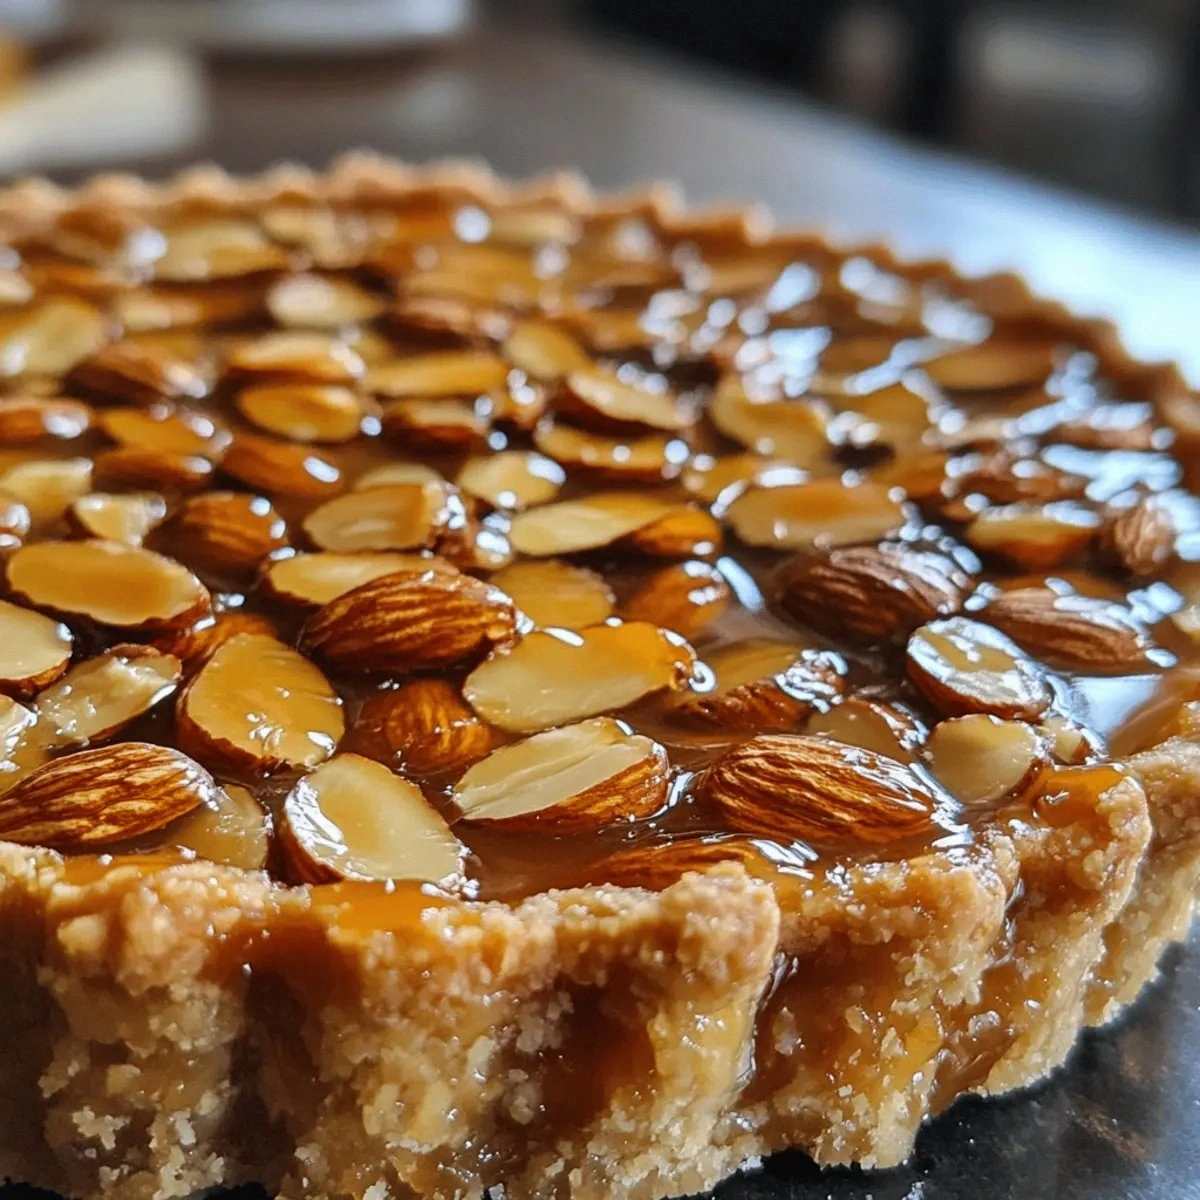
The first thing that struck me was the aroma. The sweet scent of caramel melted into the buttery fragrance of toasted almonds, while a hint of sea salt teased the palate. I could hear the gentle sizzle as the butter melted, the caramel thickening into a glossy, amber liquid that drizzled like liquid gold. The sight of golden crust edges curling into a perfect, slightly crisp ring was almost too beautiful to touch. The texture, when I finally tasted it, was a flawless marriage of crunchy, chewy, and silky—each bite a revelation.
What sets this version apart is not just the ingredients but the approach. I didn’t just follow a recipe; I reimagined the process. I discovered that a small tweak—adding a splash of heavy cream to the caramel—creates a silkier mouthfeel that melts on the tongue like a whisper. I also found that tossing toasted almonds into the batter before baking gives the crust a subtle, nutty crunch that contrasts beautifully with the silky sauce. The result? A dessert that feels indulgent yet balanced, with a subtle salt kick that lingers long after the last bite.
I dare you to taste this and not go back for seconds. Imagine a caramel that’s not just sweet but also has a savory whisper, a crust that’s crisp yet buttery, and almonds that pop with a toasted crunch. The first bite is an explosion of flavors that will have you saying, “This is hands down the best version you'll ever make at home.” The second bite? Pure bliss. The third? A guilty pleasure you’ll want to hide from the family.
I’ll be honest—after making this, I ate half the batch before anyone else got to try it. The temptation was real, but the payoff was worth it. Most recipes get this completely wrong by overcooking the crust or using too much salt. Here’s what actually works: a precise ratio of flour to butter, a gentle caramelization process, and a final drizzle that coats the tart like velvet. Picture yourself pulling this out of the oven, the whole kitchen smelling incredible, and the moment you plate it, everyone’s eyes light up.
Stay with me here—this is worth it. The next part? Pure magic. I’m about to walk you through every single step, from the first whisk to the final garnish. By the end, you’ll wonder how you ever made it any other way. Let’s dive in.
What Makes This Version Stand Out
- Flavor: The caramel isn’t just sweet; it has a subtle umami depth thanks to the sea salt flakes, creating a savory-sweet balance that lingers on the tongue.
- Texture: The crust is buttery and flaky, with a hint of crunch from the toasted almonds that gives it a delightful bite.
- Ingredient Quality: Using high‑grade unsalted butter and fresh almonds elevates the overall taste, turning an ordinary dessert into a gourmet experience.
- Visual Appeal: The glossy caramel glaze reflects light, giving the tart a luxurious sheen that’s Instagram‑ready.
- Make‑Ahead Friendly: The tart can be assembled ahead of time and refrigerated; the caramel will set perfectly, making it ideal for parties.
- Crowd Reaction: Guests rave about the crunch and the unexpected salt kick, making it a conversation starter at any gathering.
Alright, let's break down exactly what goes into this masterpiece…
Inside the Ingredient List
The Flavor Base
All-purpose flour is the foundation of the crust, providing structure and a neutral canvas for the buttery flavors. If you’re craving a slightly healthier twist, consider swapping in a portion of whole wheat flour, but be prepared for a denser crumb. Skipping the flour entirely will result in a flat, soggy base that can’t hold the caramel.
Unsalted butter is the star of the crust, giving it that rich, melt‑in‑your‑mouth quality. Butter with a higher butterfat content (like European butter) will yield an even more luscious crust. If you’re dairy‑free, try a high‑fat coconut oil, but the flavor profile will shift noticeably.
Granulated sugar in the crust balances the buttery richness with a subtle sweetness. If you want a deeper caramel flavor, replace half of this sugar with brown sugar; it will add molasses notes that complement the caramel glaze.
A pinch of salt (¼ teaspoon) brings harmony to the sweet crust, preventing it from feeling cloying. Salt also helps to accentuate the almond flavor. Too much salt, however, will overpower the delicate sweetness.
Ice water is the binding agent that holds the dough together without adding moisture that could make the crust soggy. If you’re in a hurry, a splash of chilled sparkling water can work as a substitute, but the texture will be slightly different.
The Texture Crew
The second cup of granulated sugar is reserved for the caramel sauce. This sugar melts into a glossy, amber liquid that coats the tart like a velvet blanket. Using superfine sugar can help it dissolve more quickly, reducing the risk of crystallization.
Unsalted butter (¼ cup) added to the caramel creates a silky mouthfeel, preventing the sauce from becoming too thick or grainy. If you’re looking to cut calories, reduce the butter by a tablespoon, but be prepared for a slightly less smooth texture.
Heavy cream (½ cup) is the secret to the caramel’s silkiness. Adding it after the sugar has caramelized prevents the sauce from separating. If you’re lactose intolerant, try a dairy‑free cream like coconut cream for a tropical twist.
Sea salt flakes (1 teaspoon) are the star of the flavor profile. They dissolve slowly, giving a gradual salty finish that lingers. If you don’t have sea salt, a fine Himalayan pink salt works well, but the flavor will be slightly different.
The Unexpected Star
Toasted sliced almonds (½ cup) add a nutty crunch that contrasts beautifully with the silky caramel. Toasting the almonds before adding them to the crust brings out their natural oils, giving a deeper flavor. If you prefer a vegan version, use sunflower seeds or pumpkin seeds for a similar crunch.
Brown sugar (2 tablespoons) is used sparingly to enhance the caramel’s depth without overpowering the sweetness. It adds a hint of molasses that pairs well with the sea salt. If you’re avoiding sugar, try a natural sweetener like maple syrup, but the caramel will take on a distinct taste.
The Final Flourish
A tablespoon of unsalted butter is melted at the very end to give the tart a glossy finish. This butter not only adds shine but also a subtle buttery aroma that entices the senses. Skipping this step will leave the tart dull and less appetizing.
Everything's prepped? Good. Let's get into the real action…
The Method — Step by Step
- First, combine 1 cup of all-purpose flour, ¼ teaspoon of salt, and 1/2 cup of cold, unsalted butter in a large bowl. Use a pastry cutter or your fingers to cut the butter into the flour until the mixture resembles coarse crumbs. This step is crucial; if the butter isn’t properly incorporated, the crust will be tough.
- Add 2.5 tablespoons of ice water, one tablespoon at a time, stirring after each addition until the dough just comes together. Don’t overwork it—overmixing can develop gluten and make the crust chewy. The dough should be moist but not sticky.
- Press the dough into a 9-inch tart pan with a removable bottom, ensuring the edges are evenly pressed and slightly higher than the center. Chill the crust for 15 minutes to firm up; this prevents shrinkage during baking.
- Preheat your oven to 350°F (175°C). While the crust chills, prepare the caramel: in a heavy-bottomed saucepan, melt ¼ cup of unsalted butter over medium heat until foamy.
- Add 1 cup of granulated sugar to the butter and stir continuously. The mixture will begin to bubble; let it cook until it turns a deep amber color, about 6-8 minutes. Keep a close eye—once it starts to brown, it can burn quickly.
- Slowly pour in ½ cup of heavy cream while whisking constantly. The sauce will bubble vigorously; this is normal. Continue whisking until the mixture is smooth and glossy.
- Stir in 1 teaspoon of sea salt flakes and 2 tablespoons of brown sugar. The caramel should thicken slightly; if it’s too thick, add a splash of cream. Taste and adjust salt if needed—remember, the salt should enhance, not dominate.
- Fold in ½ cup of toasted sliced almonds, ensuring they’re evenly distributed. These will give the crust a delightful crunch and a nutty aroma.
- Pour the caramel mixture over the chilled crust, spreading it evenly with a spatula. The caramel should coat the crust like a silky blanket.
- Bake the tart for 30 minutes, or until the edges are golden brown and the caramel is set. The center should still have a slight wobble—this indicates a perfectly set caramel.
- Remove the tart from the oven and let it cool in the pan for 10 minutes before transferring it to a wire rack to cool completely. This cooling period allows the caramel to set fully.
- Once cooled, melt 1 tablespoon of unsalted butter and brush it lightly over the caramel glaze. This final flourish gives the tart a glossy shine and a buttery aroma that will have guests swooning.
That's it — you did it. But hold on, I've got a few more tricks that'll take this to another level...
Insider Tricks for Flawless Results
The Temperature Rule Nobody Follows
Many bakers think any oven temperature works for a tart, but precision is key. Baking at 350°F (175°C) ensures the crust cooks evenly without burning. If your oven runs hot, lower the temperature by 25°F and increase the baking time by 5 minutes.
Why Your Nose Knows Best
Before you pull the tart out, listen for the caramel’s scent. It should smell buttery and slightly caramelized, not burnt. The aroma is a reliable indicator that the caramel has reached the right stage.
The 5-Minute Rest That Changes Everything
After removing the tart from the oven, let it rest in the pan for 10 minutes. This rest period allows the caramel to set and the crust to firm up, preventing a soggy bottom.
Brushing for Brilliance
A final brush of melted butter after cooling gives the tart a glossy sheen. It also adds a subtle buttery aroma that will draw guests in. Use a pastry brush for even application.
Cooling on a Wire Rack
Cool the tart on a wire rack to avoid condensation. Condensation can soften the crust, ruining the crisp texture. The rack also ensures even cooling and prevents the tart from becoming soggy.
Creative Twists and Variations
This recipe is a playground. Here are some of my favorite ways to switch things up:
Nutty Chocolate Swirl
Swap the toasted almonds for chopped dark chocolate. The chocolate will melt into the caramel, creating a swirl of rich, bittersweet flavor that pairs beautifully with the sea salt.
Berry Burst
Fold in a handful of fresh raspberries into the caramel before baking. The berries add a tart pop that cuts through the sweetness, giving the tart a fresh, summery vibe.
Spiced Pumpkin Delight
Add a teaspoon of pumpkin pie spice to the caramel for a fall-inspired version. The warm spices complement the caramel’s sweetness, creating a cozy, autumnal treat.
Almond Butter Glaze
Replace the final butter brush with a drizzle of almond butter. The nutty flavor enhances the almond theme and adds a velvety texture.
Seaweed Salt Finish
Instead of sea salt flakes, sprinkle a pinch of smoked seaweed salt on top of the finished tart. The smoky undertone adds an unexpected twist that will intrigue adventurous diners.
Storing and Bringing It Back to Life
Fridge Storage
Store the tart in the refrigerator for up to 3 days in an airtight container. The caramel will firm up, but the crust will remain crisp. To re‑warm, let it sit at room temperature for 15 minutes.
Freezer Friendly
Wrap the tart tightly in plastic wrap and then in aluminum foil before freezing. It will keep well for up to 2 months. Thaw overnight in the refrigerator, then let it come to room temperature before serving.
Best Reheating Method
To revive the caramel’s silky texture, place the tart in a preheated oven at 300°F (150°C) for 10 minutes. If you prefer a crisp crust, finish with a quick broil for 1-2 minutes—watch closely to avoid burning.