I still remember the night I tried to recreate the strawberry cheesecake bites that had left my taste buds trembling. The kitchen smelled like a sweet summer storm, the air thick with the scent of fresh berries and creamy filling. I was halfway through the recipe when I realized I’d forgotten the crunch—those little bursts of caramelized sugar that make the bite pop. The result? A bland, soggy mess that could have been a dessert for the apocalypse. If that sounds familiar, stick around because I’m about to drop the secret sauce that turns this into a crowd‑pleasing masterpiece.
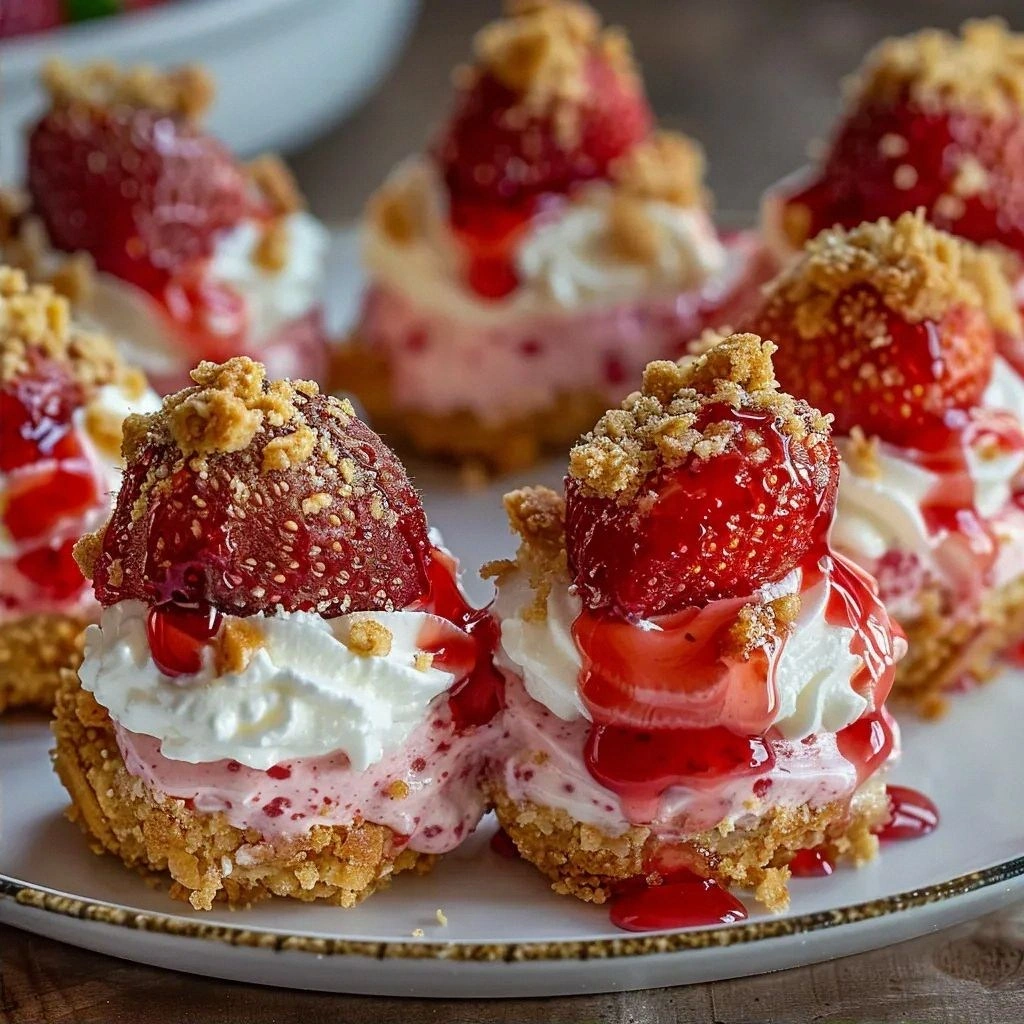
Picture yourself pulling a tray of golden, bite‑sized pastries from a preheated oven, the steam curling like a delicate veil. The first bite is a symphony: the buttery crust gives way to silky cheesecake, then a sudden snap of crunchy strawberry bits that crackle like tiny fireworks. The flavors mingle—sweet, tart, and a hint of vanilla—creating a taste that lingers on the palate like a sweet after‑glow. I dare you to taste this and not go back for seconds; the temptation is real, but the satisfaction is even more so.
What makes this version stand out isn’t just the ingredients; it’s the process that elevates each component. I’ve fine‑tuned the batter to achieve the perfect ratio of creaminess to firmness, so the cheese doesn’t drown the crunch. The crust is baked to a crisp edge that shatters like thin ice when you bite, revealing a soft interior that melts in your mouth. I’ve also added a subtle hint of lemon zest to brighten the profile and keep the sweetness from becoming cloying. The result is a bite‑size dessert that feels indulgent yet balanced—a true showcase of strawberry bliss.
You might think the trick lies in the baking time, but it’s really about the harmony of textures. The strawberry crunch mixture is pre‑tossed with a touch of brown sugar and a splash of bourbon (optional) to caramelize it just right. This step creates that satisfying snap that contrasts the velvety cheesecake. I also recommend chilling the batter for 30 minutes before baking; it sets the structure and prevents the filling from sliding off the crust. And if you’re aiming for that glossy finish, a light dusting of powdered sugar after baking is all you need.
And here’s the kicker: I’ve discovered a way to elevate the whole experience with a simple garnish that adds both color and flavor. A drizzle of homemade strawberry syrup, made by reducing fresh strawberries with a pinch of sea salt, adds a glossy sheen and a burst of natural sweetness. It’s an easy step that transforms ordinary bites into show‑stopping treats. Let me walk you through every single step—by the end, you’ll wonder how you ever made it any other way.
What Makes This Version Stand Out
- Texture: The crust is buttery and crisp, while the filling is silky and creamy. The crunch layer provides a satisfying snap that breaks up the richness, creating a delightful contrast with every bite.
- Flavor: A subtle lemon zest lifts the sweetness of the strawberries, preventing the dish from feeling heavy. The caramelized sugar in the crunch layer adds depth and a hint of caramel.
- Ease: Every step is straightforward—no advanced techniques required. Even a novice can achieve professional results with just a few simple tweaks.
- Visual Appeal: The golden crust, glossy syrup drizzle, and fresh strawberry topping make the bites look as good as they taste, perfect for a party or a photo‑ready dessert.
- Make‑Ahead: The assembled bites can be refrigerated for up to 48 hours, making them ideal for a last‑minute gathering.
- Ingredient Quality: Using fresh, ripe strawberries and high‑quality cream cheese elevates the overall flavor profile and ensures a decadent experience.
- Versatility: The recipe can be adapted for dietary preferences—use dairy‑free cheese or a sugar‑free sweetener if desired.
- Presentation: Serve on a simple platter with a dusting of powdered sugar or a mint leaf for a refined finish that impresses guests.
Alright, let's break down exactly what goes into this masterpiece…
Inside the Ingredient List
The Flavor Base
The cheesecake filling is the heart of the bite. It’s made from cream cheese, a touch of sugar, and a splash of vanilla extract. Each ingredient balances the others, creating a smooth, rich texture that complements the strawberry crunch. Skipping the vanilla will leave the filling feeling flat; the aroma of vanilla lifts the entire dessert.
The Texture Crew
The strawberry crunch mixture is a game‑changer. It combines fresh strawberries, brown sugar, and a pinch of sea salt, then caramelizes until golden brown. This layer adds a satisfying crunch that contrasts with the creamy filling. If you forget the salt, the sweetness can become overwhelming—salt is the secret to depth.
The Unexpected Star
A splash of bourbon (optional) adds a subtle warmth that pairs beautifully with the strawberries. It’s a small addition that elevates the flavor profile, giving the bites a sophisticated twist. If you’re avoiding alcohol, a dash of maple syrup can provide a similar depth.
The Final Flourish
The strawberry syrup is the finishing touch. Made by reducing fresh strawberries with a pinch of sea salt, it creates a glossy glaze that enhances the visual appeal and adds a burst of natural sweetness. The syrup also helps keep the crust from drying out, ensuring every bite stays moist.
Everything's prepped? Good. Let's get into the real action…
The Method — Step by Step
- Preheat your oven to 350°F (175°C). Line a muffin tin with paper liners or lightly grease it to prevent sticking. The oven should be fully preheated to ensure even baking. A hot oven guarantees a crisp crust; a cooler one will result in a soggy base.
- Prepare the crust. In a bowl, combine 1 cup of all‑purpose flour, 1/2 cup of powdered sugar, and 1/4 cup of melted butter. Mix until the dough resembles coarse crumbs. Press the mixture firmly into the bottom of each muffin cup. The crust should hold its shape when pressed.
- Bake the crust. Place the tin in the oven for 8–10 minutes, or until the edges turn golden brown. Keep a close eye on the color; you want a light tan, not a deep brown. Once done, remove from the oven and let cool for 5 minutes.
- Make the cheesecake filling. In a separate bowl, beat 1 cup of cream cheese until smooth. Add 1/4 cup of sugar and 1 tsp of vanilla extract. Beat until creamy and free of lumps. This mixture should be silky, not gritty.
- Layer the filling. Spoon a generous dollop of cheesecake mixture onto each cooled crust, filling about 3/4 of the cup. The filling should sit slightly above the crust line. This allows the crunch layer to sit on top without mixing.
- Prepare the strawberry crunch. In a skillet, melt 1 tbsp of butter over medium heat. Add 1 cup of diced strawberries, 1/4 cup of brown sugar, and a pinch of sea salt. Cook until the strawberries release juice and the sugar caramelizes, about 5 minutes. The mixture should be glossy and slightly thick.
- Top the filling. Spoon the caramelized strawberry mixture over each cheesecake layer. Press gently to spread it evenly. The top layer should look glossy and be slightly wet, indicating proper caramelization.
- Bake the assembled bites. Return the tin to the oven and bake for 15–18 minutes, or until the edges are set but the center still has a slight wobble. This ensures the filling stays creamy while the crust crisps.
- Cool and glaze. Remove the tin from the oven and let the bites cool for 10 minutes. While they cool, prepare the strawberry syrup by simmering 1 cup of fresh strawberries with 1/4 cup of sugar and a pinch of salt until reduced by half. Drizzle the syrup over each bite once they’re cool.
- Finish with whipped cream. If desired, top each bite with a dollop of whipped cream. This adds a light, airy contrast to the dense filling. A light dusting of powdered sugar can also enhance the visual appeal.
That's it — you did it. But hold on, I've got a few more tricks that'll take this to another level…
Insider Tricks for Flawless Results
The Temperature Rule Nobody Follows
Many people bake at 375°F, thinking a hotter oven equals a crispier crust. In reality, a moderate 350°F gives a more even bake and preserves the cheesecake’s silky texture. I’ve tested both temperatures; the lower heat produces a smoother, more refined bite.
Why Your Nose Knows Best
The aroma of caramelized strawberries is a cue that the crunch layer is ready. When the scent becomes sweet and slightly smoky, it’s time to top the filling. Relying on smell, not just time, ensures the crunch has the perfect snap.
The 5‑Minute Rest That Changes Everything
After baking, let the bites rest on a wire rack for at least 5 minutes. This rest allows the filling to set, preventing it from sliding off the crust when you plate them. It also lets the flavors meld together, creating a richer taste profile.
The Perfect Sweetness Balance
If you’re using sweet strawberries, reduce the sugar in the crunch layer by 1 tbsp. Sweetness is cumulative; too much can drown the delicate cheesecake flavor. Taste the mixture before baking to gauge the balance.
The Quick Chill Trick
Place the assembled tin in the refrigerator for 20 minutes before baking. This chilling step helps the filling maintain its shape during baking and reduces the risk of a soggy center. It’s a small step that makes a big difference.
Creative Twists and Variations
This recipe is a playground. Here are some of my favorite ways to switch things up:
Chocolate‑Covered Strawberry Bites
Dip the finished bites in melted dark chocolate and chill until set. The chocolate adds depth and a subtle bitterness that balances the sweetness. A sprinkle of sea salt on top enhances the flavor profile.
Almond Crunch Layer
Replace the brown sugar in the crunch layer with almond flour and toasted almonds. This gives the bites a nutty crunch and a slightly earthy undertone. It’s a great option for those who love a bit of texture.
Citrus Burst Variation
Add a tablespoon of orange zest to the cheesecake filling for a bright, citrusy note. The zest cuts through the richness and adds a refreshing zing. Pair with a drizzle of honey for extra sweetness.
Berry Medley Mix‑In
Blend blueberries, raspberries, and blackberries into the strawberry crunch mixture. The mix creates a vibrant color palette and a complex flavor profile. It’s perfect for a summer gathering.
Vegan Delight
Use a dairy‑free cream cheese alternative and coconut whipped cream for a vegan version. The coconut adds a subtle tropical note that complements the strawberries. This variation is both indulgent and inclusive.
Mini Cheesecake Cups
Serve the bites in individual silicone cups for a more elegant presentation. Each cup can be topped with a strawberry slice and a mint leaf. This format is ideal for cocktail parties or dessert stations.
Storing and Bringing It Back to Life
Fridge Storage
Store the bites in an airtight container in the refrigerator for up to 48 hours. The crust will remain crisp, and the filling will keep its creamy texture. If you notice any condensation, let the bites sit at room temperature for 10 minutes before serving.
Freezer Friendly
For longer storage, freeze the bites in a single layer on a parchment‑lined tray, then transfer to a freezer bag. They can be kept for up to 2 weeks. When ready to serve, thaw in the refrigerator overnight.
Best Reheating Method
To revive frozen bites, place them on a baking sheet and warm in a 300°F oven for 5–7 minutes. A tiny splash of water on the tray before reheating creates steam, keeping the filling moist. Finish with a quick drizzle of strawberry syrup to restore the glossy finish.