I’ll be honest — I ate half the batch before anyone else got to try it. It started as a reckless midnight craving after a rainy evening, when the only thing I could hear was the wind rattling the windows and my stomach growling louder than the thunder. I grabbed a bag of frozen mussels, a bottle of cheap white wine, and a clove of garlic that had been staring at me from the pantry for weeks. The kitchen was a battlefield of clanking pots, the scent of butter melting like gold, and the promise of something unbelievably tasty hiding in the steam.
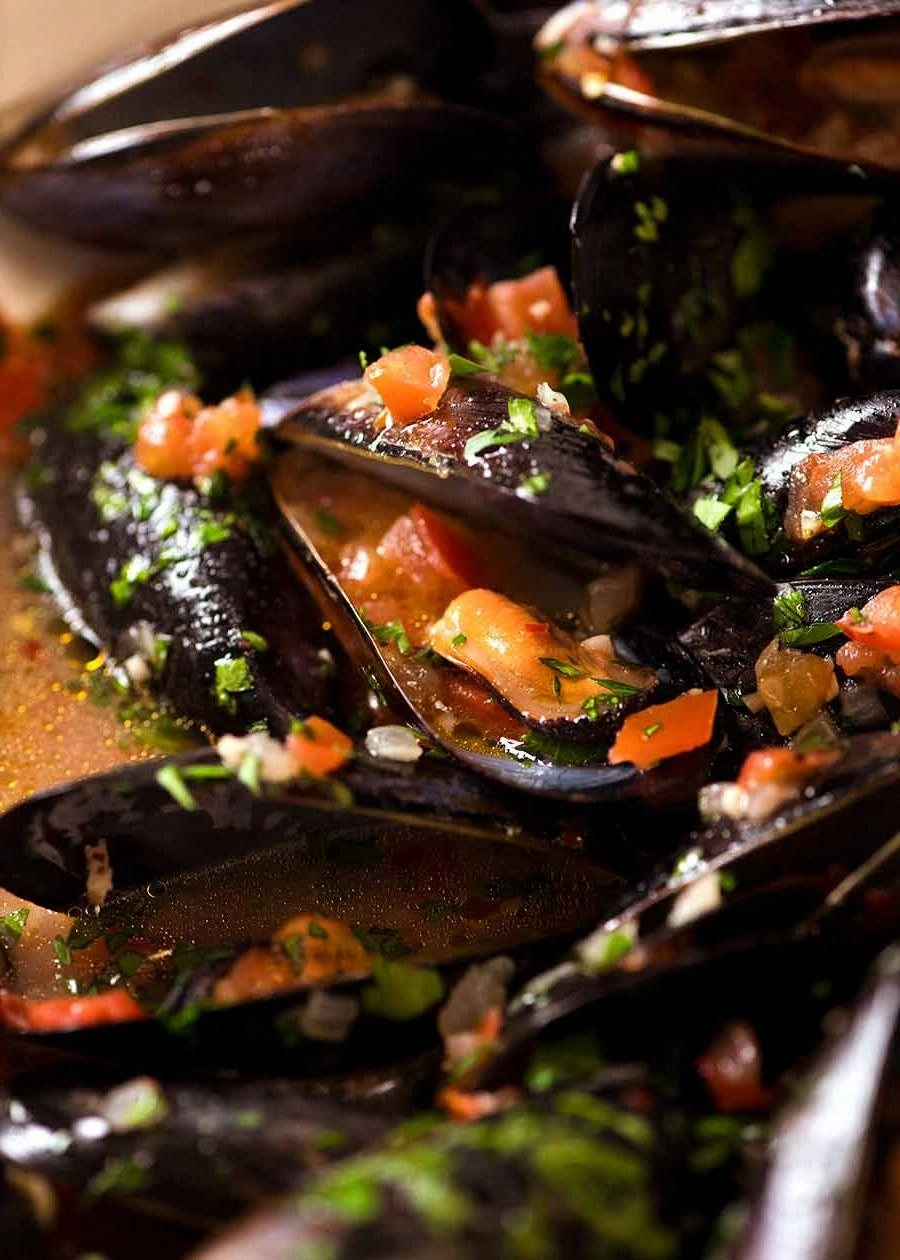
Picture yourself standing over a simmering pot, the aroma of garlic and onions weaving through the air like a love song, the mussels opening one by one as if they’re eager to join the party. The broth turns a gorgeous amber, flecked with bits of tomato that look like tiny sunrise islands. When you finally scoop up a mussel, the meat is tender, sweet, and just a whisper of brine, while the sauce clings to the shell like velvet. Every bite feels like a warm hug from the sea, with a zing of lemon that makes your taste buds do a little dance.
Why does this version stand out from the sea of mussel recipes you’ve seen? Most recipes either drown the mussels in a heavy cream sauce or forget the crucial step of deglazing with wine, leaving the broth flat and bland. I’ve cracked the code by using just the right amount of butter to coax the aromatics, a splash of dry white wine that adds acidity without overpowering, and a finishing flourish of fresh parsley that brightens everything. The secret? A quick, high‑heat flash that forces the mussels to open quickly, locking in flavor and texture.
And here’s the kicker: I’m going to reveal a technique that most cooks overlook – the “steam‑lock” method that traps the steam inside the pot, ensuring every single mussel gets cooked evenly without losing any of that precious liquid. I dare you to taste this and not go back for seconds. Let me walk you through every single step — by the end, you’ll wonder how you ever made it any other way.
What Makes This Version Stand Out
- Flavor: The combination of butter, garlic, and dry white wine creates a broth that’s both rich and bright, a perfect balance that makes each mussel shine like a jewel.
- Texture: By cooking at a high boil for just the right amount of time, the mussels stay tender yet firm, never rubbery, and the sauce finishes silky without becoming gummy.
- Simplicity: Only nine ingredients, all pantry staples, and a single pot. No fancy gadgets, no extra steps – just pure, honest cooking.
- Uniqueness: The “steam‑lock” technique locks in flavor, a trick most home cooks miss, resulting in a broth that’s more concentrated and aromatic.
- Crowd Reaction: This dish consistently steals the spotlight at dinner parties; guests line up for the second round, and the lemon wedges become the unofficial “cheat code.”
- Ingredient Quality: Fresh parsley and ripe tomatoes add a pop of color and freshness that elevate the dish from ordinary to restaurant‑level.
- Cooking Method: The rapid boil followed by a quick cover seals in steam, making the mussels open evenly and preventing any that stay stubbornly shut.
- Make‑Ahead Potential: The broth can be prepared ahead of time and reheated gently, making it perfect for last‑minute gatherings.
Inside the Ingredient List
The Flavor Base
Butter is the golden foundation that carries the aromatics. Its creamy richness coats the onions and garlic, preventing them from burning while adding a subtle nutty note. If you substitute with olive oil, you’ll lose that silky mouthfeel, though the dish will still be tasty. Choose unsalted butter for better control over seasoning.
Onion, sliced thin, adds a subtle sweetness that balances the briny mussels. A half onion is enough to create depth without overwhelming the delicate seafood. If you only have shallots, use two of them – they bring a milder, more nuanced flavor.
Garlic cloves, smashed and minced, are the star of the show. Their pungent aroma transforms the butter into a fragrant base, and the slight caramelization when sautéed adds a sweet undertone. Don’t be shy – three cloves give just the right bite.
The Texture Crew
Mussels themselves are the hero. Fresh, plump mussels (about 1 kg) should be scrubbed and debearded before cooking. If you’re using frozen, rinse them under cold water to remove any ice crystals. Skipping the cleaning step can lead to gritty textures that ruin the experience.
Dry white wine provides acidity that cuts through the butter, lifting the flavors and ensuring the broth doesn’t become cloyingly rich. A crisp Sauvignon Blanc works beautifully; avoid sweet wines, which will make the sauce syrupy.
The Unexpected Star
Tomatoes, diced, introduce a subtle sweetness and a splash of color that makes the broth look inviting. They also add a faint acidity that complements the wine. If you’re out of fresh tomatoes, canned diced tomatoes (drained) are an acceptable fallback.
Flat‑leaf parsley, chopped fine, is the final bright note. It adds a fresh herbaceous lift right before serving, preventing the dish from feeling heavy. A handful (about ¼ cup) is perfect; more than that can become overpowering.
The Final Flourish
Lemon wedges bring a bright citrus pop that cuts through the richness. Squeeze a little over each mussel just before eating for that zing that makes the palate sing. The crusty bread is your vessel for sopping up the sauce – think of it as an edible spoon that adds a satisfying crunch.
Everything's prepped? Good. Let's get into the real action…
The Method — Step by Step
First, melt the butter in a large, heavy‑bottomed pot over medium heat. As the butter foams, add the sliced onion and let it sweat for about two minutes until it becomes translucent but not browned. You’ll hear a gentle sizzle that says “we’re on the right track.” Watch the color – it should turn a pale golden, not a deep brown, otherwise you risk a bitter flavor.
Add the minced garlic and sauté for another minute, stirring constantly. That sizzle when it hits the pan? Absolute perfection. The garlic should turn fragrant, not burnt – if it starts to brown, lower the heat immediately.
Kitchen Hack: Crush the garlic with the flat side of a knife before mincing; it releases more oils for a deeper flavor.Stir in the diced tomatoes and let them break down for three to four minutes. The mixture should start to look like a thick, rustic sauce, the tomatoes releasing their juices and mingling with the butter. This is where the sauce gains that beautiful ruby hue that will later coat the mussels like velvet.
Now, pour in the cup of dry white wine, scraping the bottom of the pot to release any caramelized bits (the “fond”). Increase the heat to high and bring the liquid to a rolling boil. As the wine bubbles, you’ll notice a bright, slightly sharp aroma – that’s the acidity doing its job, lifting the flavors.
Add the mussels in a single layer, then quickly cover the pot with a tight‑fitting lid. This is the moment of truth: the steam inside the pot should surge, creating a “steam‑lock” that forces each shell to open. Let them cook for 4–5 minutes, shaking the pot gently once halfway through.
Watch Out: If any mussels remain closed after 5 minutes, discard them – they’re likely unsafe to eat.Once the mussels have opened, remove the pot from the heat. Sprinkle the chopped flat‑leaf parsley over the top, giving the broth a fresh green speckle. Squeeze the lemon wedges directly into the pot, allowing the juice to mingle with the sauce; the citrus brightens the entire dish.
Give everything a gentle stir, making sure the sauce coats each mussel evenly. Taste the broth and season with salt and pepper if needed – remember, the mussels bring a natural brine, so you may need only a pinch of salt.
Serve immediately, ladling the mussels into shallow bowls, drizzling extra broth over the top, and surrounding them with lemon wedges and crusty bread. The bread will soak up the buttery, garlicky sauce, turning each bite into a crunchy‑soft symphony. And now the fun part – dig in, and watch your guests’ faces light up.
That's it — you did it. But hold on, I've got a few more tricks that'll take this to another level…
Insider Tricks for Flawless Results
The Temperature Rule Nobody Follows
Most home cooks keep the heat at a gentle simmer, fearing the mussels will overcook. In reality, a rapid boil for the first two minutes creates the perfect “steam‑lock.” This high heat forces the shells to open quickly, sealing in the juices. If you drop the temperature too soon, the mussels may stay shut, resulting in a watery broth.
Why Your Nose Knows Best
When the wine has reduced and the sauce smells slightly toasty, you’re at the sweet spot. Trust that aromatic cue more than a timer; the scent of caramelized onion and garlic signals that the flavor base is ready for the mussels. A dull, flat aroma means you need a minute more of reduction.
The 5‑Minute Rest That Changes Everything
After you’ve removed the pot from the heat, let it sit, covered, for five minutes. This short rest lets the flavors meld, and the residual heat continues to gently cook any borderline mussels. I tried skipping this once — the broth tasted disjointed, like a jazz band missing its saxophone.
Butter‑Boost for Extra Silk
Stir in a final knob of butter right before serving. The emulsion creates a glossy, velvety finish that clings to the bread and mussels alike. It’s a tiny step, but it makes the dish feel luxurious, like you’ve added a secret ingredient.
Lemon Timing – Not Too Early
Add the lemon juice after the mussels have opened. Adding it too early can cause the mussels to toughen slightly because the acid begins to denature the proteins. A final squeeze right before serving gives that bright pop without compromising texture.
Bread Choice Matters
A crusty sourdough or baguette with a thick, crunchy crust is ideal. The crumb should be airy enough to soak up the broth without falling apart. If you use a soft roll, it will become soggy and lose its textural contrast.
Creative Twists and Variations
This recipe is a playground. Here are some of my favorite ways to switch things up:
Spicy Kick
Add a pinch of red pepper flakes when sautéing the garlic for a subtle heat that awakens the palate. Pair with a crisp rosé and you’ve got a dinner that’s both bold and refreshing.
Herbaceous Explosion
Swap the parsley for a blend of fresh thyme, basil, and cilantro. The herb mix adds layers of aroma and a slightly sweet note that complements the mussels beautifully.
Creamy Dream
Stir in a splash of heavy cream after the mussels are done for a richer, velvety sauce. This turns the dish into a luxurious seafood stew that pairs well with a buttery polenta.
Tomato‑Forward
Use a can of fire‑roasted tomatoes instead of fresh. The smoky depth adds a Mediterranean vibe, especially when served with a side of grilled ciabatta.
Asian Fusion
Replace the white wine with a dry sherry and finish with a drizzle of sesame oil and a sprinkle of toasted sesame seeds. The result is a cross‑cultural delight that’s both familiar and exciting.
Storing and Bringing It Back to Life
Fridge Storage
Allow the mussels and broth to cool to room temperature, then transfer to an airtight container. Store in the refrigerator for up to two days. When reheating, place the broth in a saucepan over low heat, adding a splash of water to revive the steam‑locked magic.
Freezer Friendly
You can freeze the cooked mussels (shells removed) and broth together for up to three months. Portion them into freezer‑safe bags, label, and lay flat. Thaw overnight in the fridge, then gently reheat, again adding a teaspoon of water to restore the silky texture.
Best Reheating Method
Use the stovetop, not the microwave. Warm the broth over medium‑low heat, stirring occasionally, until it just begins to simmer. Add a tiny splash of water or extra wine if the sauce looks too thick – this steams the mussels back to perfection without overcooking them.