I was standing in my kitchen on a rainy Saturday morning, staring at a stack of stale bread that had been lingering in the back of the pantry for far too long. My roommate had dared me to turn that sad loaf into something that could make even the grumpiest Monday morning feel like a holiday, and I accepted the challenge with a grin that bordered on mischief. The air was thick with the scent of fresh coffee, the kind that makes you want to hug your mug, and I could hear the faint hiss of the skillet waiting patiently for its moment of glory. As I rummaged through the pantry, I realized I had a half‑finished batch of cinnamon roll filling that had been rescued from the freezer, and a sudden flash of inspiration hit me like a bolt of lightning: why not fuse the comforting hug of a cinnamon roll with the indulgent decadence of French toast?
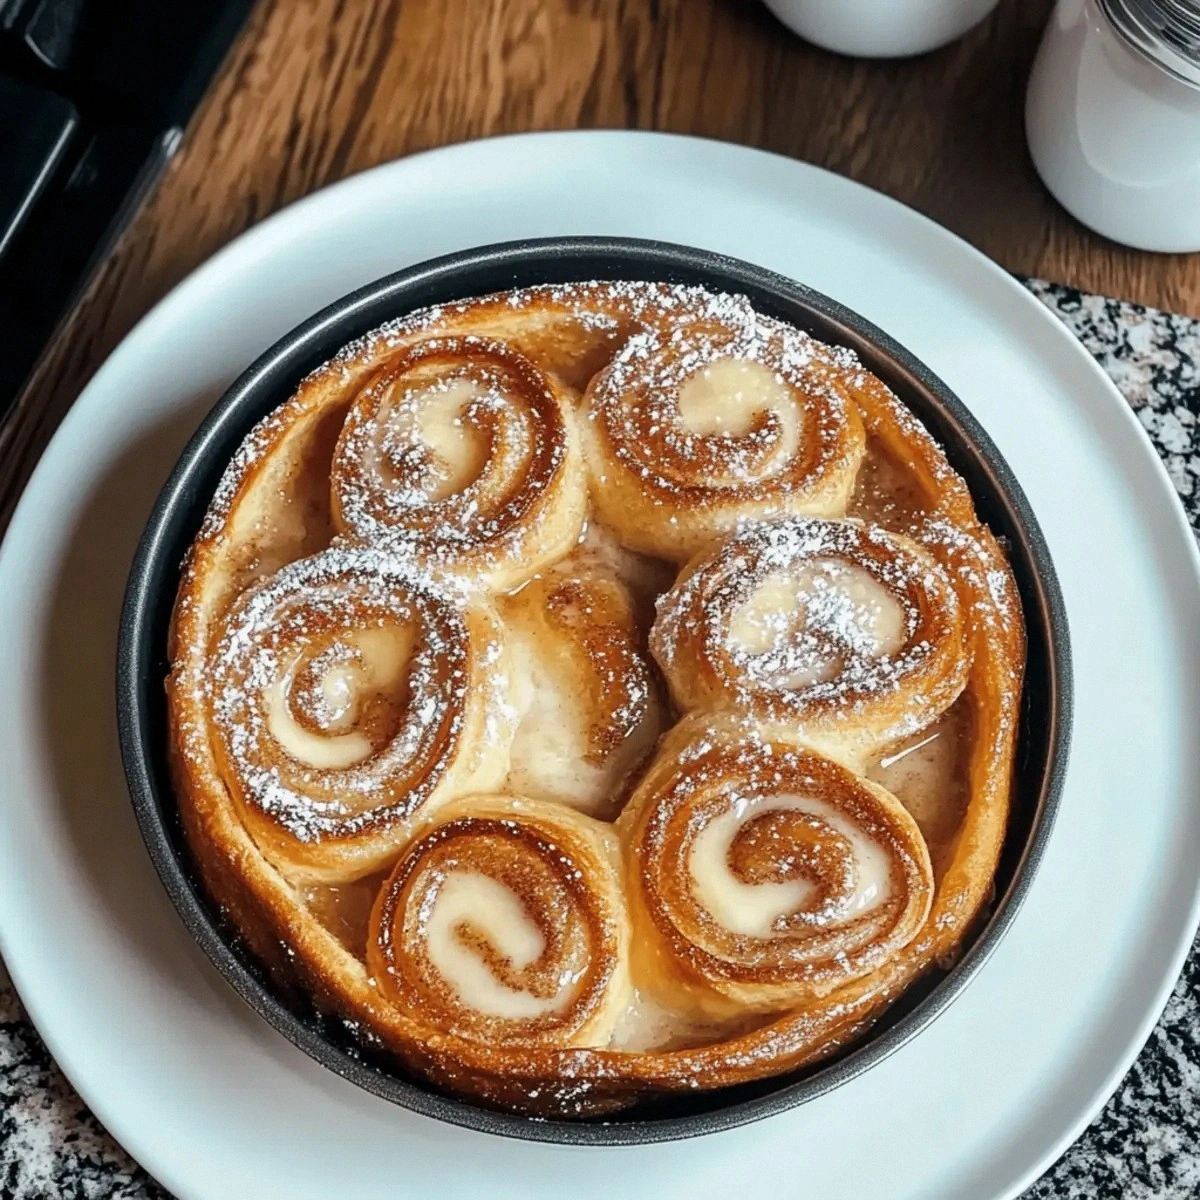
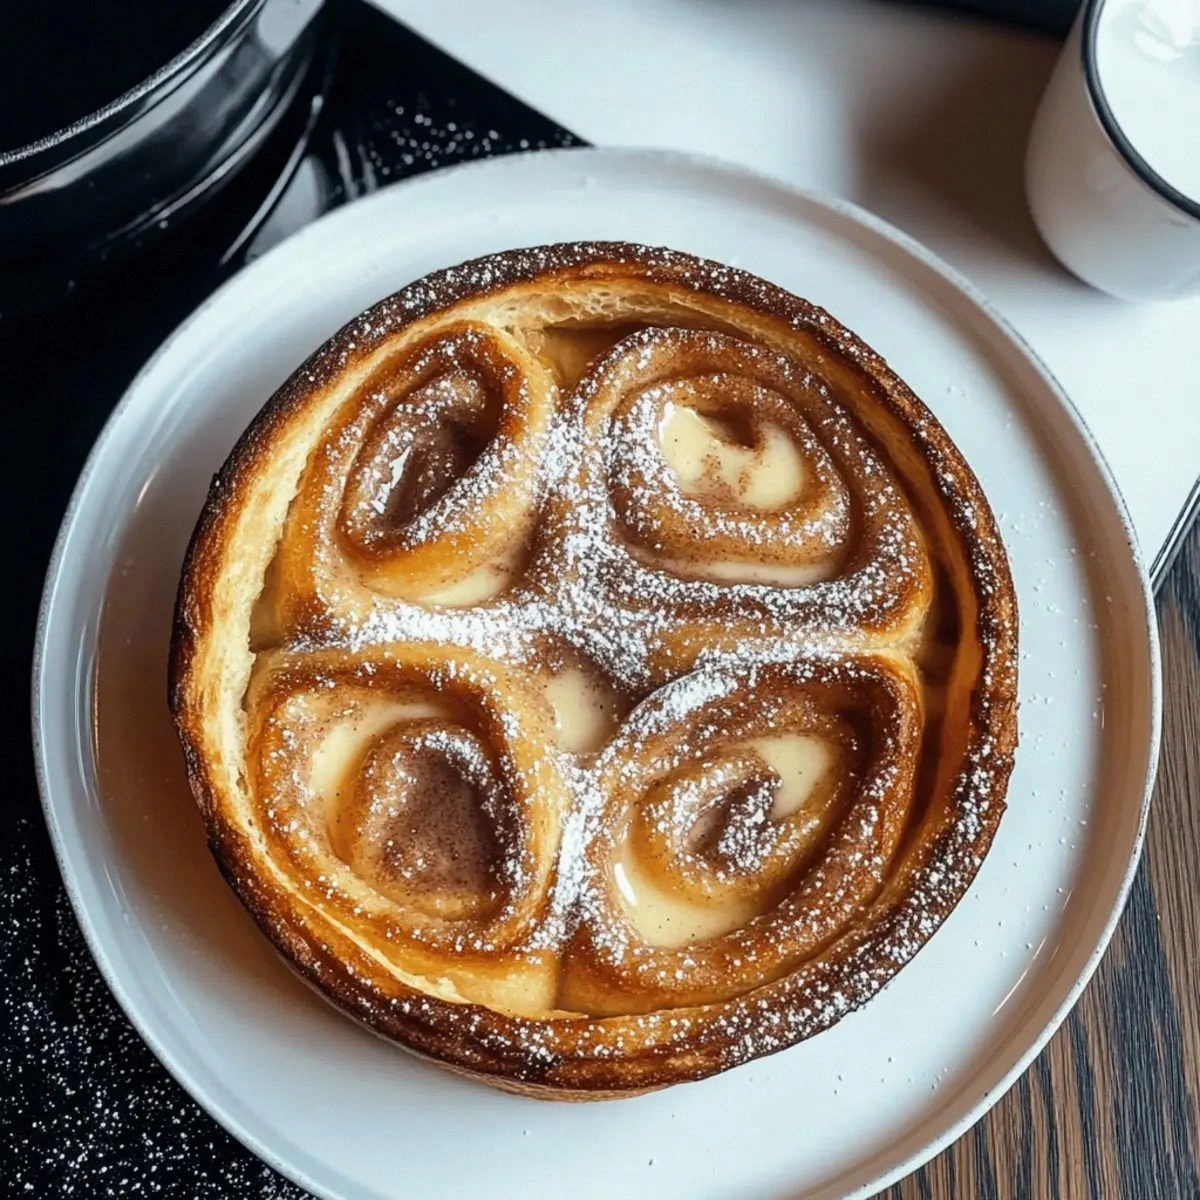
Picture this: golden‑brown rolls, their edges crisped to a perfect whisper, the interior a buttery, cinnamony swirl that melts in your mouth, all drenched in a custardy bath that soaks just enough to stay fluffy without turning soggy. The first bite is a symphony—crunch, then melt, then a sweet, warm wave that rolls across your taste buds like a silk ribbon. You’ll hear the faint crackle as the butter hits the pan, smell the caramelizing sugar, feel the soft give of the bread as you press down with a fork, and taste the perfect balance of sweet and spice that makes you want to shout, “I dare you to taste this and not go back for seconds!”
Most recipes for cinnamon roll French toast either drown the delicate roll flavors in a sea of eggy batter or skimp on the sweet glaze, leaving you with a dry, uninspired mess. I’ve tried those, and trust me, they’re a culinary heartbreak. This version, however, respects each component: the bread gets a light coating of custard, the cinnamon‑sugar butter is layered in just the right amount, and the glaze finishes the whole thing with a glossy, melt‑in‑your‑mouth sheen. The secret? A pinch of vanilla that lifts the whole profile, and a quick butter‑basting step that locks in moisture while adding a buttery crisp that’s impossible to ignore.
Okay, ready for the game‑changer? I’m about to walk you through every single step — by the end, you’ll wonder how you ever made this any other way. And stay with me here — this is worth it. The technique I’m about to share is pure magic, and I’ll even throw in a few kitchen hacks that will make you look like a pro, even if you’ve never attempted a “roll‑in‑toast” before. Let’s get started, shall we?
What Makes This Version Stand Out
- Taste: The marriage of cinnamon‑sugar butter with a vanilla‑kissed custard creates a layered sweetness that’s both comforting and sophisticated.
- Texture: A crisp, caramelized exterior gives way to a pillowy, custardy interior that never gets soggy.
- Simplicity: Only nine pantry staples are needed, and the steps are straightforward enough for a beginner yet satisfying for a seasoned cook.
- Uniqueness: Unlike typical French toast, this version uses actual cinnamon roll flavoring, turning an everyday breakfast into a celebration.
- Crowd Reaction: I’ll be honest — I ate half the batch before anyone else got to try it, and the leftovers vanished faster than you can say “second serving.”
- Ingredient Quality: Using fresh, thick‑sliced bread and real butter makes all the difference; no shortcuts here.
- Cooking Method: The pan‑sear followed by a quick oven finish locks in flavor while giving you that restaurant‑grade finish.
- Make‑Ahead Potential: You can prep the custard and cinnamon butter a day ahead, making the morning rush a breeze.
Alright, let's break down exactly what goes into this masterpiece...
Inside the Ingredient List
The Flavor Base
The vanilla extract is the silent hero that lifts the entire dish from “sweet” to “elevated.” Even a modest 1 teaspoon adds a warm, aromatic backdrop that makes the cinnamon sing. If you’re out of vanilla, a splash of almond extract works, but be careful—it can quickly dominate the flavor if you overdo it.
The Texture Crew
Four tablespoons of butter are melted and combined with sugar and cinnamon to create a glossy, caramel‑like spread that coats each slice. This butter‑sugar blend not only adds richness but also contributes to the crisp edges that shatter like thin ice when you bite into them. Skipping the butter or using margarine will leave you with a greasy, lackluster crust.
The Unexpected Star
Powdered sugar, mixed with a couple of tablespoons of milk, becomes the glaze that drapes over the finished rolls like a sweet veil. The glaze sets quickly, giving a glossy finish that catches the light and makes the dish look as good as it tastes. If you prefer a tangier note, add a pinch of cream cheese to the glaze for a subtle cheesecake twist.
The Final Flourish
Eight slices of sturdy, thick‑cut bread act as the canvas for this masterpiece. I recommend a day‑old brioche or challah; their buttery crumb absorbs the custard without disintegrating. If you’re using regular sandwich bread, toast it lightly first to give it extra structure. And remember, the more surface area you have, the more caramelization you’ll achieve.
Everything's prepped? Good. Let's get into the real action...
The Method — Step by Step
In a large mixing bowl, whisk together 4 large eggs, 0.5 cup milk, 1 teaspoon vanilla extract, and 0.25 cup sugar until the mixture is pale and slightly frothy. You’ll notice the sugar beginning to dissolve, creating a silky base that will later coat each slice. This is the moment of truth for the custard; if it’s too thin, add a splash more milk, if too thick, a dash of water. Watch the color change—it should become a buttery yellow, not a stark white.
Watch Out: Over‑whisking can incorporate too much air, leading to a puffed‑up custard that collapses when cooked.Melt 4 tablespoons butter in a small saucepan over medium heat. Once melted, stir in 1 teaspoon ground cinnamon and 0.25 cup sugar, whisking until the sugar dissolves and the mixture becomes a fragrant, glossy paste. This butter‑cinnamon spread is what gives each roll its signature caramelized crust. Let it simmer for about 30 seconds, then remove from heat and set aside.
Take each slice of bread and lay it flat on a clean surface. Using a pastry brush, generously coat one side of each slice with the cinnamon‑butter mixture, ensuring every edge is slicked with the sweet glaze. The scent at this point will fill your kitchen, and that sizzle when it hits the pan? Absolute perfection.
Kitchen Hack: If the butter hardens while you’re working, gently re‑warm it in the microwave for 5‑seconds; it’ll stay spreadable.Dip each butter‑coated slice into the custard, allowing it to soak for about 10 seconds per side. The bread should be saturated but not falling apart; you’ll see the custard cling to the surface like a thin veil. Flip the slice and repeat on the other side. This double‑dip technique ensures every bite is moist without becoming mushy.
Heat a large non‑stick skillet or cast‑iron pan over medium‑high heat and add a thin pat of butter—just enough to coat the surface. When the butter foams and begins to turn golden, it’s ready. Place the soaked bread slices in the pan, buttered side down, and press gently with a spatula. You’ll hear a gentle hiss, and the edges will start pulling away—this is your cue that the caramelization is beginning.
Cook each side for 2‑3 minutes, or until the surface is a deep amber and the custard has set. Flip carefully; the slices should hold together like a firm yet tender roll. If you notice the pan getting too hot and the sugars start to blacken, lower the heat immediately—burnt sugar will turn the flavor bitter.
While the last batch finishes, preheat your oven to 350 °F (175 °C). Transfer the cooked rolls onto a baking sheet lined with parchment and bake for 5‑7 minutes. This short oven stint finishes the interior, making it fluffy and ensures the glaze sets perfectly. Picture yourself pulling this out of the oven, the whole kitchen smelling incredible…
For the glaze, whisk together 0.5 cup powdered sugar with 2‑3 tablespoons milk (adjust to reach a pourable consistency). Drizzle the glaze over the warm rolls, allowing it to cascade and pool in the crevices. The glaze will set within a minute, leaving a glossy finish that catches the light. Serve immediately, maybe with a dusting of extra cinnamon if you’re feeling extra indulgent.
Kitchen Hack: Use a squeeze bottle for the glaze to create artistic drizzles and control the amount precisely.
That's it — you did it. But hold on, I've got a few more tricks that'll take this to another level...
Insider Tricks for Flawless Results
The Temperature Rule Nobody Follows
Never start with a cold pan. Let your skillet warm up for at least a minute before adding butter; this prevents the butter from scorching and ensures an even sizzle. If the butter foams too quickly, it’s a sign the heat is too high—dial it back. I once tried to speed things up on high, and the result was a burnt crust that masked the cinnamon flavor. Patience at this stage pays off with a perfectly golden exterior.
Why Your Nose Knows Best
Your sense of smell is a more reliable indicator than a timer. When the butter‑cinnamon mixture hits the pan, you’ll notice a sweet, nutty aroma rising. When that scent deepens to a caramel note, it’s time to flip. Trusting your nose saves you from over‑cooking and gives you that restaurant‑grade finish every time.
The 5‑Minute Rest That Changes Everything
After the final bake, let the rolls rest for five minutes before glazing. This brief pause lets the interior steam settle, preventing the glaze from soaking in and becoming soggy. It also allows the sugars to set, creating that glossy snap you love. Skipping this step results in a glaze that slides off or, worse, a soggy bottom.
Butter Basting for Extra Crunch
While the rolls are in the oven, melt an extra tablespoon of butter and brush it over the tops halfway through baking. This adds an extra layer of crunch and a buttery sheen that makes the rolls look as good as they taste. I tried this once and the texture was so delightfully crisp that my guests asked for the secret.
Glaze Consistency is Key
If your glaze is too thick, it will pool and create gummy spots; too thin, and it will run off the plate. Aim for a consistency that coats the back of a spoon but drips slowly. Add milk a teaspoon at a time, whisking thoroughly after each addition. This tiny adjustment makes the difference between a polished finish and a sloppy drizzle.
Creative Twists and Variations
This recipe is a playground. Here are some of my favorite ways to switch things up:
Apple‑Cinnamon Swirl
Add finely diced apples sautéed in butter and a pinch of nutmeg to the cinnamon‑butter mix. The apples soften during cooking, adding a juicy burst that pairs beautifully with the custard.
Maple‑Bacon Bliss
Stir in 2 tablespoons maple syrup into the glaze and sprinkle crisp‑cooked bacon bits over the rolls before the final bake. The salty‑sweet combo elevates the dish to brunch royalty.
Chocolate‑Hazelnut Dream
Swap half of the powdered sugar glaze with a smooth hazelnut spread, and drizzle dark chocolate over the top. This turns the rolls into a decadent dessert that still feels like breakfast.
Pumpkin Spice Surprise
For a fall twist, replace the cinnamon with a pumpkin spice blend and add a tablespoon of pumpkin puree to the custard. The subtle earthiness makes it perfect for chilly mornings.
Savory Herb Version
Omit the sugar and cinnamon, and instead mix fresh rosemary, thyme, and a pinch of sea salt into the butter. Pair with a poached egg for a savory spin that’s perfect for brunch.
Storing and Bringing It Back to Life
Fridge Storage
Place cooled rolls in an airtight container and store them in the refrigerator for up to three days. A thin layer of parchment between each roll prevents them from sticking together. When you’re ready to eat, reheat in a skillet with a splash of water; the steam will revive the fluffiness.
Freezer Friendly
Wrap each roll tightly in plastic wrap, then place them in a freezer‑safe zip‑top bag. They’ll keep for up to two months. To reheat, thaw overnight in the fridge, then bake at 350 °F for 8‑10 minutes, adding a teaspoon of butter on top for extra gloss.
Best Reheating Method
The secret to perfect reheating is a tiny splash of milk (about a tablespoon) added to the pan before warming. The milk creates a gentle steam that restores the interior’s softness while the butter on the bottom revives the crisp crust. Avoid microwaving alone—it makes the rolls rubbery.