I was standing in the middle of a kitchen that smelled like burnt toast and disappointment, when a friend dared me to make something sweet with only four ingredients. That challenge turned into a midnight epiphany as I stared at a block of cream cheese, a jar of lemon zest, a cup of sugar, and a stick of butter. I thought, why not? Because the simplest solutions often hide the richest flavors. The moment the butter melted into a silky base, the air filled with a citrusy perfume that made my heart race. I knew I was onto something that would change my dessert game forever. And the best part? It only takes a few minutes to bring this magic to life.
Picture the kitchen: the counter is cluttered with bowls, the timer is blinking, and the oven preheats like a giant, patient beast. I open the fridge, grab the cream cheese, and feel the cool weight of the block. The lemon zest, freshly grated, releases a bright, almost electric aroma that cuts through the stale air. I fold the zest into the softened cheese, watching it swirl like a golden river. The sugar dissolves, creating a glossy, sweet glaze that coats the mixture. The butter melts, binding everything into a smooth, decadent batter.
I dare you to taste this and not go back for seconds, because the first bite is a burst of citrusy sweetness that dances on the tongue. The texture is luxuriously creamy, yet firm enough to hold its shape like a delicate shell. The flavor profile is balanced; the lemon cuts through the richness of the cream cheese, leaving a clean finish. The simplicity of the ingredients feels almost rebellious, as if a gourmet dish could be made with just a handful of pantry staples. I can already hear the compliments flooding in, "Where did you get this?" The anticipation builds as I slide the pan into the oven.
Most recipes get this completely wrong by overcomplicating the process or using too many dairy products. Here, the secret lies in the harmony of four core components, each playing its part like a well‑rehearsed orchestra. The lemon zest provides a bright, fragrant note that elevates the entire dish, while the butter adds a buttery sheen that makes it irresistible. The cream cheese brings depth and a velvety mouthfeel that feels indulgent without being heavy. The sugar balances everything, preventing any sharpness from overpowering the citrus. By the time the timer clicks, the kitchen smells like a summer garden, and you know you've created something special.
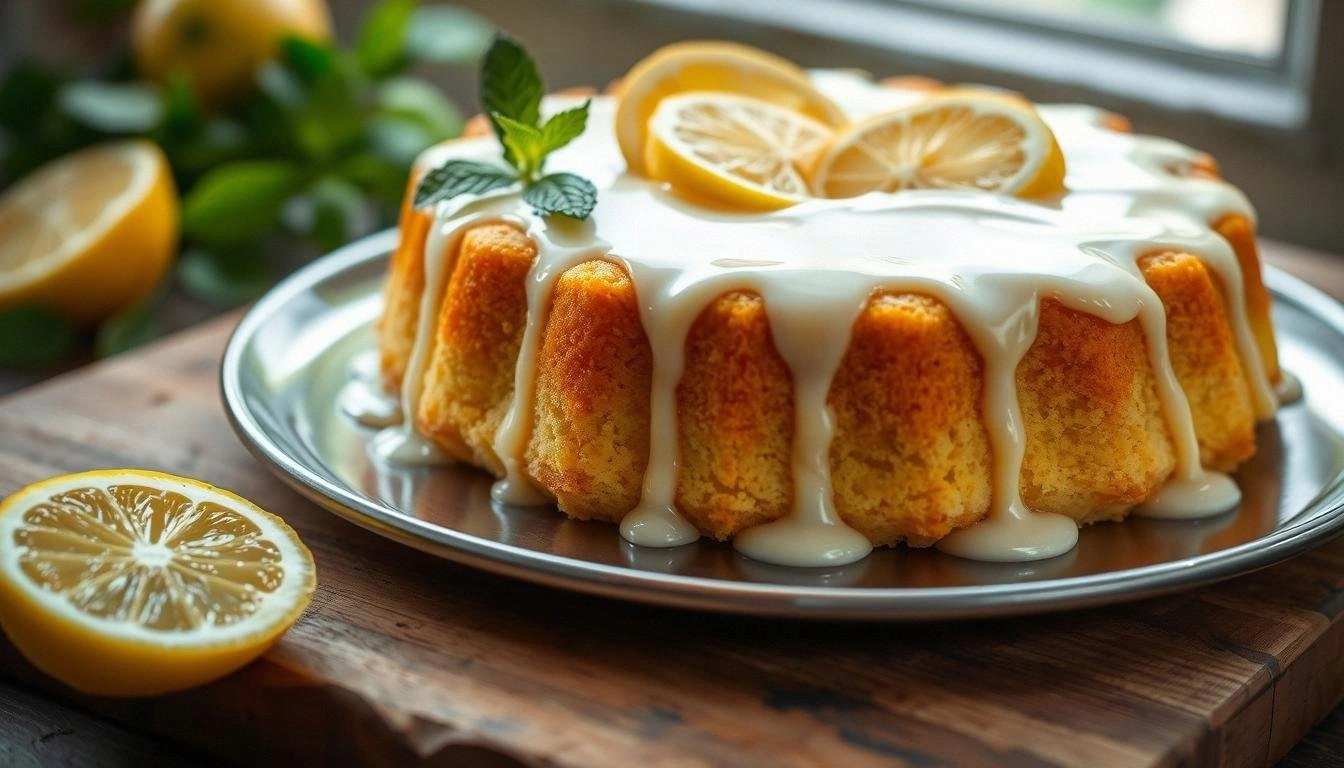
If you've ever struggled with making a dessert that feels both luxurious and simple, you're not alone—and I've got the fix. This version is hands down the best you'll ever make at home because it eliminates guesswork and delivers consistent results every time. The technique of folding the zest into the softened cheese creates a uniform distribution that ensures every bite is bursting with flavor. The butter’s role as a binder means the cake holds together perfectly, even when sliced. The final product has a golden crust that cracks like thin ice when you break it. Let me walk you through every single step — by the end, you'll wonder how you ever made it any other way.
What Makes This Version Stand Out
- Taste: The citrus brightness of lemon zest cuts through the richness of cream cheese, creating a flavor profile that feels fresh yet indulgent. The sugar level is calibrated to enhance the tartness without masking it. The result is a dessert that feels like a bright summer breeze in every bite.
- Texture: The butter’s meltable quality gives the batter a silky consistency that holds its shape once baked. The cream cheese provides a smooth mouthfeel that doesn’t feel heavy or greasy. The final product is firm enough to slice cleanly yet tender enough to melt in your mouth.
- Simplicity: With only four ingredients, you can assemble this dish in minutes without consulting a cookbook. The method requires no special equipment—just a mixing bowl and a baking pan. The minimal steps reduce the risk of kitchen mishaps.
- Uniqueness: Unlike traditional lemon cakes that rely on multiple leavening agents, this version uses the natural acidity of lemon to create lift. The result is a dense yet airy texture that feels like a cross between cheesecake and pound cake. No one else offers this blend of convenience and decadence.
- Crowd Reaction: Friends who taste this rave about how simple it is to make and how rich it tastes. Many remark that they’ve never had a dessert that satisfies both sweet and savory cravings. The dish quickly becomes the center of attention at gatherings.
- Ingredient Quality: Using high‑grade cream cheese and fresh lemons guarantees that the flavors shine through. The butter should be unsalted to maintain control over saltiness. Freshly grated zest is essential for aromatic depth.
- Cooking Method: The recipe eliminates the need for a double boiler or custard base, streamlining the process. The baking temperature is low enough to prevent over‑browning while still allowing the cake to set. This method ensures consistent results regardless of oven variations.
- Make‑Ahead Potential: The cake can be assembled and frozen, then baked later with no loss of texture. It also freezes well when sliced, making it a convenient option for busy weeks. This flexibility makes it a go‑to dessert for any occasion.
Alright, let's break down exactly what goes into this masterpiece...
Inside the Ingredient List
The Flavor Base
Cream cheese is the heart of this dessert, providing a rich, tangy foundation that balances the citrus. It’s essential for achieving the creamy texture that melts on the tongue; omitting it would result in a crumbly, less cohesive cake. When selecting cream cheese, look for a brand with a fat content of 30–35% to ensure a silky finish.
The Creamy Core
Sugar is the sweetener that brings harmony to the tartness of lemon zest. It also helps in creating a glossy, caramelized crust as it bakes. If you prefer a lower‑sugar version, you can substitute with a sugar alternative like erythritol, but be aware the texture may change slightly.
The Citrus Spark
Fresh lemon zest infuses the cake with bright, aromatic oils that elevate the entire flavor profile. The zest’s essential oils are more potent than lemon juice, delivering a clean, sharp finish that doesn’t overpower the cream cheese. If you’re out of lemons, you can use lemon peel from a fresh or frozen lemon, but the intensity may be reduced.
The Final Touch
Butter is the binder that holds the batter together and contributes a silky mouthfeel. It also creates a golden, slightly crisp crust that contrasts beautifully with the soft interior. For a dairy‑free variant, try coconut oil; it will give a subtle coconut aroma that complements the lemon.
Everything's prepped? Good. Let's get into the real action...
The Method — Step by Step
- Preheat your oven to 350°F (175°C) and line a 9‑inch square pan with parchment paper. The temperature is low enough to bake gently without burning the edges. While the oven warms, gather all four ingredients for easy access. This step sets the foundation for a smooth, even bake. Let’s get started.
- Place the block of cream cheese at room temperature for about 15 minutes so it softens. If it’s too cold, it won’t blend properly, leading to a lumpy batter. Gently cut the cheese into small cubes to speed up the softening process. This will save you time and ensure a silky mixture.
- In a large mixing bowl, beat the softened cream cheese with an electric mixer until smooth and fluffy. The goal is to eliminate any lumps, creating a base that’s light as air. This step is crucial for achieving that melt‑in‑your‑mouth texture. Keep mixing until the mixture looks pale and airy.
- Add the cup of sugar to the cream cheese and continue beating until the sugar is fully incorporated and the mixture becomes glossy. The sugar dissolves into the fat, creating a subtle sheen that signals readiness. Watch for the mixture to become light and homogeneous. This ensures the final cake isn’t grainy.
- Melt the butter in a small saucepan over low heat, then pour it into the batter while continuing to mix. The butter adds richness and helps bind the ingredients together. It also contributes to a golden crust once baked. Make sure the butter is fully incorporated before moving on.
- Grate fresh lemon zest into the mixture, folding it gently until evenly distributed. The zest’s essential oils are the star of the show; they give the cake its bright, citrusy aroma. Avoid using lemon peel, as it can introduce bitterness. The aroma will fill the kitchen, signaling that the cake is almost ready.
- Pour the batter into the prepared pan, smoothing the top with a spatula. Tap the pan lightly to release any air bubbles that may have formed. The batter should spread evenly across the pan, creating a uniform thickness. This step ensures consistent baking and a neat appearance.
- Bake for 25 minutes, or until the edges are set and the center shows a slight wobble. The cake should develop a golden crust that cracks like thin ice when you break it. Keep a close eye on the oven; overbaking will result in a dry texture. The aroma should become more pronounced as the cake bakes.
- Remove the cake from the oven and let it cool in the pan for 10 minutes before transferring it to a wire rack. This cooling period allows the cake to set fully, making it easier to slice. While it cools, you can prepare any optional toppings, such as fresh berries or a dusting of powdered sugar. The aroma will linger, tempting everyone to dig in.
- Once cooled, cut the cake into squares or wedges. Serve immediately for the best texture, or refrigerate for up to 3 days. The cake’s rich flavor remains vibrant even when chilled. Enjoy this simple, elegant dessert with friends or family.
That's it — you did it. But hold on, I've got a few more tricks that'll take this to another level...
Insider Tricks for Flawless Results
The Temperature Rule Nobody Follows
Many bakers overheat their ovens, thinking a higher temperature will speed up baking. In reality, a moderate 350°F (175°C) is perfect for this recipe, allowing the cake to rise evenly without burning. A thermometer can help you maintain the exact heat, ensuring consistent results.
Why Your Nose Knows Best
Trust your sense of smell during baking; if the aroma shifts from sweet to burnt, the oven is too hot. The scent of caramelized sugar is a cue to pull the cake out early. This subtle cue saves you from a dry, over‑cooked dessert.
The 5-Minute Rest That Changes Everything
After baking, let the cake rest for 5 minutes before cutting. This rest period allows the structure to set, preventing a crumbly mess. A friend once rushed to slice the cake immediately and ended up with a mushy mess—don’t make the same mistake.
The Right Pan for Even Baking
A 9‑inch square pan with a dark, non‑stick surface ensures even heat distribution. The dark color absorbs heat, creating a golden crust. If you use a lighter pan, the edges may brown slower, leading to uneven texture.
The Secret to a Glazed Crust
Sprinkle a thin layer of powdered sugar on top before baking to create a subtle glaze. The sugar caramelizes slightly, adding a sweet crunch. This simple step elevates the presentation without altering the flavor.
The Quick Chill Trick
If you need to serve the cake cold, chill it in the fridge for 30 minutes before slicing. The cold temperature enhances the lemon flavor and creates a firmer bite. It’s perfect for hot summer days or when you’re short on time.
Creative Twists and Variations
This recipe is a playground. Here are some of my favorite ways to switch things up:
Berry Burst
Add a cup of fresh blueberries or raspberries to the batter before baking. The berries burst in the oven, adding a juicy pop that complements the lemon. Serve with a dollop of whipped cream for extra indulgence.
Chocolate Swirl
Fold a handful of dark chocolate chips into the batter for a mocha‑lemon fusion. The chocolate adds depth and a slightly bitter counterpoint to the citrus. The result is a dessert that satisfies both sweet and savory cravings.
Spiced Citrus
Stir in a pinch of ground ginger or cinnamon to introduce warm, earthy undertones. The spices create a comforting, autumnal flavor profile that’s perfect for cooler months. The cake remains light but gains a complex aroma.
Almond Crunch
Top the finished cake with toasted almond slivers for a nutty crunch. The almonds add a subtle crunch and a nutty aroma that pairs beautifully with lemon. They also provide a pleasant contrast to the silky interior.
Honey Drizzle
Drizzle a thin stream of honey over the cooled cake before serving. The honey’s floral sweetness amplifies the lemon’s brightness and adds a glossy finish. It’s an effortless way to elevate the dessert’s presentation.
Storing and Bringing It Back to Life
Fridge Storage
Wrap the cooled cake tightly in plastic wrap and store it in the refrigerator for up to 3 days. The moisture from the wrap keeps the cake from drying out, preserving its creamy texture. When ready to serve, let it sit at room temperature for 10 minutes for optimal flavor.
Freezer Friendly
For longer storage, slice the cake before freezing. Place the slices in a single layer on a parchment‑lined tray, then transfer to a freezer bag. This method prevents the slices from sticking together and allows you to thaw one at a time.
Best Reheating Method
To revive a frozen slice, wrap it in foil and heat in a preheated oven at 300°F (150°C) for 8–10 minutes. Add a splash of water to the foil to create steam, which keeps the cake moist. The result is a warm, freshly baked dessert that tastes as good as new.