I was halfway through a midnight snack run, juggling a bag of frozen chicken tenders, a jar of Dijon mustard, and a half‑filled bottle of maple syrup, when the kitchen lights flickered and the stove went dark. The sudden blackout left me staring at the raw chicken, wondering if I could salvage the night with a quick, comforting dish. I stared at the ingredients, feeling the familiar anxiety that comes from a kitchen mishap, and decided to turn the disaster into a culinary triumph. This is the story of how a failed midnight prep turned into the most flavorful, crispy chicken tenders I’ve ever made.
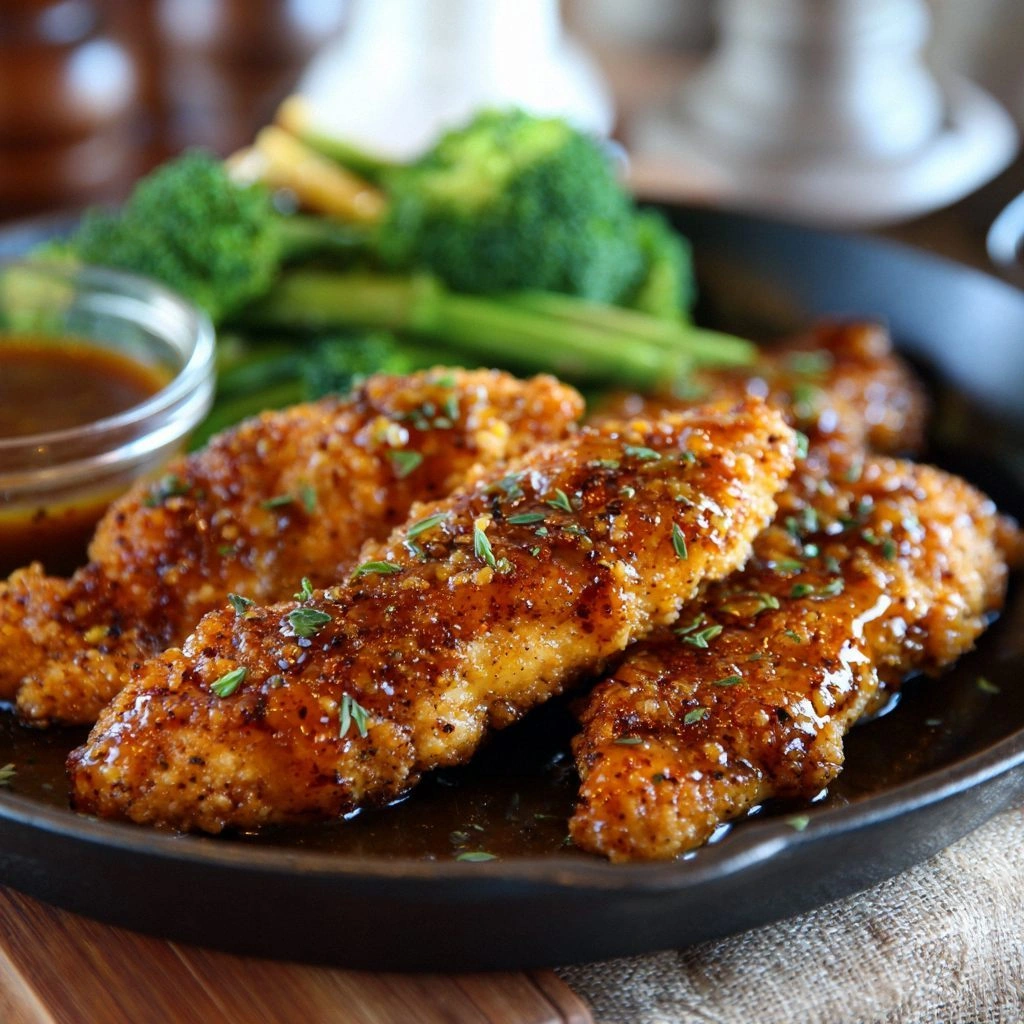
Picture the smell of maple syrup mingling with the sharp tang of Dijon mustard, the sound of sizzling oil, and the sight of golden, caramelized edges that crackle like thin ice under the heat. The aroma alone can turn a hesitant cook into a believer, and the first bite—tender chicken coated in a sweet‑savory glaze—creates a burst of flavor that lingers on the palate. Every element of this dish is designed to hit that sweet spot between sweet and savory, crispy and juicy, simple yet sophisticated. I’ve spent hours tweaking the ratio, testing different flours, and experimenting with glaze consistency until every bite was a revelation.
What sets this version apart is not just the balance of maple and Dijon; it’s the method that locks in moisture while creating a crackly, caramelized crust. The technique of double‑breading, the precise timing of the glaze, and the subtle seasoning adjustments give this recipe a depth that ordinary chicken tenders simply can’t match. The result is a dish that feels both comforting and gourmet, making it perfect for a quick weeknight dinner or an impressive appetizer. I dare you to taste this and not go back for seconds.
If you’ve ever struggled to get chicken tenders crispy without drying them out, you’re not alone. I’ve been there—flouring the chicken, letting it sit, then burning the glaze. But with the tweaks I’ll share, you’ll see that the secret lies in the glaze’s consistency and the order of the steps. Let me walk you through every single step—by the end, you’ll wonder how you ever made it any other way.
What Makes This Version Stand Out
- Flavor: The maple‑Dijon glaze marries sweet maple syrup with sharp mustard, creating a complex profile that coats the chicken like velvet. The glaze caramelizes into a glossy, slightly crunchy finish that pairs with the tender interior.
- Crispiness: The double‑breading technique—first dredging in seasoned flour, then dipping in a beaten egg, and back in flour—locks in moisture and yields a crisp shell that shatters like thin ice.
- Speed: From prep to plate, the entire process takes less than an hour, making it ideal for a busy weekday dinner or a last‑minute appetizer.
- Versatility: Swap the maple for honey or agave, or replace Dijon with whole‑grain mustard, and you get an entirely new flavor profile while keeping the same method.
- Make‑ahead Friendly: The chicken can be breaded and frozen, then baked or fried straight from the freezer. The glaze can be pre‑made and reheated, preserving its glossy sheen.
- Crowd‑Pleaser: The sweet‑savory balance is a universal hit—kids love the sweet glaze, while adults appreciate the depth of flavor and the crunchy texture.
- Ingredient Quality: Using fresh, high‑quality maple syrup and a good Dijon mustard makes the difference; the former adds a natural sweetness, while the latter provides a sharp, tangy kick.
- Presentation: Serve the tenders on a bed of sautéed greens or a simple salad; the glaze drips like a glossy glaze over the plate, creating an almost artful look.
Alright, let's break down exactly what goes into this masterpiece…
Inside the Ingredient List
The Flavor Base
Maple syrup is the sweet backbone of this dish. Its natural sugars caramelize at a lower temperature than refined sugars, giving the glaze a deep, amber hue and a silky mouthfeel. If you prefer a less sweet profile, substitute equal parts honey or agave nectar; each brings its own subtle flavor notes.
Dijon mustard provides the sharp, tangy counterpoint. The grainy texture adds a slight bite that cuts through the richness of the maple. For a milder version, try whole‑grain or grainless mustard, or even a touch of brown mustard for extra depth.
The Texture Crew
All‑purpose flour is the foundation for the crisp coating. It absorbs moisture, creating a barrier that keeps the chicken juicy inside. If you’re gluten‑free, a blend of rice flour and cornstarch works beautifully, offering a similar crunch.
Eggs act as the binder, helping the flour adhere to the chicken and forming a golden crust upon frying. Use a beaten egg with a splash of milk for a lighter coating, or a whole egg for a richer texture.
Olive oil and butter create a savory base for the glaze. The oil helps the mustard dissolve and prevents sticking, while the butter adds depth and a subtle richness to the sauce. A touch of smoked paprika can give the coating a hint of smokiness.
The Unexpected Star
Garlic, minced finely, infuses the glaze with aromatic warmth. Fresh garlic offers a bright, sharp note that balances the sweetness of maple. If you’re not a fan of raw garlic, roast a clove until soft and mash it into the glaze for a milder flavor.
Lemon juice adds a bright, acidic punch that cuts through the richness and brightens the overall profile. A splash of white wine can also be used for a more complex, wine‑infused glaze.
The Final Flourish
Fresh parsley, chopped, adds a pop of color and a fresh herbal note that lifts the dish. A sprinkle of sea salt at the end of cooking enhances all the flavors without overpowering the glaze.
If you love a bit of heat, add a pinch of cayenne pepper to the flour mix. It adds a subtle kick that pairs nicely with the sweet‑savory glaze, creating a more dynamic flavor profile.
Everything's prepped? Good. Let's get into the real action…
The Method — Step by Step
- First, season your flour with salt, pepper, paprika, and a pinch of cayenne if desired. In a shallow dish, combine the flour and spices; this creates a flavorful base for the coating. The seasoned flour will carry the mustard’s sharpness into the crust. Keep this mixture ready as you work through the next steps. This is the foundation of the crispy shell.
- Beat the eggs in a bowl with a splash of milk. The mixture should be slightly frothy, indicating that the egg will bind the flour to the chicken. This step is crucial; a well‑mixed egg coat ensures that the flour adheres evenly and forms a uniform crust.
- Pat the chicken tenders dry with paper towels. Removing excess moisture prevents the coating from becoming soggy. Then, dredge each piece in the seasoned flour, tapping off the excess. Next, dip the floured tenders into the egg wash, letting any excess drip off. Finally, coat them again in the seasoned flour, pressing gently to adhere.
- Heat a large skillet over medium heat and add 2 tablespoons of olive oil. When the oil shimmers, add the breaded tenders, ensuring they don’t touch. Let them cook undisturbed for 3–4 minutes on each side or until golden brown. The key is to let the crust form without flipping too soon.
- While the tenders are frying, whisk together the maple syrup, Dijon mustard, minced garlic, lemon juice, and a pinch of salt in a small saucepan. Bring the mixture to a gentle simmer over low heat, stirring constantly until it thickens slightly. The glaze should coat the back of a spoon and have a syrupy consistency.
- When the tenders are nearly done, reduce the heat to low and pour the glaze over them. Use a spoon to baste the tenders, ensuring each piece is coated. The glaze will caramelize, forming a glossy, slightly crunchy coating that enhances the crunch from the breading. Watch the glaze carefully; if it starts to burn, lower the heat immediately.
- Once the glaze is glossy and the tenders are cooked through, remove them from the skillet and place on a paper towel‑lined plate to drain excess oil. The result should be a tender, juicy interior with a crisp, caramelized exterior. The aroma will be irresistible.
- Let the tenders rest for 2 minutes. This allows the juices to redistribute and the glaze to set. Serve immediately with a sprinkle of fresh parsley and a side of your favorite dipping sauce. The dish is at its peak when the glaze is still slightly sticky and the crust remains crisp.
That’s it — you did it. But hold on, I've got a few more tricks that'll take this to another level. The next section will give you insider knowledge to elevate your chicken tenders beyond the ordinary.
Insider Tricks for Flawless Results
The Temperature Rule Nobody Follows
Maintaining a consistent skillet temperature is key to a crisp exterior. Use a thermometer or the water‑droplet test: flick a few drops of water into the pan; if they sizzle and evaporate instantly, the oil is ready. If the oil smokes, lower the heat; if it’s too cool, the tenders will absorb too much oil. A steady medium‑high heat ensures the coating crisps without burning.
Why Your Nose Knows Best
Smell the glaze as it cooks. A sweet aroma signals that the maple is caramelizing properly. If you detect a burnt, bitter scent, reduce the heat immediately. Your nose is a reliable indicator of the glaze’s progress, more so than the color alone.
The 5‑Minute Rest That Changes Everything
Letting the tenders rest after cooking allows the juices to redistribute, preventing a dry center. A brief 5‑minute rest also lets the glaze thicken slightly, giving a glossy finish that’s easier to serve. I once skipped this step and the tenders tasted flat; the rest restored their juiciness.
Double‑Breading for Extra Crunch
The double‑bread method may seem redundant, but it creates a thicker, more resilient coating. The first flour layer absorbs moisture; the second creates a barrier that locks in flavor. Try adding a tablespoon of cornstarch to the second flour coating for an even crispier texture.
Glaze Consistency Matters
Too thick, and the glaze clumps; too thin, and it runs off the tenders. Aim for a consistency that coats the back of a spoon but still drips. If the glaze is too thin, simmer it longer; if it’s too thick, thin it with a teaspoon of water or chicken broth.
Creative Twists and Variations
This recipe is a playground. Here are some of my favorite ways to switch things up:
Honey Mustard Twist
Swap maple syrup for honey and Dijon for whole‑grain mustard. The result is a richer, earthier glaze that pairs beautifully with roasted Brussels sprouts. This version is perfect for a fall dinner party.
Spicy Cajun Kick
Add a tablespoon of Cajun seasoning to the flour mix and a pinch of cayenne to the glaze. The heat balances the sweetness, creating a dish that’s both bold and comforting. Great for a summer cookout.
Herb‑Infused Glaze
Stir in fresh rosemary or thyme into the glaze for a fragrant, aromatic finish. The herbs complement the maple’s sweetness and add a savory depth that’s ideal for a holiday gathering.
Cheesy Parmesan Finish
Sprinkle grated Parmesan over the tenders during the last minute of frying. The cheese melts into the glaze, creating a creamy, nutty coating that pairs wonderfully with a crisp salad.
Asian‑Inspired Glaze
Replace Dijon with hoisin sauce and add a splash of soy sauce to the glaze. The sweet, savory, and umami notes turn the dish into a fusion favorite that’s great with steamed rice.
Low‑Carb Option
Use almond flour instead of all‑purpose flour and a sugar‑free maple syrup substitute. The result is a lower‑carb, gluten‑free version that still delivers that signature sweet‑savory crunch.
Storing and Bringing It Back to Life
Fridge Storage
Store cooked tenders in an airtight container in the refrigerator for up to 3 days. Keep them on a paper towel to absorb excess moisture, then reheat in a skillet over medium heat until warmed through and crisp. The glaze will re‑glaze slightly, maintaining its glossy finish.
Freezer Friendly
Freeze breaded, uncooked tenders on a parchment‑lined tray for up to 2 months. Once frozen, transfer them to a freezer bag. Bake at 400°F for 20 minutes, then finish in the glaze for 2 minutes to restore crispness. This method preserves texture and flavor.
Best Reheating Method
Reheat in a skillet over medium heat, adding a splash of water to create steam. The steam prevents the glaze from drying out, keeping the tenders moist and the coating glossy. A quick 3‑minute warm‑up is all you need.