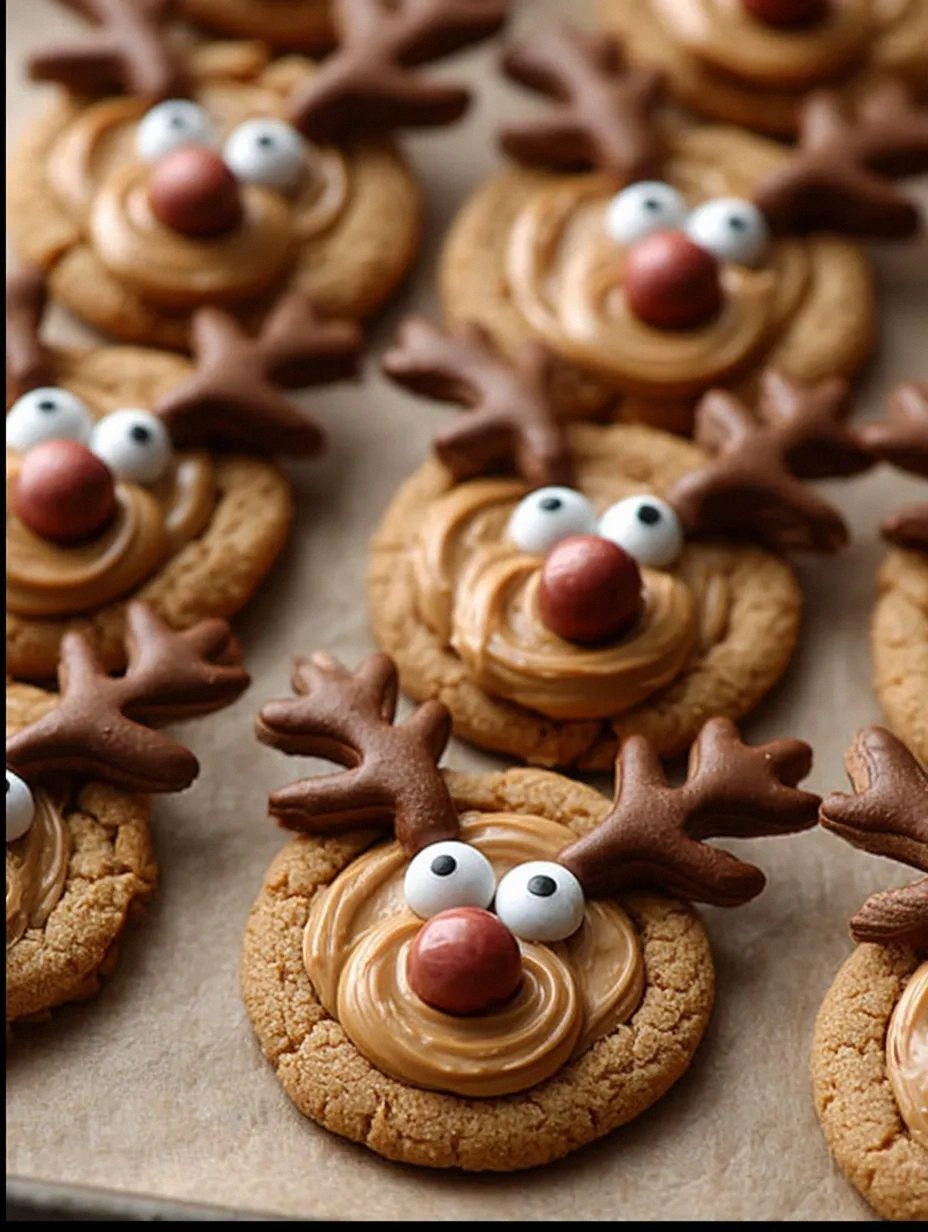
Picture this: I’m in the middle of a chaotic holiday prep, the oven’s humming like a nervous reindeer, and my roommate just announced she’s bringing over a store‑bought cookie platter. I stared at the glossy, perfectly shaped cookies and thought, “No way am I letting those win.” That moment sparked a dare that turned into the most indulgent, peanut‑buttery masterpiece you’ll ever taste. I grabbed my favorite peanut butter, a bag of chocolate chips, and a handful of red candy melts, and set out to create a cookie that not only tastes like a holiday hug but also looks like a tiny, adorable reindeer ready to prance across your plate.
The kitchen quickly transformed into a sensory playground. The buttery aroma mingled with the earthy scent of roasted peanuts, while the faint crackle of the candy melts hitting the pan added a rhythmic soundtrack. My fingertips felt the cool dough as I rolled it into balls, each one a promise of chewy softness and a crisp edge that would shatter like thin ice under a curious bite. The oven’s heat radiated a comforting warmth, and the faint hum of the refrigerator was the only thing reminding me that the world outside was still in full swing.
Now, why does this version stand out from every other cookie you’ve ever seen? Most recipes either drown the peanut butter in sugar or forget the festive flair that makes holiday baking memorable. This one balances the nutty richness with just enough sweetness, and the swirl of red candy melt creates a visual reindeer antler that’s as Instagram‑worthy as it is delicious. The secret? A pinch of sea salt that lifts the flavors, plus a quick chill that locks in moisture, giving you a cookie that stays soft for days yet still delivers that satisfying snap when you bite into the chocolate‑dotted edges.
I’m about to spill the beans on the technique that makes the swirl so flawless – you’ll need a tiny offset spatula and a bit of patience, but trust me, it’s worth it. And there’s a surprise ingredient that adds a buttery depth you won’t find in any store‑bought version. Ready to dive in? Let me walk you through every single step — by the end, you’ll wonder how you ever made it any other way.
What Makes This Version Stand Out
- Taste: The peanut butter’s natural earthiness is amplified by caramelized brown sugar, creating a flavor that feels both nostalgic and brand‑new.
- Texture: A chewy interior meets a crisp, caramelized edge, delivering a mouthfeel that’s simultaneously soft and satisfying.
- Simplicity: Only ten pantry staples are needed, and the technique requires no fancy equipment – just a spoon, a spatula, and a good playlist.
- Uniqueness: The red candy‑melt swirl mimics reindeer antlers, turning each cookie into a festive art piece without any icing pipe‑work.
- Crowd Reaction: I dare you to taste this and not go back for seconds; even the most skeptical cookie‑connoisseur ends up begging for the recipe.
- Ingredient Quality: Using creamy, natural‑oil peanut butter (no hydrogenated oils) makes the dough richer and the flavor more authentic.
- Cooking Method: A short chill before baking prevents spreading, ensuring each cookie keeps its perfect round shape and decorative swirl.
- Make‑Ahead Potential: These cookies freeze beautifully, so you can prep a batch in advance and pull them out whenever the holiday cravings hit.
Inside the Ingredient List
The Flavor Base
Peanut Butter (1 cup): This is the heart of the cookie. Its natural oils keep the dough moist and give that unmistakable nutty aroma. Skipping it for a generic “nut butter” will strip away the depth that makes these cookies unforgettable. If you’re allergic to peanuts, try almond butter, but expect a slightly sweeter profile.
Brown Sugar (½ cup): The molasses in brown sugar caramelizes during baking, creating those glossy edges that crackle like tiny fireworks. Using white sugar alone would produce a flatter, less complex flavor. For a deeper caramel note, swap half of it with dark brown sugar.
The Texture Crew
All‑Purpose Flour (2 cups): Provides structure. Too much flour and the cookies become cake‑like; too little and they spread into a greasy mess. I recommend sifting it with the baking soda to ensure an even rise.
Baking Soda (1 tsp): The leavening agent that gives the cookies a slight lift, preventing them from becoming dense. If you forget it, the texture will be heavy and the swirl won’t hold its shape.
Unsalted Butter (½ cup, softened): Adds richness and helps the dough hold together. Salted butter would over‑salt the batch, so keep it unsalted and add a pinch of sea salt later.
Egg (1 large): Binds everything together and adds a subtle silkiness. If you’re vegan, replace with a flax‑egg (1 tbsp ground flaxseed + 3 tbsp water) – the texture will be slightly different but still delicious.
The Unexpected Star
Red Candy Melts (½ cup, melted): This is the visual hero, creating the reindeer antler swirl. They melt quickly, so work in short bursts to avoid hardening. If you can’t find candy melts, melt white chocolate and stir in a few drops of natural red food coloring.
Chocolate Chips (1 cup): Tiny bursts of chocolate that melt into pockets of gooey goodness. Dark chocolate chips add a bitter contrast; milk chocolate chips keep it sweet and kid‑friendly.
The Final Flourish
Vanilla Extract (1 tsp): Enhances the peanut butter’s aroma, making the flavor profile feel more rounded. Real vanilla bean seeds would elevate it even further, but the extract does the trick.
Sea Salt (½ tsp): Just a pinch to awaken the sweet and nutty flavors, creating that “wow” moment on the palate. Too much will dominate, so measure carefully.
Pretzel Sticks (12 pieces): Optional but fun – they become the antlers when you dip them in the red candy melt. If you’re gluten‑free, use rice crackers shaped like sticks.
Everything's prepped? Good. Let's get into the real action...
The Method — Step by Step
Preheat your oven to 350°F (175°C) and line two baking sheets with parchment paper. While the oven warms, take a moment to inhale the buttery scent that will soon mingle with the peanuts – that’s your cue that you’re on the right track. I like to set a timer for 5 minutes; if you hear the oven’s fan start, you know it’s reached the perfect temperature.
In a large mixing bowl, whisk together the flour, baking soda, and sea salt. This dry blend ensures the leavening is evenly distributed, preventing any flat spots in the final cookies. Watch Out: Over‑mixing the flour with the wet ingredients later can develop gluten, making the cookies tough.
In a separate bowl, cream the softened butter, peanut butter, brown sugar, and white sugar until the mixture is light and fluffy – think cloud‑like, not grainy. This should take about 2‑3 minutes on medium speed. The key is to incorporate air, which gives the cookies a tender crumb.
Add the egg and vanilla extract to the butter‑peanut mixture, beating until fully combined. You’ll notice the batter become glossy and smooth.
Kitchen Hack: If the batter looks a bit too thick, add a splash of milk (about 1 tbsp) to loosen it without affecting the flavor.Gradually fold the dry flour mixture into the wet batter, stirring just until you see no streaks of flour. Over‑mixing here is a common pitfall – stop as soon as the dough comes together. The dough should be slightly sticky but manageable.
Gently fold in the chocolate chips, distributing them evenly. At this point, the dough will have a deep, peanut‑buttery hue speckled with chocolate. If you’re adding pretzel sticks, set them aside for now – they’ll be used later for the antlers.
Cover the bowl with plastic wrap and place it in the refrigerator for exactly 20 minutes. This short chill firms the dough just enough to hold its shape while still being pliable for the swirl. Power transition: Okay, ready for the game‑changer?
While the dough chills, melt the red candy melts in a microwave‑safe bowl in 20‑second bursts, stirring between each burst until smooth. Once melted, set aside to cool just a tad – it should be warm but not hot to the touch.
Remove the dough from the fridge. Using a tablespoon or small ice‑cream scoop, portion out dough balls (about 1.5 inches in diameter) and place them on the prepared baking sheets, spacing them 2 inches apart. This is the moment of truth: each ball should feel firm yet yield slightly under pressure.
Now for the swirl: Using an offset spatula, create a shallow well in the center of each dough ball. Spoon a small dollop (about ½ teaspoon) of the red candy melt into the well, then gently fold the dough over the melt, creating a marbled effect. The goal is a visible red streak that looks like a reindeer's antler – don’t over‑mix or the color will disappear.
If you’re using pretzel sticks, dip the tip of each stick into the remaining red melt and lay them across the top of the cookie, forming the antler shape. This visual cue turns a simple cookie into a holiday centerpiece.
Slide the trays into the oven and bake for 12‑14 minutes, or until the edges turn a light golden brown and the tops look set. You’ll notice a faint caramel scent and the chocolate chips will have melted just enough to peek through.
Remove the cookies and let them cool on the baking sheet for 3 minutes before transferring to a wire rack. This short rest allows the cookies to firm up without becoming too brittle. Watch Out: Moving them too early will cause them to break; too late and they’ll lose their soft interior.
That's it — you did it. But hold on, I've got a few more tricks that'll take this to another level...
Insider Tricks for Flawless Results
The Temperature Rule Nobody Follows
Most bakers recommend room‑temperature butter, but for these cookies, cold butter (just softened, not melted) gives a tighter crumb and prevents excessive spreading. I once tried using melted butter and ended up with flat, cakey discs. Keep the butter chilled until the moment you cream it – the contrast of cold butter meeting warm sugars creates that perfect texture.
Why Your Nose Knows Best
Instead of watching the timer obsessively, trust the aroma. When the cookies start to smell buttery with a hint of caramel, they’re almost ready. If you wait until the timer dings, you risk over‑browning the edges, turning the delicate swirl into a bitter crust.
The 5‑Minute Rest That Changes Everything
After baking, let the cookies rest on the sheet for exactly five minutes. This short pause lets steam redistribute, keeping the interior moist while the exterior firmens just enough for a satisfying snap. Skipping this step leaves you with a cookie that’s too soft to pick up without crumbling.
Chocolate Chip Placement Mastery
Don’t just dump the chips in; fold them in thirds. First, stir in a third, let the dough rest for two minutes, then add the second third, and finally the last. This staggered method prevents the chips from sinking to the bottom and ensures even distribution.
Antler Perfection Technique
When dipping pretzel sticks, hold them at a 45‑degree angle and rotate slowly. This creates a thin, even coating that looks like a polished antler rather than a clumpy mess. A friend once tried to dip the whole stick at once and ended up with a candy‑melt blob that fell off during baking.
Creative Twists and Variations
This recipe is a playground. Here are some of my favorite ways to switch things up:
Nutty Crunch Variation
Swap half the chocolate chips for toasted chopped peanuts. The extra crunch adds a surprising texture contrast, and the peanut‑to‑peanut flavor intensifies the overall nutty experience.
Holiday Spice Remix
Stir in ½ tsp ground cinnamon and a pinch of ground ginger into the dry ingredients. The warm spices complement the peanut butter, turning the cookies into a cozy winter treat.
White Chocolate & Cranberry
Replace the dark chocolate chips with white chocolate and fold in dried cranberries. The tartness of the cranberries balances the sweetness, and the white chocolate gives a milder melt.
Gluten‑Free Adaptation
Use a 1:1 gluten‑free flour blend in place of all‑purpose flour. Add a tablespoon of xanthan gum to mimic the elasticity of gluten, and you’ll get the same chewy interior without the gluten.
Vegan Friendly
Swap the butter for coconut oil and the egg for a flax‑egg. Use dairy‑free dark chocolate chips, and you’ve got a vegan version that still boasts that iconic swirl and antler look.
Double‑Red Celebration
For an extra festive punch, drizzle a thin line of raspberry jam over the finished cookies before the candy melt hardens. The jam adds a tangy burst that cuts through the richness.
Storing and Bringing It Back to Life
Fridge Storage
Place cookies in an airtight container lined with a parchment sheet. Store them in the refrigerator for up to one week. The cool environment preserves the soft interior while keeping the antler swirl intact.
Freezer Friendly
Layer cookies between sheets of parchment and seal them in a zip‑top freezer bag. They’ll freeze beautifully for up to three months. When you’re ready, thaw at room temperature for 30 minutes, then re‑heat briefly.
Best Reheating Method
Preheat your oven to 300°F (150°C) and bake the cookies for 5‑7 minutes. Add a tiny splash of water (about 1 tsp) to the baking sheet before heating – the steam revives the chewy center without drying out the edges.