There was a moment last summer when I stared at a half‑empty bowl of strawberries, feeling the unstoppable urge to turn them into something that would make even the most stoic dessert skeptic swoon. I tossed a handful of oats in, grabbed a stick of butter, and before I knew it I was shouting, “I’m daring you to eat just one bar and not come back for seconds!” The kitchen filled with the buttery aroma of toasted grain, the sweet perfume of fresh fruit, and the faint crackle of sugar caramelizing in the pan. I was in full‑blown dessert‑making overdrive, and the results were nothing short of a culinary epiphany.
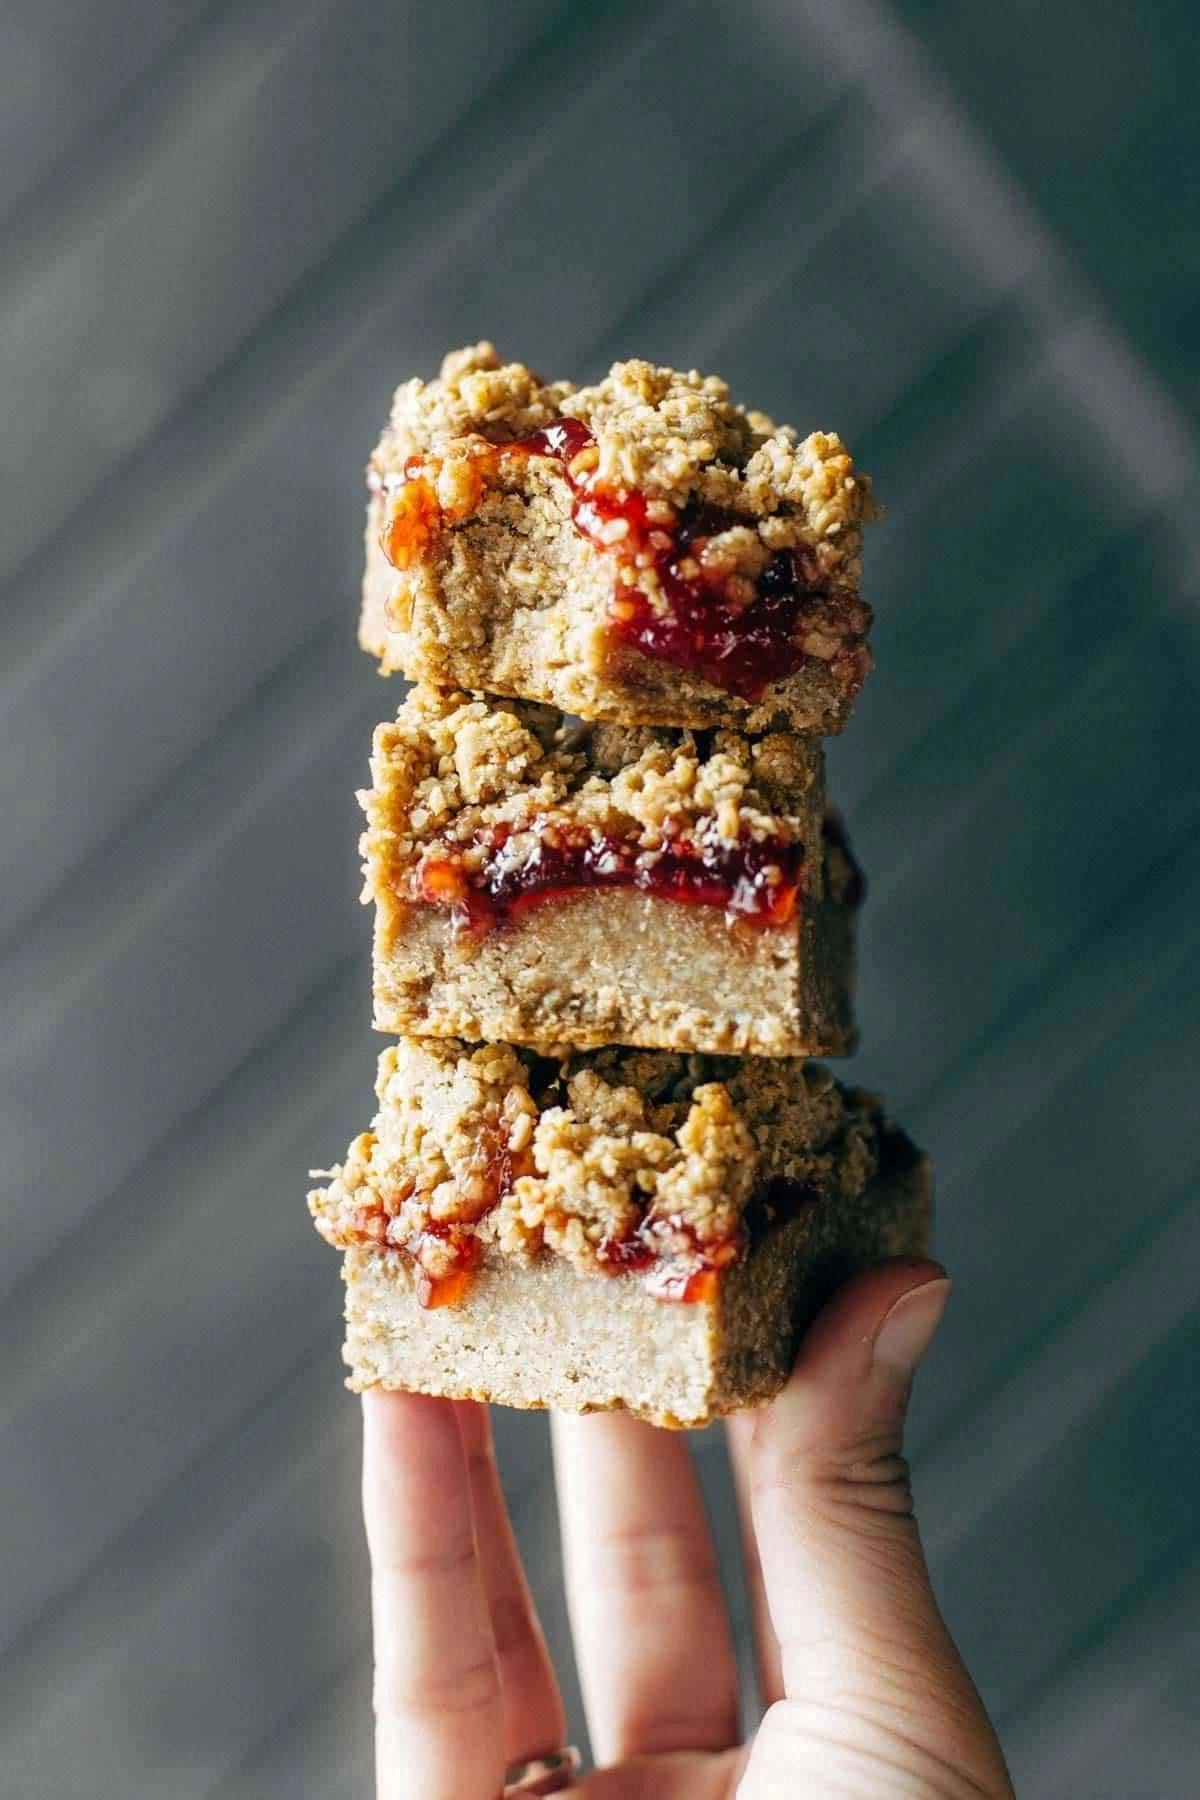
Picture this: you open the oven, and a golden‑brown crust gives way to a luscious, ruby‑red strawberry layer that’s as juicy as a summer picnic and as vibrant as a sunrise over a field of wheat. The texture? Imagine the delicate crunch of a perfectly baked crumble paired with the soft, melt‑in‑your‑mouth bite of a bar that holds together without crumbling into oblivion. The taste? A harmonious marriage of tart strawberry tang, sweet honey‑kissed oats, and a whisper of vanilla that lingers like a fond memory.
Most recipes get this completely wrong. They either drown the strawberries in a sugary swamp or make the topping so hard that it feels like chewing on a cardboard box. This version? It’s the Goldilocks of crumble bars—just the right balance of sweet, tart, and buttery, and the method is so straightforward that even a kitchen novice can nail it on the first try. I’ll be honest—I ate half the batch before anyone else got a chance, and that’s a confession I’m willing to make because it proves just how addictive these bars are.
And now the fun part: I’m about to reveal a secret ingredient that most people overlook—a splash of lemon zest that brightens the entire flavor profile like a spotlight on stage. Okay, ready for the game‑changer? Let me walk you through every single step — by the end, you’ll wonder how you ever made it any other way.
What Makes This Version Stand Out
- Flavor Fusion: The tartness of fresh strawberries is perfectly offset by the sweet, nutty oat base, creating a symphony of flavors that dance on the palate.
- Texture Triumph: A crunchy, buttery crumble sits atop a soft, juicy strawberry center, delivering that satisfying bite‑and‑chew contrast you crave.
- Ingredient Simplicity: No exotic pantry items here—just pantry staples and fresh fruit, making it accessible for anyone, anytime.
- Unexpected Brightness: A tiny dash of lemon zest cuts through the sweetness, adding a zing that keeps the taste from feeling heavy.
- Crowd‑Pleaser: Whether it’s a brunch buffet, a school bake sale, or a midnight snack, these bars earn rave reviews and empty plates.
- Make‑Ahead Magic: The bars keep their texture and flavor for up to three days in the fridge, so you can prep ahead for busy weeks.
- Versatile Base: Swap strawberries for blueberries or raspberries, or add a handful of chocolate chips for an extra indulgent twist.
- Nutrition Balance: While indulgent, the oats provide fiber, and the modest sugar content keeps the bars from being overly sweet.
Alright, let's break down exactly what goes into this masterpiece...
Inside the Ingredient List
The Flavor Base
Fresh strawberries are the heart of this bar. Their natural acidity balances the sweet oat crumble, and their vibrant color makes each bite look as good as it tastes. If you skip the strawberries, you’ll lose the juicy core that differentiates these bars from a plain oat cookie. A good swap is frozen berries—just thaw and pat dry to avoid excess moisture.
The Texture Crew
Rolled oats lend chewiness, while all‑purpose flour gives structure. Butter is the star of the crumble, providing that melt‑in‑your‑mouth richness; using unsalted butter lets you control the salt level precisely. Brown sugar adds a deep caramel note, whereas a touch of white sugar helps the crust brown evenly. Missing any of these will make the bar either too dense or too crumbly.
The Unexpected Star
Lemon zest may seem minor, but its citrus oils brighten the entire flavor profile, preventing the bar from feeling cloyingly sweet. A pinch of sea salt amplifies the sweetness and brings out the fruit’s natural flavors. If you’re allergic to citrus, a splash of orange extract can mimic the brightness.
The Final Flourish
Vanilla extract rounds out the flavors, adding a warm, aromatic backdrop that ties everything together. A drizzle of honey in the topping imparts a subtle floral sweetness and helps the crumble achieve a glossy finish. Should you desire a nutty twist, fold in a quarter cup of toasted sliced almonds for added crunch.
Everything's prepped? Good. Let's get into the real action...
The Method — Step by Step
Preheat your oven to 350°F (175°C) and line a 9‑by‑13‑inch baking pan with parchment paper, letting the edges hang over for easy removal. As the oven heats, you'll hear the faint hum of the fan—a comforting reminder that you're about to create something spectacular. While the oven warms, wash the strawberries, remove the stems, and slice them into quarter‑inch pieces; set aside in a bowl to release their juices.
In a large mixing bowl, whisk together 2 cups of all‑purpose flour, 1.5 cups rolled oats, ½ cup brown sugar, ¼ cup granulated sugar, ½ tsp salt, and 1 tsp ground cinnamon. This dry blend is the foundation of your crumble, and the moment you stir it together you'll notice a faint sweet aroma rising—a prelude to the flavor explosion to come.
Now, for the butter. Cut 1 cup (2 sticks) of cold, unsalted butter into ½‑inch cubes. Okay, ready for the game‑changer? Toss the butter into the dry mixture and, using a pastry cutter or your fingertips, rub it in until the mixture resembles coarse crumbs with a few pea‑sized butter bits.
Kitchen Hack: If you’re short on time, pulse the butter and dry ingredients in a food processor for 5‑7 seconds—just enough to create crumbs without turning it into paste.Transfer half of the crumb mixture onto the prepared pan and press it down firmly with the back of a spoon or a flat measuring cup, creating an even base layer. The pressure should be enough that the crumbs stick together, but not so hard that they become a solid slab. This base acts like a buttery blanket that will soak up strawberry juices later.
In a separate bowl, combine the sliced strawberries with 2 tbsp honey, 1 tsp vanilla extract, 1 tsp lemon zest, and a pinch of sea salt. Toss gently until the fruit is well coated. The honey adds a floral sheen, while the lemon zest pops bright, turning the mixture into a glossy, ruby‑red carpet.
Spread the strawberry mixture evenly over the pressed oat base, smoothing the top with a spatula. You’ll notice the fruit settling into the crumb, releasing a fragrant steam that smells like a fresh‑picked farmer’s market on a warm day.
Take the remaining crumb mixture and crumble it over the strawberry layer in an uneven, rustic fashion. Watch out: if you press the top too firmly, the strawberry juices won’t seep through, resulting in a dry bar. The goal is a patchwork of golden nuggets that will toast to perfection.
Slide the pan into the oven and bake for 30‑35 minutes, or until the top is lightly browned and the strawberry juices are bubbling around the edges. Mid‑bake, rotate the pan 180 degrees to ensure even browning—this tiny move makes a world of difference.
When the timer dings, remove the pan and let the bars cool in the pan for 10 minutes, then lift them using the parchment overhang and transfer to a wire rack. The cooling period allows the crumb to set, making slicing clean and tidy. This next part? Pure magic. Use a sharp knife, wiped clean between cuts, to achieve perfect squares.
That's it — you did it. But hold on, I've got a few more tricks that'll take this to another level...
Insider Tricks for Flawless Results
The Temperature Rule Nobody Follows
Always start with a cold oven! Turn the temperature down to 325°F for the first 10 minutes, then bump it up to 350°F. This gentle start prevents the bottom from scorching while allowing the crumb to set gradually. I once tried rushing the heat and ended up with a burnt base—trust me, that’s a lesson learned the hard way.
Why Your Nose Knows Best
When the crumble turns a deep amber and you catch a nutty, toasted scent, that's your cue that the bars are nearly done. The aroma is a reliable indicator, often more accurate than the timer. If you trust your nose, you’ll avoid over‑cooking and keep that perfect buttery crunch.
The 5‑Minute Rest That Changes Everything
Allow the bars to rest on a wire rack for at least five minutes after removing them from the pan. This short pause lets the sugars settle and the crumb firm up, making each slice hold together without crumbling into a mess. Skipping this step is the quickest way to create a splatter‑fest on your plate.
Butter Matters More Than You Think
Use real, high‑fat butter—not margarine or reduced‑fat versions. The higher fat content yields a richer, more tender crumble that literally melts in your mouth. I once substituted with a butter blend and the result was flat and greasy—lesson: never compromise on butter for this recipe.
Even Spread, Even Love
When spreading the strawberry layer, use the back of a spoon to gently press the fruit into the base without smashing it. The goal is an even blanket that lets each bite deliver fruit and crumble in perfect harmony. Over‑pressing forces the juice out, leading to soggy spots—nothing kills the texture faster.
Creative Twists and Variations
This recipe is a playground. Here are some of my favorite ways to switch things up:
Chocolate‑Stirred Delight
Fold ¼ cup of mini chocolate chips into the crumb before baking. As the bars bake, the chips melt into pockets of gooey chocolate that contrast beautifully with the tart strawberry. Chocolate lovers will swear this is the ultimate combo.
Nutty Crunch Explosion
Replace half the rolled oats with toasted almond slivers or chopped walnuts. The nuts add an extra layer of crunch and a subtle earthiness that deepens the flavor profile, making the bars feel more sophisticated.
Berry Medley Madness
Swap the strawberries for an equal mix of blueberries, raspberries, and blackberries. The varied colors create a visual feast, and each berry brings its own acidity level, turning the bars into a tangy‑sweet symphony.
Coconut‑Lime Breeze
Add ¼ cup shredded coconut to the crumble and a tsp of lime zest to the strawberry mix. The coconut gives a subtle tropical note while the lime zest lifts the overall brightness—perfect for summer evenings.
Spiced Autumn Version
Introduce a pinch of ground nutmeg and swap lemon zest for orange zest. The warm spices pair nicely with the oats, making this variation ideal for crisp fall days when you crave comfort with a twist.
Protein‑Packed Power Bar
Stir in ¼ cup of vanilla whey protein powder into the dry ingredients and increase the oat portion by ¼ cup. You’ll end up with a bar that fuels post‑workout cravings without sacrificing the indulgent flavor.
Storing and Bringing It Back to Life
Fridge Storage
Transfer the cooled bars to an airtight container and store in the refrigerator for up to three days. The chill keeps the crumb firm and prevents the strawberry layer from becoming soggy. If you notice slight firmness, let them sit at room temperature for 10 minutes before serving.
Freezer Friendly
Wrap each bar individually in plastic wrap, then place them in a freezer‑safe zip‑lock bag. They’ll keep for up to two months. To defrost, pop a bar into the microwave for 20‑30 seconds or let it thaw on the counter for 15 minutes.
Best Reheating Method
When you want that fresh‑out‑of‑the‑oven warmth, preheat your oven to 300°F (150°C) and warm the bars for 5‑7 minutes. Add a tiny splash of water—just a teaspoon—on the top before reheating; the steam revives the crumb’s crispness without drying out the fruit.