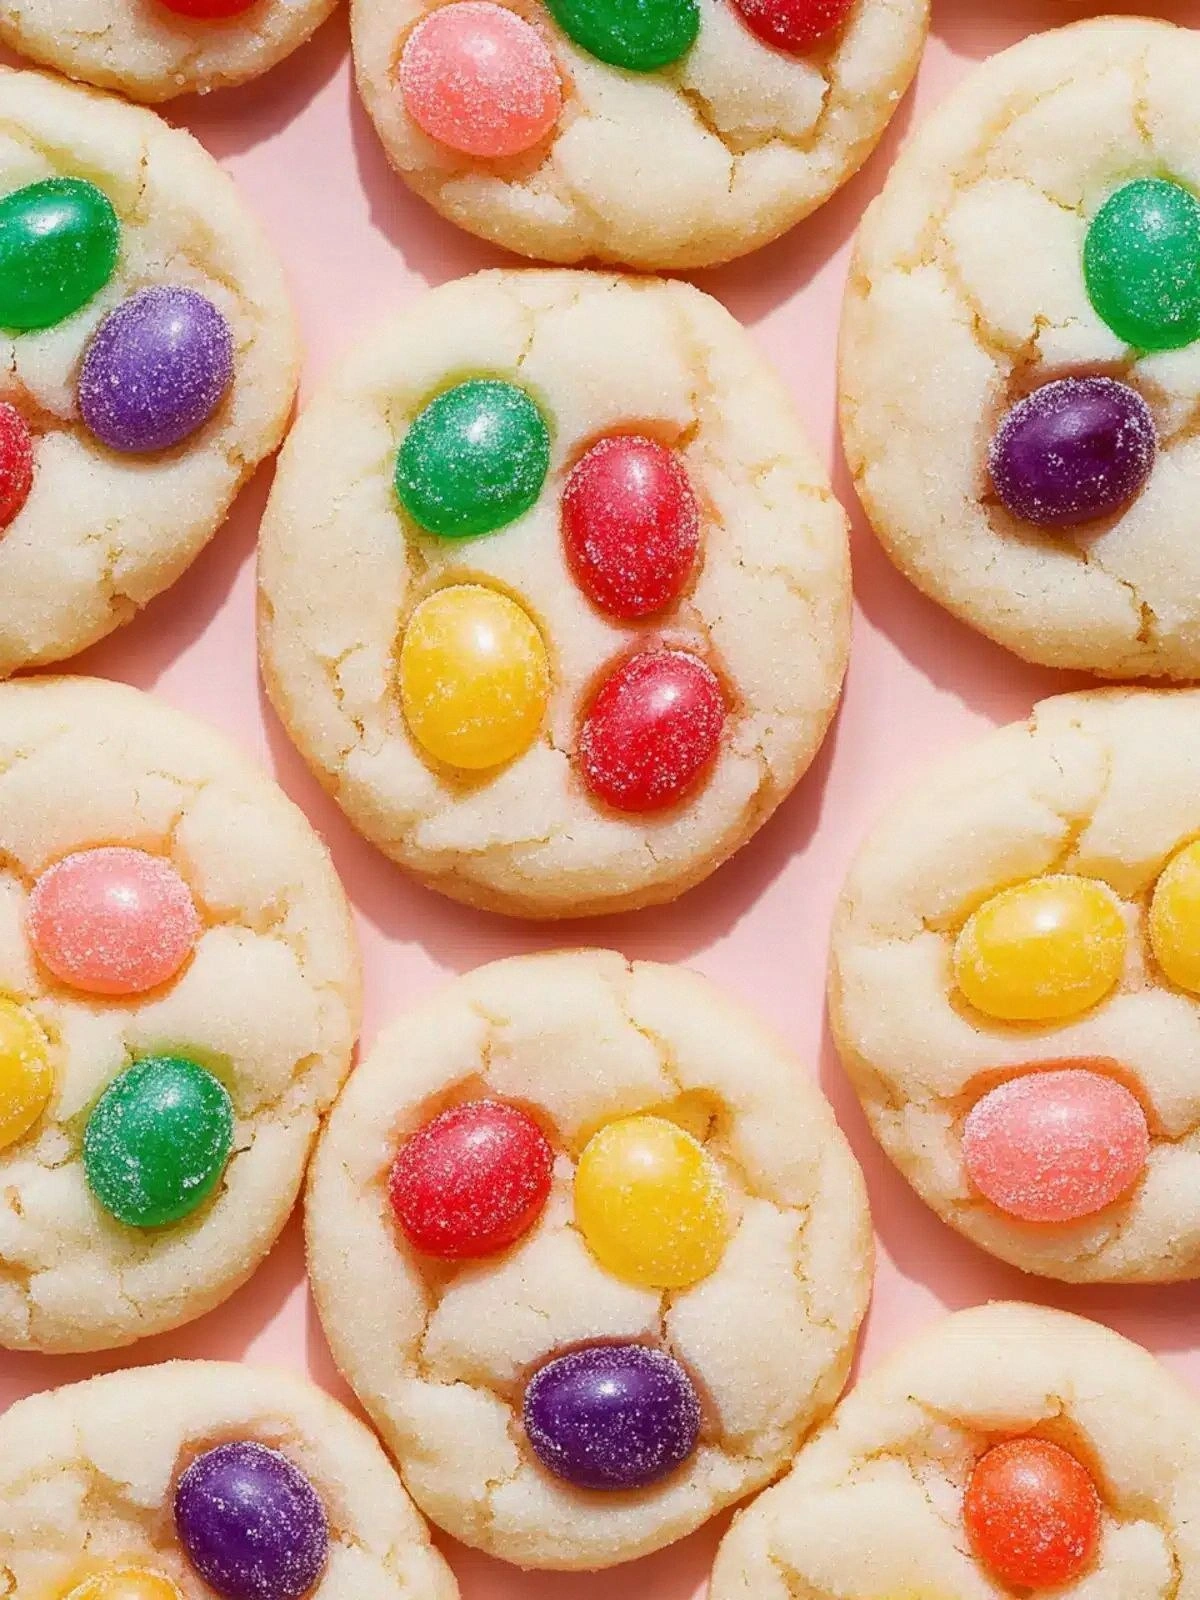
Jelly Bean Sugar Cookies That
The moment I knocked over a bowl of flour and watched it splash across the counter like a white confetti storm, I was convinced that my baking life was over. That chaotic mess turned into a spark of inspiration when my sister offered me a bag of jelly beans, claiming they were “the secret to turning any cookie into a party.” I laughed, scooped the beans into a bowl, and decided that if a kitchen disaster could lead to a sweet breakthrough, I’d follow it to the end. I grabbed my apron, set my timer, and began to experiment with dough, butter, and sugar, feeling the anticipation building like a drumbeat in my chest. The air filled with the buttery scent of melted butter and the sweet promise of sugar, and I could already taste the first bite in my mind.
Picture the moment when the dough first rises, a soft, golden dome that feels like a miniature cloud. The sound is almost audible—a faint pop as the air pockets expand, a subtle hiss of steam. The aroma is a warm hug of vanilla and almond, with the faintest hint of candy coating that hints at the surprise to come. The texture is silky, almost silk‑smooth, and when you press it with your fingers, it yields with a satisfying give. The visual is a pale ivory that glints under the kitchen light, promising a crunch that will crack like thin ice when bitten.
I was determined to create a cookie that would not only taste divine but also look like a candy‑laden treasure chest. My version is a rebellion against the bland, over‑baked cookies that plague most baking books. I dared to combine the crunch of jelly beans with the soft, buttery crumb of a classic sugar cookie, and the result is a confection that feels like a carnival in your mouth. The secret? A delicate balance of almond and vanilla extracts that lift the dough, a precise baking temperature that crisps the edges without drying them, and a generous handful of jelly beans that burst with color and flavor. I promise you, this is hands down the best version you'll ever make at home.
I dare you to taste this and not go back for seconds. If you've ever struggled with achieving the perfect balance of crunch and softness in sugar cookies, you're not alone—and I've got the fix. Most recipes get this completely wrong, leaving you with cookies that are either too hard or too doughy. Picture yourself pulling this out of the oven, the whole kitchen smelling incredible, and watching the first cookie bite into a delightful crunch that shatters like thin ice. Let me walk you through every single step—by the end, you'll wonder how you ever made it any other way.
What Makes This Version Stand Out
- Taste: The combination of vanilla and almond extracts gives the dough an aromatic depth that elevates every bite, while the jelly beans add a pop of sweet surprise that lingers on the tongue.
- Texture: The cookies boast a crisp exterior that snaps under the first bite, revealing a tender, almost melt‑in‑your‑mouth interior that feels like a buttery cloud.
- Ingredient Quality: Using unsalted butter and high‑quality all‑purpose flour ensures a rich flavor profile and a smooth dough that’s easy to work with.
- Visual Appeal: Each cookie is a canvas of bright colors from the jelly beans, turning a simple treat into a festive centerpiece.
- Make‑Ahead Potential: These cookies store well for up to a week in an airtight container, and the jelly beans stay crisp, making them perfect for parties and gift boxes.
- Ease of Preparation: The recipe requires no specialized equipment, and the dough can be rolled or flattened with a simple rolling pin, making it accessible for bakers of all skill levels.
Alright, let's break down exactly what goes into this masterpiece...
Inside the Ingredient List
The Flavor Base
The all‑purpose flour forms the backbone of the cookie, providing structure and a neutral canvas for the flavors to shine. At 1.5 cups, it gives the dough enough heft to hold the jelly beans without becoming dense. Skipping the flour would leave you with a sticky mess that never rises. For a gluten‑free version, swap the flour with a 1:1 blend of gluten‑free flour and a binding agent like xanthan gum.
Baking powder, measured at one teaspoon, is the secret to lift. It reacts with the butter and sugar to create tiny bubbles that expand as the cookie bakes, giving the cookies their airy interior. If you omit it, the cookies will be flat and heavy, lacking that desirable lift. A quick alternative is to use a pinch of baking soda with an acidic ingredient like lemon zest, but the flavor profile will shift slightly.
A half teaspoon of salt is essential to balance the sweetness and enhance the overall flavor. It cuts through the richness of the butter and the sugary crunch of the jelly beans, creating a harmonious taste. Too little salt and the cookies will taste cloyingly sweet; too much, and they’ll be harsh. Use fine sea salt for a subtle crunch and better dissolution.
The Texture Crew
Unsalted butter, at half a cup, is the fat that gives the cookie its tender crumb. Butter must be at room temperature for the dough to incorporate smoothly, allowing the sugar to dissolve evenly. If you use salted butter, adjust the salt accordingly to avoid an overly salty cookie. For a richer flavor, try using a combination of butter and a splash of coconut oil.
Granulated sugar, one cup, is the sweetener that caramelizes on the surface, forming a golden crust. It also helps to keep the dough from spreading too much during baking. If you prefer a slightly darker, more caramelized cookie, replace half the granulated sugar with brown sugar. However, the texture will become a bit chewier.
The Unexpected Star
A single large egg binds everything together, adding moisture and structure. The egg also helps the dough hold its shape as the jelly beans settle into the center. If you’re vegan, you can substitute a flaxseed egg or a commercial egg replacer to achieve similar results. Be careful not to overmix the dough after adding the egg; this can toughen the cookie.
Almond extract, at half a teaspoon, introduces a nutty aroma that complements the vanilla. Its subtle complexity lifts the overall flavor profile, making the cookies feel more sophisticated. If you don’t have almond extract, a pinch of almond powder can be used, but the aroma will be less pronounced. Avoid using too much, as the flavor can become overpowering.
The Final Flourish
Pure vanilla extract, also half a teaspoon, is the sweet, floral counterpoint to the almond. Vanilla is essential for a classic sugar cookie flavor, providing depth and warmth. If you prefer a stronger vanilla note, double the amount, but be mindful that it can dominate the delicate balance of flavors. For a twist, try a flavored vanilla like bourbon or rum for a subtle adult edge.
The star of the show, a bag of jelly beans, adds crunch, color, and a burst of candy flavor that turns each cookie into a miniature party. The beans are evenly distributed throughout the dough, ensuring that every bite contains a surprise. If you’re looking for a seasonal twist, use jelly beans in holiday colors like red, green, or blue. Keep the beans in a sealed bag until ready to bake to preserve their crunch.
Everything's prepped? Good. Let's get into the real action...
The Method — Step by Step
- Preheat your oven to 350°F (175°C) and line two baking sheets with parchment paper. The parchment prevents sticking and ensures even heat distribution. Let the sheets sit on the middle rack, allowing the cookies to bake evenly. While the oven warms, gather all your ingredients to keep the process smooth and efficient. The aroma of butter begins to mingle with the sweet anticipation.
- In a large mixing bowl, combine the all‑purpose flour, baking powder, and salt. Sift the dry ingredients to aerate them and eliminate any clumps. This ensures a light, even dough. Whisk the mixture briefly to distribute the leavening agent uniformly. The dry blend feels light, like a cloud of powder.
- Cream the unsalted butter and granulated sugar together in a separate bowl until the mixture is pale and fluffy. Use an electric mixer on medium speed for 3–4 minutes; the mixture should resemble whipped cream. The creaming process incorporates air, which helps the cookies rise. Feel the butter soften and the sugar dissolve into the butter’s silky texture.
- Add the egg, almond extract, and vanilla extract to the creamed mixture, beating until fully incorporated. The egg will bind the wet and dry ingredients together, creating a cohesive dough. The extracts infuse the batter with aromatic depth. Keep beating until the mixture is smooth and glossy.
- Gradually fold the dry ingredients into the wet mixture, mixing just until the dough comes together. Overmixing can cause the cookies to become tough, so stop as soon as the flour is incorporated. The dough should feel soft and slightly sticky, but not wet.
- Gently fold in the jelly beans, ensuring they are evenly distributed throughout the dough. The beans should be nestled within the dough, not sitting on top. This step is crucial for a balanced candy experience in every bite. The dough now looks speckled with bright colors.
- Using a cookie scoop or tablespoon, drop dough onto the prepared baking sheets, spacing each cookie about 2 inches apart. The cookies will spread slightly, so give them enough room. Flatten each cookie gently with the back of a spoon to create a uniform thickness. The dough should feel pliable, not sticky.
- Bake for 12–15 minutes, or until the edges turn golden brown and the centers are set but still soft. The cookies should emit a warm, buttery aroma that invites you to taste immediately. Keep an eye on the color; the first sign of browning is a cue to pull them out. Allow the cookies to cool on the sheet for 5 minutes before transferring them to a wire rack.
- Let the cookies cool completely before serving; this allows the jelly beans to firm up slightly, enhancing the crunch. The cookies will still be warm, but the interior will have set. Taste one now and feel the contrast between the buttery crumb and the candy burst. This is the moment of truth—you’re about to experience a flavor explosion.
- Store the cooled cookies in an airtight container at room temperature for up to a week. The parchment paper keeps the cookies from sticking together. If you want to extend freshness, add a slice of bread to the container; the bread absorbs excess moisture. Keep the container away from direct sunlight to preserve the jelly beans’ color.
- For a quick snack, reheat the cookies in a 300°F (150°C) oven for 5 minutes to restore crispness. If you’re serving them at a party, arrange them on a platter and sprinkle a dusting of powdered sugar for an extra touch of elegance. The cookies will look as good as they taste, turning your table into a sweet showcase.
- Enjoy the cookies with a glass of cold milk or a cup of hot tea. The contrast of hot and cold enhances the flavor profile, making each bite a sensory delight. If you’re feeling adventurous, pair them with a splash of espresso or a drizzle of caramel for a decadent twist. Remember, the joy of these cookies is in the moment you share them with loved ones.
That's it — you did it. But hold on, I've got a few more tricks that'll take this to another level...
Insider Tricks for Flawless Results
The Temperature Rule Nobody Follows
Most bakers bake at 375°F, but lowering the temperature to 350°F keeps the cookies from spreading too quickly. The cooler oven allows the butter to melt slowly, creating a tender crumb while still crisping the edges. I once baked at 375°F and the cookies came out flat and chewy; the next batch at 350°F was a revelation. Keep the oven rack in the middle to ensure even heat distribution, and preheat for at least 20 minutes.
Why Your Nose Knows Best
The aroma of baked cookies is a reliable indicator of doneness. When the smell turns nutty and slightly caramelized, the cookies are ready to come out. I always trust my nose more than the timer because the scent changes subtly with each minute. If the scent is still sweet and buttery, give them a few more minutes. This technique saves you from overbaking.
The 5-Minute Rest That Changes Everything
After baking, let the cookies rest on the sheet for 5 minutes before transferring them to a wire rack. This brief pause allows the interior to set, preventing the cookies from breaking apart. The edges will firm up slightly, making them easier to handle. I’ve seen people pull them off the sheet too early and they crumble like paper.
Perfecting the Crunch
If you want extra crunch, sprinkle a pinch of sea salt on top of the dough before baking. The salt enhances the caramelization of the sugar and adds a subtle savory contrast. The trick works best when you use flaky sea salt, which dissolves slowly, giving you a crunch with every bite. Try it next time and notice the difference.
Using Fresh Jelly Beans
Fresh jelly beans hold their crunch better than stale ones. Store them in an airtight container and use them within a month of opening. If you notice any soft spots, replace those beans before baking. Fresh beans provide a bright, crisp burst that keeps the cookies lively.
Creative Twists and Variations
This recipe is a playground. Here are some of my favorite ways to switch things up:
Chocolate‑Covered Jelly Bean Cookies
After baking, dip half of the cookies in melted dark chocolate and let them set. The chocolate adds a rich, bittersweet layer that pairs beautifully with the sweet jelly beans. For an extra touch, sprinkle crushed nuts on top before the chocolate hardens. The result is a cookie that looks like a candy bar and tastes like a dessert.
Holiday‑Seasoned Jelly Bean Cookies
Swap the standard jelly beans for holiday‑colored ones—red, green, and gold. Add a pinch of ground cinnamon or nutmeg to the dough for a warm, seasonal aroma. After baking, dust the cookies with powdered sugar to mimic snow. These cookies are perfect for Christmas parties or New Year’s celebrations.
Nutty Crunch Variation
Add a handful of chopped almonds or walnuts to the dough for an extra crunch. The nuts pair nicely with the almond extract, creating a harmonious flavor. Toast the nuts lightly before adding to bring out their natural oils. This variation gives the cookie a more complex texture profile.
Low‑Sugar Version
Reduce the granulated sugar to ¾ cup and replace the remaining ¼ cup with a sugar substitute that caramelizes, such as erythritol. The cookies will still develop a golden crust, but with a lower calorie count. Keep an eye on the baking time; the cookies may brown faster due to the sugar substitute’s different melting point.
Vegan Jelly Bean Cookies
Replace the butter with equal parts coconut oil and use a flaxseed egg (1 tablespoon ground flaxseed mixed with 3 tablespoons water) in place of the egg. Use plant‑based vanilla and almond extracts. The texture will be slightly denser but still delightful. The jelly beans provide the necessary crunch and color.
Ginger‑Spiced Variation
Add ½ teaspoon of ground ginger and a pinch of cayenne pepper to the dough for a subtle heat. The ginger complements the vanilla, creating a warm, spicy undertone. The cayenne adds a surprise kick that pairs well with the sweet jelly beans. This version is great for autumn gatherings.
Storing and Bringing It Back to Life
Fridge Storage
Place the cooled cookies in an airtight container with a single layer of parchment paper between layers. Store them in the refrigerator for up to a week. The cold environment prevents the jelly beans from becoming too soft, preserving the crunch. When ready to eat, let them sit at room temperature for 10 minutes before serving.
Freezer Friendly
Pack the cookies in a freezer‑safe bag, removing as much air as possible. Freeze for up to 3 months. When you want a fresh batch, pop them directly into a preheated 300°F oven for 5 minutes. The cookies will reheat evenly, and the jelly beans will retain their crispness. This method is ideal for holiday gift baskets.
Best Reheating Method
The key to reheating is a low temperature and a short time. Preheat the oven to 300°F, place the cookies on a parchment‑lined sheet, and bake for 5 minutes. If you want extra crispness, add a splash of water to the bottom of the pan to create steam. The steam keeps the cookies from drying out while re‑crisping the edges.