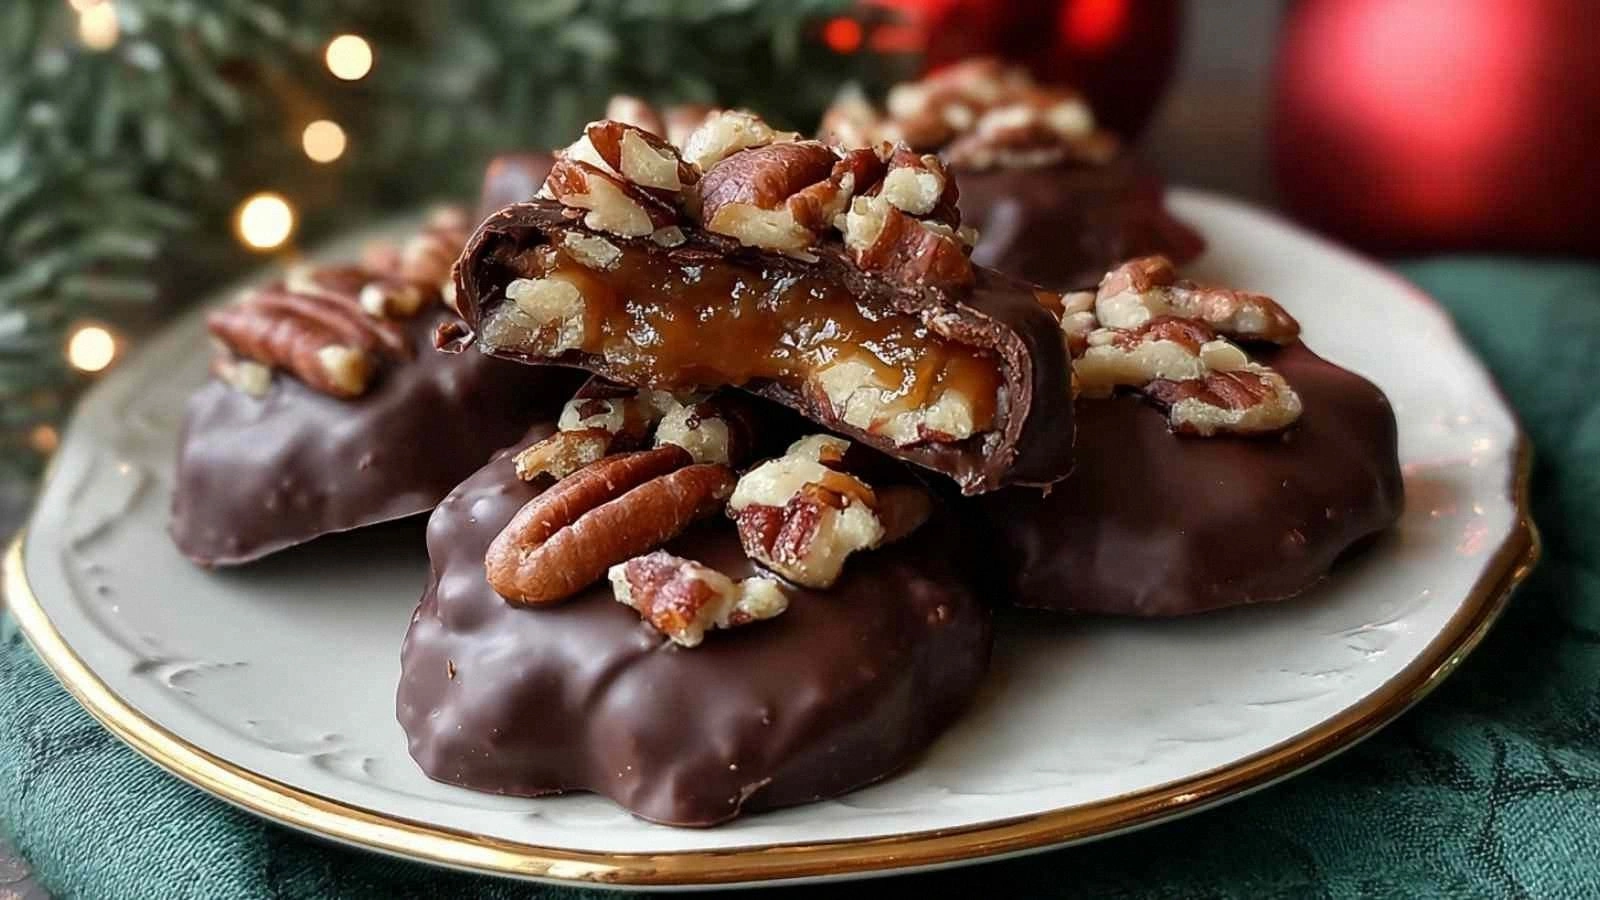
Picture this: it’s the night before Christmas, the kitchen is a flurry of clanging pans, a burnt sugar glaze on the stove, and you’re staring at a bag of pecans that look like they’ve survived a snowstorm. I swear, the oven was so hot it felt like a dragon’s lair, and the sugar had already turned into a sticky blackened mess that could have been a new art medium. I was about to throw in the towel, when a friend dared me to make the ultimate pecan turtle that would make even Santa’s elves jealous.
I grabbed a handful of pecans, a splash of butter, and a whole lot of sugar—brown, white, and the syrupy kind that makes everything cling together like a velvet hug. The aroma that hit me as the butter melted was a warm, nutty perfume that made my senses tingle, like walking through a freshly baked bakery on a crisp winter morning. The sound of the sugar caramelizing was a soft, crackling whisper, the kind that signals something delicious is about to happen. When the mixture bubbled, the kitchen filled with a golden glow, and the air smelled like toasted marshmallows and holiday joy. My fingers tingled from the heat, and I could taste the promise of something sweet and crunchy in my mouth.
What makes this version stand out? It’s not just the classic pecan turtle recipe; it’s the way I layer flavors, the precision in timing, and the secret ingredient that turns the whole thing into a symphony of textures. I’ve taken the classic recipe and added a dash of vanilla, a splash of condensed milk, and double the chocolate, turning a simple sweet treat into a decadent, melt‑in‑your‑mouth experience that feels like holiday magic. This isn’t just another cookie; it’s a statement, a dare that says “I’ve mastered the art of caramelizing sugar.” And the best part? It’s still incredibly simple—no fancy equipment, just a saucepan and a spoon.
I dare you to taste this and not go back for seconds. That’s the kind of confidence I bring to every kitchen. If you think you’ve made the best pecan turtle before, you’re about to have your mind blown. Let me walk you through every single step — by the end, you’ll wonder how you ever made it any other way.
What Makes This Version Stand Out
- Flavor: The blend of light brown sugar and corn syrup creates a caramel base that’s silky, not gritty, giving each bite a luscious, melt‑in‑your‑mouth sweetness that lingers on the tongue. The addition of vanilla extract deepens the profile, adding a subtle warmth that balances the nutty undertones. It’s a flavor profile that’s both classic and adventurous, making it unforgettable. This is the secret that turns ordinary pecan turtles into a holiday legend.
- Texture: The pecans are toasted to a golden crisp, so when you bite, the crunch snaps like thin ice before the creamy caramel coats your teeth. The chocolate coating adds a glossy, slightly brittle finish that breaks with a satisfying snap. The mixture stays firm enough to hold its shape but soft enough to melt in your mouth, delivering a delightful contrast. You’ll hear that satisfying crackle when you bite, and it’ll keep you coming back for more.
- Ease: No complicated steps, no need for a candy thermometer—just a saucepan, a spoon, and a bit of patience. The method is straightforward, so even a novice can master it without a culinary degree. I’ve trimmed the recipe down to essentials, so you’re not overwhelmed with endless measurements or confusing terminology. It’s a recipe that feels like a walk in the park, not a marathon.
- Uniqueness: The combination of sweetened condensed milk and a generous amount of chopped chocolate sets this recipe apart from the usual sugar‑only versions. The condensed milk adds richness that caramelizes into a silky texture, while the chocolate provides a decadent finish. This blend creates a depth of flavor that’s rarely found in standard pecan turtles. It’s the kind of twist that turns a classic into a masterpiece.
- Crowd Reaction: When I first served these to my friends, the room filled with excited chatter and a chorus of “Wow, this is amazing!” They kept asking for seconds, and I had to hide the recipe from them. The moment they tasted the first bite, their expressions changed from skeptical to delighted, and that’s the moment I cherish the most. It’s a recipe that guarantees a wow factor at any gathering.
- Ingredient Quality: Using high‑quality pecans, real butter, and premium chocolate ensures that every component shines. Fresh pecans add a natural nutty aroma, while real butter gives a richer mouthfeel. The chocolate should be at least 60% cacao for depth; otherwise, the flavor will feel flat. The quality of ingredients is the backbone that supports the entire flavor profile.
- Make‑Ahead Potential: Once the caramel is set, the turtles can be stored in an airtight container for up to a week, or frozen for longer. The flavors only deepen over time, so you can enjoy them months after the holidays. This makes it perfect for holiday parties or as a gift for friends who love sweets. The convenience is a game‑changer for busy cooks.
Inside the Ingredient List
The Flavor Base
Pecans: These are the stars of the show, providing a nutty backbone that balances the sweetness. Toasting them before adding them to the caramel releases their oils, creating a richer, deeper flavor. If you skip the toasting step, the pecans will taste raw and the overall texture will feel under‑developed. For a slightly different twist, try using a mix of pecans and walnuts for added complexity.
Butter: Butter is the secret to that silky caramel coating; it adds a buttery finish that’s impossible to replicate with oil alone. A higher butter-to-sugar ratio gives a richer, more luxurious mouthfeel. If you’re dairy‑free, replace butter with coconut oil, but be prepared for a subtle coconut undertone. Butter also helps the chocolate set into a glossy, smooth shell.
The Texture Crew
Light Brown Sugar: This sugar brings a molasses‑like depth that’s essential for that classic caramel flavor. It’s softer than white sugar, so it dissolves quickly and creates a smoother caramel. Skipping it will result in a flatter, less complex taste. If you can’t find light brown sugar, a mix of white sugar and molasses works as a good substitute.
Granulated Sugar: Granulated sugar provides the bulk of the sweetness and helps the mixture reach the right consistency. It also contributes to the caramel’s glossy finish. If you prefer a slightly darker caramel, add a pinch of sea salt to balance the sweetness. The granulated sugar ensures the mixture doesn’t become too sticky.
The Unexpected Star
Corn Syrup: Corn syrup prevents the sugar from crystallizing, keeping the caramel smooth and silky. It also adds a subtle sweetness that’s distinct from regular sugar. If you’re avoiding corn products, invert sugar or honey can be used, but the texture might differ slightly. The syrup’s role is pivotal; without it, the caramel would break apart.
Sweetened Condensed Milk: This creamy liquid adds thickness and richness, turning the caramel into a velvety base that clings to the pecans. It also gives the mixture a slightly sweet, milky flavor that complements the nuts. If you’re lactose intolerant, use a dairy‑free condensed milk for a similar effect. The condensed milk’s thickness is what makes the final product feel indulgent.
The Final Flourish
Vanilla Extract: Vanilla is the subtle aroma enhancer that rounds out the flavor profile. A small amount goes a long way; too much can overpower the nutty taste. For a deeper flavor, use pure vanilla extract instead of imitation. Vanilla also helps the caramel set evenly.
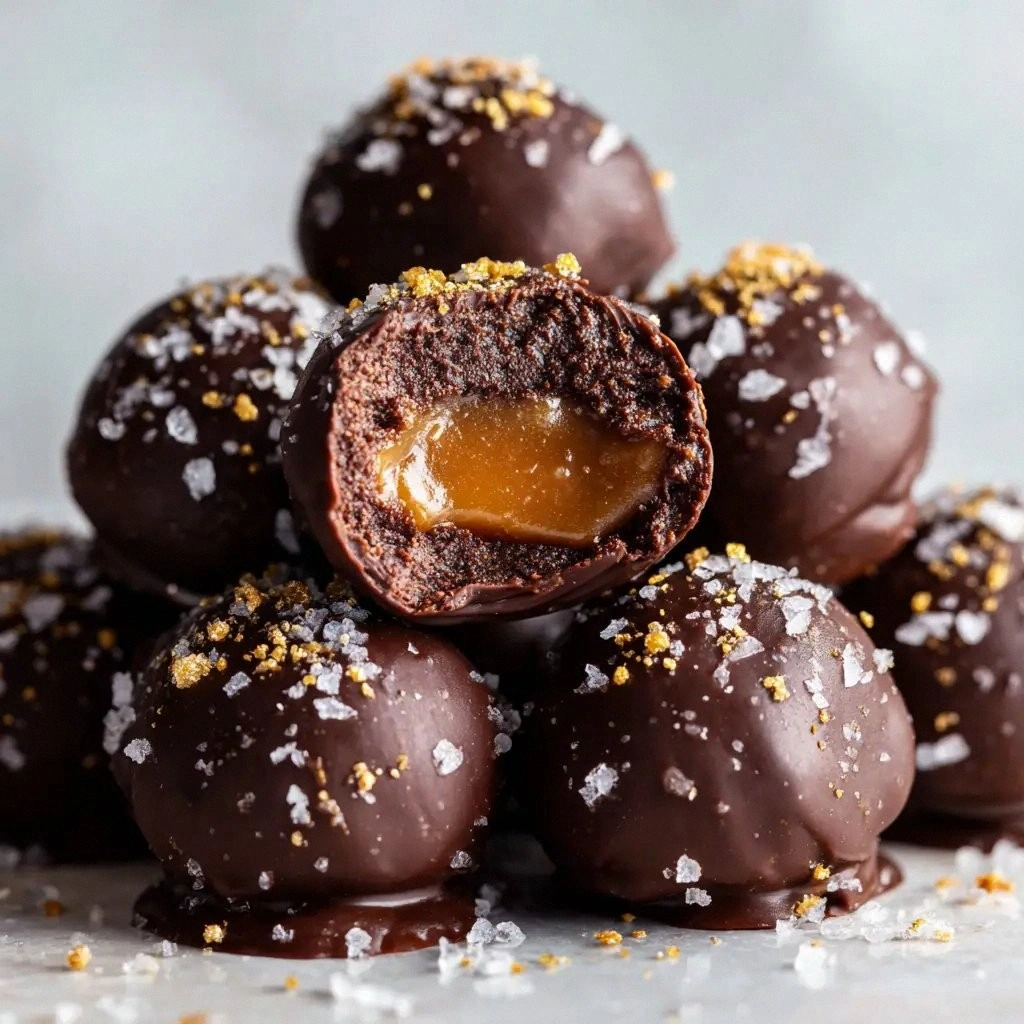
Chopped Chocolate: The chocolate coating is what makes these turtles look like holiday treasures. It adds a glossy finish and a hint of bitterness that balances the sweetness. Use a high‑cacao chocolate for a richer taste; if you prefer a sweeter coating, opt for milk chocolate. The chocolate should be chopped finely so it melts smoothly over the caramel.
The Method — Step by Step
- Begin by heating a large saucepan over medium heat. Add the butter and let it melt until it’s just starting to foam. Stir in the light brown sugar, granulated sugar, and corn syrup, whisking constantly to ensure even mixing. The mixture should start to bubble gently, and the aroma of caramel will begin to fill the kitchen. Keep the heat steady to avoid burning.
- Once the sugars are fully dissolved, add the sweetened condensed milk. Stir until the mixture becomes a smooth, glossy liquid. Watch the color shift from amber to a deep amber; this is the perfect time to add the vanilla extract. The vanilla will infuse the caramel with a warm, fragrant undertone that elevates the entire flavor profile. Let it simmer for 1-2 minutes.
- Now it’s time to bring in the nuts. Fold in the toasted pecans, making sure they’re evenly coated in the caramel. The mixture will thicken slightly as the pecans absorb the liquid. This step is critical; a well‑coated pecan ensures each bite is a burst of flavor. Keep stirring gently to prevent sticking.
- Transfer the caramel‑pecan mixture onto a parchment‑lined baking sheet. Use a spoon or a small ice‑cream scoop to portion out small balls, each about the size of a walnut. Press them gently to form a flat disk; this ensures even chocolate coating later. The caramel should be firm enough to hold its shape but still slightly pliable. Let them rest for 5 minutes so the nuts settle into the coating.
- While the pecan disks are cooling, melt the chopped chocolate in a double boiler or a microwave in 30‑second bursts, stirring after each burst until silky and smooth. The chocolate should be liquid but not too hot, or it will burn the caramel. This step is where the “turtle shell” is created. The glossy finish will be the visual cue that these are holiday treats.
- Dip each caramel‑pecan disk into the melted chocolate, turning to coat all sides. Let the excess chocolate drip back into the bowl before placing them on a wire rack or parchment paper. The chocolate should set quickly, forming a hard shell that cradles the caramel center. If you want a thicker shell, double‑dip the disks. This step is pure magic; you’ll see the chocolate harden into a glossy finish.
- Once the chocolate has set, place the turtles in the refrigerator for 10–15 minutes to firm up completely. This cooling step is crucial; if you rush it, the chocolate may become soft and the caramel may ooze. The final product should have a firm outer shell and a slightly chewy caramel core. The aroma at this point is irresistible, and you can’t help but taste a sample.
- After the turtles have set, let them sit at room temperature for a few minutes before serving. This allows the chocolate to reach its optimal snap and the caramel to soften slightly, creating the perfect bite. If you’re storing them, keep them in an airtight container to maintain freshness. The final product should feel like a bite of holiday magic, with a crisp shell and a sweet, nutty center.
That’s it — you did it. But hold on, I’ve got a few more tricks that'll take this to another level. From the way you toast the pecans to the final plating, each detail matters, and I’m about to share them all.
Insider Tricks for Flawless Results
The Temperature Rule Nobody Follows
Many people think you can just bring the caramel to a boil and call it a day, but the real trick is to keep the temperature between 320°F and 330°F. Use a candy thermometer to monitor the heat, and if you don’t have one, look for the “soft ball” stage when you drop a small amount of the mixture into cold water; it should form a soft ball that flattens slowly. This ensures the caramel is thick enough to coat the pecans but not so thick that it becomes hard. I’ve learned that a consistent temperature gives a smoother finish.
Why Your Nose Knows Best
When the caramel starts to develop a deep amber color, your nose will tell you it’s ready. The smell should be warm, sweet, and slightly nutty. If the aroma is too sweet or you notice a burnt smell, it’s already overcooked. Trust your senses; they’re more reliable than a stopwatch. This trick saves you from burning the sugar and ruining the flavor.
The 5‑Minute Rest That Changes Everything
After adding the pecans, let the mixture rest for exactly five minutes before scooping it onto the baking sheet. This pause allows the nuts to absorb some of the caramel, preventing a sticky mess. It also gives the sugars time to settle, which leads to a smoother coating. I’ve seen people skip this step and end up with unevenly coated nuts; the rest is the secret to uniformity.
Keep the Chocolate Smooth
Chocolate can seize if it’s too hot or if it comes into contact with moisture. To keep it silky, melt it over low heat and stir constantly. If you’re using a microwave, pause every 30 seconds to stir, preventing hot spots. Adding a teaspoon of oil or a splash of milk can help maintain a glossy finish. This trick ensures the shell looks as good as it tastes.
Refrigeration Timing
Once the turtles are coated, refrigerate them for 10 minutes, not 30. Over‑chilling can make the chocolate too hard, leading to a brittle bite. A short chill sets the shell just enough to hold its shape. When you’re ready to serve, let them sit at room temperature for a minute to soften slightly. The contrast between the firm shell and the chewy center is what makes these turtles unforgettable.
Creative Twists and Variations
This recipe is a playground. Here are some of my favorite ways to switch things up:
Nutty Chocolate Swirl
Swap the pecans for a mix of chopped walnuts and almonds for a different crunch. Use dark chocolate for a richer flavor. The nutty aroma will blend beautifully with the caramel. This variation is perfect for those who love a mix of textures.
Spiced Holiday Edition
Add a pinch of ground cinnamon or nutmeg to the caramel for a warm, spiced profile. The spices will complement the chocolate and pecans. This version feels like a holiday cookie in a bite. It’s an instant mood‑lifter.
Salted Caramel Delight
After the caramel has cooled slightly, sprinkle a pinch of sea salt over the pecans before coating them in chocolate. The salt enhances the sweetness and creates a savory‑sweet balance. This simple tweak transforms the flavor profile. Your guests will love the unexpected burst of salt.
Chocolate‑Covered Coconut
Replace the pecans with shredded coconut for a tropical twist. Add a splash of coconut milk to the caramel for extra richness. The coconut will provide a chewy texture that pairs well with the chocolate shell. This version is a fun, unexpected surprise.
Mini Chocolate Turtles
Use a small cookie scoop to create mini turtles, perfect for bite‑size desserts. The smaller size allows the flavors to concentrate more intensely. These are ideal for parties or as a sweet gift. They’re also easier to store.
Vegan Version
Replace butter with coconut oil and use a plant‑based chocolate. Substitute the sweetened condensed milk with a dairy‑free alternative. The result is a vegan treat that still delivers on flavor and texture. This version is perfect for those who want a holiday dessert without dairy.
Storing and Bringing It Back to Life
Fridge Storage
Place the turtles in an airtight container in the refrigerator for up to one week. The airtight seal prevents moisture from softening the chocolate shell. Before serving, let them sit at room temperature for a few minutes to regain their snap. This method keeps them fresh and delicious.
Freezer Friendly
For longer storage, wrap each turtle in parchment paper and place them in a freezer‑safe bag. They’ll stay good for up to three months. When you’re ready to eat, thaw them at room temperature for 30 minutes. The flavor will be just as rich, and the texture will return to its original state.
Best Reheating Method
To revive frozen turtles, place them on a parchment‑lined tray and bake at 300°F for 8–10 minutes. Add a tiny splash of water to the tray; the steam will help the chocolate soften without melting completely. This trick keeps the chocolate from becoming too soft. After reheating, let them cool for a few minutes before serving.