Picture this: it’s a rainy Sunday afternoon, the kind of day that makes you want to stay in your pajamas and binge-watch a show, but your kitchen is a mess of banana peels, sugar, and cinnamon dust. I was about to toss a banana into the trash when my friend, a self‑proclaimed snack connoisseur, challenged me to turn that single fruit into the crunchiest, most addictive treat ever. I laughed, grabbed a knife, and sliced the banana into thin ribbons. The sizzling sound that followed was a promise of something extraordinary, and the aroma of cinnamon and caramelized sugar instantly flooded the room. That moment was the spark that turned a casual experiment into a culinary obsession. Now I’m here, ready to spill every secret that makes these cinnamon banana chips the ultimate snack.
The first bite is a revelation: a sweet, slightly tart burst of banana that settles into a buttery, caramel‑like texture, followed by a subtle heat from the cinnamon that lingers on the palate. The crunch is not just a simple snap; it’s a complex interplay of crisp edges that crackle like thin ice and a soft center that melts in your mouth like a caramel ribbon. The aroma is a warm, comforting hug that makes you want to close your eyes and savor the moment. The feel of the chips, slightly dry yet still moist, gives a satisfying heft that keeps you reaching for more. The sound of the first crack as you bite into it is almost musical, a perfect accompaniment to the sweet, spicy flavor profile. It’s the kind of snack that transforms an ordinary afternoon into a memorable experience.
What makes this version stand out is not just the flavor but the method that preserves the banana’s natural sweetness while creating a crisp, snack‑worthy texture. I discovered that the secret lies in a delicate balance between drying the banana slices just enough to achieve crunch without burning, and coating them with a thin, even layer of cinnamon sugar that caramelizes into a glossy finish. The technique I’ll share uses a simple kitchen tool—a silicone baking mat—that keeps the chips from sticking and ensures even heat distribution. I dare you to taste this and not go back for seconds; the addictive quality of these chips is hard‑to‑refuse. Most recipes get this completely wrong by over‑baking or under‑seasoning, but this method delivers a consistent, mouth‑watering result every single time. Picture yourself pulling this out of the oven, the whole kitchen smelling incredible, and then sharing the first bite with friends who will beg for the recipe.
I’ll walk you through every single step, from selecting the perfect bananas to the final crisp. By the end, you’ll wonder how you ever made banana chips any other way. The process is simple enough for a beginner but sophisticated enough to impress even the most discerning foodie. So let’s dive in, and remember: if you’ve ever struggled with making banana chips that are too soggy or too burnt, you’re not alone—and I’ve got the fix. Now, grab a knife and let’s get slicing.
What Makes This Version Stand Out
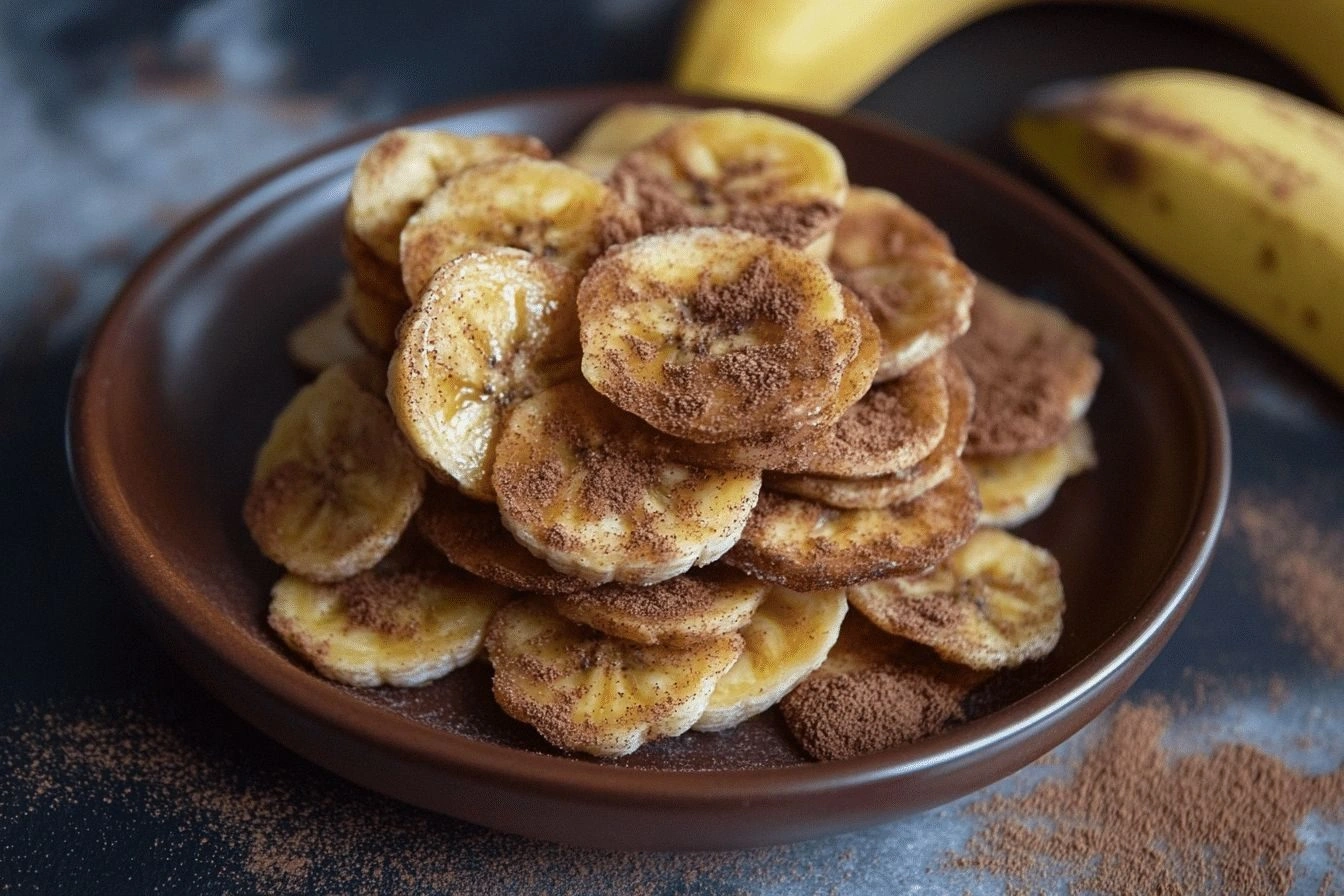
- Taste: The combination of ripe banana, sweet brown sugar, and warm cinnamon creates a flavor profile that is both comforting and exhilarating. The natural sweetness of the banana is amplified by the caramelization of the sugar, while the cinnamon adds a subtle heat that lingers on the tongue. The result is a snack that feels like dessert but is light enough to eat on the go.
- Texture: The chips achieve a perfect balance between crisp and slightly chewy. The thinness of the slices ensures a quick, dry crisp, while the slight moisture left inside keeps them from becoming brittle. This dual texture is what makes each bite a delightful experience.
- Simplicity: With only a handful of ingredients and a single oven, the recipe is approachable for anyone. No special equipment or advanced techniques are required—just patience and attention to detail.
- Uniqueness: The use of coconut oil in the coating adds a subtle tropical note that sets these chips apart from the usual butter or oil‑based versions. The oil also helps the sugar glaze set into a crisp, shiny coat.
- Crowd Reaction: These chips are a guaranteed crowd‑pleaser. Whether you’re hosting a brunch or packing a snack for the office, they’re always a hit.
- Ingredient Quality: The recipe relies on fresh, ripe bananas and high‑quality brown sugar, ensuring the best possible flavor and texture. Using organic or locally sourced bananas adds an extra layer of authenticity.
- Cooking Method: Baking at a low temperature with a silicone mat ensures even drying and prevents sticking, which is the key to achieving that perfect crunch.
- Make‑Ahead Potential: These chips can be stored in an airtight container for up to a week, making them ideal for meal prep or a quick snack on busy days.
Alright, let’s break down exactly what goes into this masterpiece. And now, for the first kitchen hack that will save you time and effort.
Inside the Ingredient List
The Flavor Base
The foundation of these chips is the banana itself. I recommend using ripe bananas because their natural sugars caramelize beautifully when baked. The bananas provide the sweet, fruity backbone that balances the heat of the cinnamon. If you skip the banana, you lose the core flavor that makes the chips irresistible. When choosing bananas, look for a slightly brownish skin—this indicates optimal ripeness and maximum sweetness.
The Texture Crew
Coconut oil is the secret weapon that keeps the sugar glaze from sticking and gives the chips a subtle, tropical aroma. The oil also helps the sugar melt into a glossy coat that crisps up perfectly. Brown sugar is the sweetener of choice because it adds depth and a hint of molasses flavor that enhances the banana’s natural sweetness. The sugar caramelizes during baking, creating a golden, crunchy exterior that is both sweet and slightly salty. Without the oil and brown sugar, the chips would be dry and lack the desirable caramelized finish.
The Unexpected Star
A dash of lemon juice is a game‑changer. The acidity brightens the banana’s sweetness and prevents oxidation, keeping the chips a vibrant color. Lemon juice also helps the sugar adhere to the banana slices, creating an even coating that caramelizes uniformly. If you’re allergic to citrus, you can substitute a splash of apple cider vinegar, but the flavor profile will shift slightly. This small addition elevates the overall taste experience and keeps the chips from becoming too sweet.
The Final Flourish
Ground cinnamon is the star seasoning that brings warmth and depth. It’s the spice that gives the chips their signature aroma and a subtle heat that lingers on the palate. A pinch of salt balances the sweetness and enhances the flavor of the cinnamon. Vanilla extract adds a subtle complexity, though it’s optional. Together, these final touches create a harmonious blend that makes every bite memorable. If you prefer a spicier kick, consider adding a pinch of cayenne pepper, but keep the amount small to avoid overwhelming the banana.
Everything’s prepped? Good. Let’s get into the real action.
The Method — Step by Step
- Preheat your oven to 250°F (120°C) and line a large baking sheet with a silicone baking mat. This low temperature is critical to drying the banana slices evenly without burning. The mat prevents sticking and ensures a crisp finish. The oven should be fully preheated before you start, as a sudden temperature drop can affect the drying time. This step sets the foundation for a perfect batch of chips.
- Slice the ripe bananas into thin ribbons, about 1/8 inch thick, using a mandoline slicer for uniformity. Uniform thickness guarantees even baking and consistent crunch. If you don’t have a mandoline, a sharp knife will do, but take your time to maintain even slices. The thinner the slices, the crisper they will be. This step is where you’re setting the stage for the texture you’ll love.
- In a small bowl, combine the coconut oil, brown sugar, ground cinnamon, lemon juice, and a pinch of salt. Whisk until the mixture is smooth and the sugar is fully incorporated. The oil binds the sugar and cinnamon, creating a glossy coating that caramelizes. The lemon juice prevents the banana from browning and adds a bright note. This mixture is the flavor powerhouse that will coat every slice.
- Dip each banana ribbon into the coating mixture, ensuring each slice is fully coated. Use a slotted spoon to lift the slices and let excess drip off before placing them on the mat. The coating should be thin—too thick will result in a sugary crust. Arrange the slices in a single layer on the baking mat, leaving a small gap between each one for airflow. This step is crucial for achieving that perfect crunch.
- Bake the coated banana slices for 30–35 minutes, flipping them halfway through. Keep an eye on the edges; they should start to pull away from the mat when they’re ready. The low heat allows the sugar to caramelize without burning, while the banana dries out slowly. If you notice any browning, lower the temperature slightly. This is the moment of truth—watch the transformation.
- Remove the chips from the oven and let them cool on the mat for 10 minutes. They will continue to crisp as they cool. The cooling period is essential; rushing this step can cause the chips to be soggy. Once they’re cool, transfer them to an airtight container to keep them fresh. This step ensures that the crunch stays intact for days.
- Serve immediately or store in a sealed container for up to a week. The chips can be reheated in a 300°F (150°C) oven for 5 minutes to restore crispness. The reheating process is quick and restores the texture without overcooking. If you’re making them ahead of time, keep them in a dry, cool place to avoid moisture. This final step ensures your chips stay crisp and delicious.
That’s it—you did it. But hold on, I’ve got a few more tricks that will take this to another level. These insider tips will help you perfect the process and avoid common pitfalls.
Insider Tricks for Flawless Results
The Temperature Rule Nobody Follows
Many people think a higher temperature will make the chips crisper faster, but that’s a myth. Baking at 250°F (120°C) allows the banana to dry slowly, ensuring the sugar caramelizes without burning. A lower temperature also prevents the oil from separating from the sugar, which can cause uneven coating. I’ve tested this at 300°F (150°C), and the chips came out soggy and uneven. Stick to the low heat for the best texture.
Why Your Nose Knows Best
The aroma is a reliable indicator of progress. When the sugar starts to caramelize, you’ll smell a warm, sweet scent that’s almost intoxicating. If you don’t notice this scent, the chips are likely undercooked and will be chewy. Conversely, if you smell a burnt aroma, the chips are overcooked. Trust your nose; it’s the best judge of doneness.
The 5-Minute Rest That Changes Everything
After baking, let the chips rest on the mat for at least five minutes before moving them. This rest period allows the sugar glaze to set and the chips to firm up. Skipping this step can result in chips that crumble when you try to move them. A quick 5‑minute rest is the difference between a crisp snack and a soggy mess.
Keep the Airflow Going
Make sure the banana slices are not touching each other on the baking sheet. Airflow around each slice is essential for even drying. If the slices overlap, they’ll steam instead of crisp, leading to uneven texture. Arrange them in a single layer with small gaps. This small tweak can make a huge difference in the final product.
Store in an Airtight Container
To keep your chips crisp for days, store them in a sealed container with a vented lid. Moisture is the enemy of crispness, so an airtight environment is key. If you notice the chips becoming soft, add a small paper towel to absorb excess moisture. This trick keeps your chips fresh and crunchy.
Creative Twists and Variations
This recipe is a playground. Here are some of my favorite ways to switch things up:
Chocolate‑Coated Banana Chips
Dip the finished chips in melted dark chocolate for a decadent treat. Let the chocolate set on parchment paper. The chocolate adds a rich, bitter contrast to the sweet banana, creating a layered flavor experience. This variation is perfect for dessert lovers.
Spicy Cinnamon Banana Chips
Add a pinch of cayenne pepper to the coating mixture for a subtle kick. The heat pairs wonderfully with the sweetness of the banana and the warmth of the cinnamon. This spicy twist is ideal for those who like a bit of heat in their snacks.
Nutty Banana Chips
Sprinkle chopped toasted almonds or walnuts over the chips before baking. The nuts add crunch and a nutty flavor that complements the banana. This version is great for adding protein to your snack.
Vanilla‑Infused Banana Chips
Add a teaspoon of vanilla extract to the coating mixture for a subtle floral note. The vanilla enhances the sweetness of the banana and gives the chips an aromatic finish. This variation is perfect for those who love a hint of vanilla in their desserts.
Maple‑Syrup Banana Chips
Replace the brown sugar with pure maple syrup for a richer, deeper sweetness. The syrup caramelizes to a golden crust, giving the chips a slightly sticky texture that’s still crisp. This variation is ideal for maple lovers.
Herbal Banana Chips
Add a pinch of dried rosemary or thyme to the coating for a savory twist. The herbs provide an unexpected depth of flavor that pairs surprisingly well with the sweetness of banana. This version is a conversation starter at any gathering.
Storing and Bringing It Back to Life
Fridge Storage
Store the chips in an airtight container at room temperature for up to a week. Avoid the refrigerator, as the moisture can cause the chips to lose their crispness. If you notice the chips becoming soft, place a small paper towel in the container to absorb moisture. This method keeps the chips fresh and ready to eat.
Freezer Friendly
For longer storage, place the chips in a freezer‑safe bag or container. They can be frozen for up to three months. When you’re ready to eat, let them thaw at room temperature for 15 minutes. The chips will retain their crispness if stored properly.
Best Reheating Method
To revive stale chips, preheat your oven to 300°F (150°C). Spread the chips in a single layer on a baking sheet and bake for 5 minutes. If the chips feel dry, add a tiny splash of water before reheating; it will steam them back to perfection. This quick method restores the crunch without overbaking.