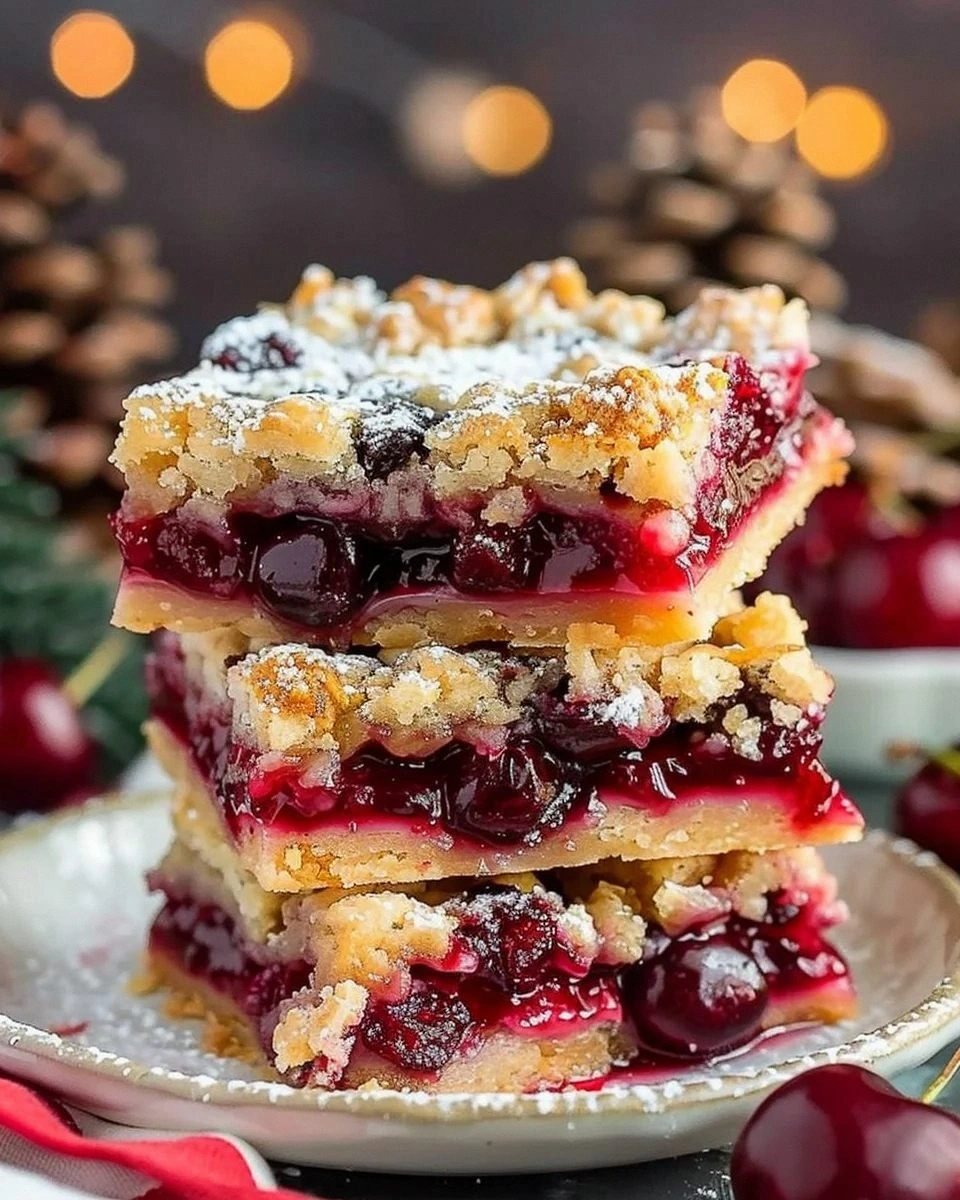
I’ll be honest — I ate half the batch before anyone else got a chance to try them, and that’s because these Christmas Cherry Bars are the kind of dessert that turns a simple kitchen into a festive wonderland. The moment I cracked open a jar of cherry pie filling and smelled that sweet‑tart perfume, I knew I was onto something that would outshine every store‑bought version. Picture yourself pulling a pan of golden‑brown bars out of the oven, the buttery crust giving way to a molten cherry center that glistens like tiny rubies under the kitchen lights. That sizzle when the batter hits the hot pan? Absolute perfection.
The backstory? A frantic holiday party, a burnt batch of store‑bought brownies, and a dare from my roommate: “If you can make something better than these, I’ll bring the eggnog.” I accepted, and after a night of trial, error, and a few tears (mostly from the onions I was chopping for a side dish), the final version emerged — a bar that balances buttery richness, just‑right sweetness, and a burst of cherry that makes your taste buds sing carols. Most recipes get the crust too dry or the cherry filling too watery; this one nails the texture like a seasoned pastry chef who’s been through a dozen holiday marathons.
What sets this version apart is a secret technique: a brief butter‑oil emulsification that gives the crust a melt‑in‑your‑mouth crumb while keeping it sturdy enough to hold the generous cherry topping. I also add a whisper of vanilla that dances with the cherries, creating a flavor duet that feels both nostalgic and fresh. And here’s the kicker — I use a simple 15‑minute chill before baking, which locks in moisture and prevents the bars from becoming soggy. I dare you to taste this and not go back for seconds; the combination is that addictive.
Okay, ready for the game‑changer? Let me walk you through every single step — by the end, you’ll wonder how you ever made it any other way. Stay with me here — this is worth it.
What Makes This Version Stand Out
- Taste: The buttery crust paired with a sweet‑tart cherry center creates a flavor contrast that’s like a holiday fireworks show on your palate.
- Texture: A crisp, golden edge gives way to a soft, melt‑in‑your‑mouth interior, delivering that perfect bite‑size crunch and chew.
- Simplicity: Only seven core ingredients, all pantry‑friendly, mean you won’t need a specialty store run on Christmas Eve.
- Uniqueness: The brief butter‑oil emulsification step is a pro‑chef trick that most home cooks overlook, giving the crust an unrivaled tenderness.
- Crowd Reaction: Expect the “wow” factor — guests will line up for seconds, and you’ll become the unofficial holiday dessert hero.
- Ingredient Quality: Real butter and a high‑quality cherry pie filling make a world of difference; no artificial flavors here.
- Cooking Method: The cool‑down before baking ensures the bars stay moist, a step many recipes skip, leading to dry results.
- Make‑Ahead Potential: These bars keep beautifully for up to three days, making them perfect for busy holiday schedules.
Alright, let's break down exactly what goes into this masterpiece...
Inside the Ingredient List
The Flavor Base
Butter is the foundation of any good bar, delivering a rich, creamy texture that you can practically hear crackle as it melts. Using softened, unsalted butter ensures you get that deep, buttery flavor without any unwanted saltiness. If you’re in a pinch, margarine can work, but nothing beats real butter for flavor — the difference is like night versus day when you bite into the crust. For the best results, choose a butter with at least 80% fat; the higher fat content means more flavor and a softer crumb.
The Sweetening Agent
Granulated sugar does double duty: it sweetens the batter and helps achieve that golden‑brown color we all love. A pinch of brown sugar can be swapped in for a caramel undertone, but the classic white sugar keeps the cherry flavor front and center. Sugar also assists in creating a slight caramelization on the crust’s edges, giving you that irresistible crunch. Remember, the sugar should be fully incorporated into the butter before adding the eggs, otherwise you’ll end up with a gritty texture.
The Binding Duo
Eggs are the glue that holds everything together, providing moisture and structure. Two large eggs are perfect for a four‑serving batch; they create a tender crumb without making the bars too cakey. For vegans, a flaxseed “egg” (1 tbsp ground flaxseed + 3 tbsp water) can mimic the binding properties, though the flavor profile will shift slightly. The eggs also help the crust rise just enough to get that airy, melt‑in‑your‑mouth feel.
The Aromatic Lift
Vanilla extract adds warmth and a comforting aroma that elevates the overall taste. A single teaspoon is enough to brighten the cherry’s tartness without overpowering it. If you have access to pure vanilla bean, scrape the seeds into the batter for an even more luxurious note. This little addition is often the secret behind why some recipes feel “store‑bought” while yours feels handcrafted.
The Texture Crew
All‑purpose flour gives the bars their structure, creating that perfect balance between crumbly and sturdy. Two cups is the sweet spot for a four‑serving pan; any less and the crust will be too fragile, any more and it becomes dense. For gluten‑free diners, almond flour or coconut flour can substitute, but expect a slightly different crumb and a hint of nuttiness. Keep the flour sifted to avoid lumps, which can lead to uneven baking.
The Unexpected Star
Cherry pie filling is the show‑stopper. The sweet‑tart cherries provide that festive flavor that screams Christmas. Use a high‑quality brand that contains whole cherry pieces, not just a syrup; the texture of the fruit adds a delightful bite. If you’re feeling ambitious, fresh cherries can be cooked with a splash of sugar and a teaspoon of cornstarch to thicken, but the canned version saves time and guarantees consistent results.
The Final Flourish
A pinch of salt might seem trivial, but it’s the unsung hero that balances the sweetness and makes the cherry pop. Just one teaspoon for the entire batch is sufficient; too much and you’ll overpower the delicate flavors. Salt also strengthens the gluten network in the flour, contributing to that perfect crumb. Sprinkle it evenly into the butter‑sugar mixture to ensure uniform distribution.
Everything's prepped? Good. Let's get into the real action...
The Method — Step by Step
Preheat your oven to 350°F (175°C) and line a 9‑by‑13‑inch baking pan with parchment paper, allowing the excess to hang over the sides for easy removal later. While the oven warms, take your softened butter and melt it gently in a saucepan over low heat, then drizzle in a tablespoon of neutral oil and whisk until you see a glossy emulsion forming. This emulsified butter will be the secret behind that melt‑in‑your‑mouth crust.
Kitchen Hack: After whisking, let the butter‑oil mixture sit for 5 minutes; the fat particles will settle into a perfect consistency for mixing.In a large mixing bowl, combine the granulated sugar with the emulsified butter, beating with an electric mixer on medium speed until the mixture is light, fluffy, and a shade paler — think “sun‑kissed sand.” This step is crucial; it incorporates air, which later translates to a lighter crumb. Add the eggs one at a time, beating well after each addition, then stir in the vanilla extract until you can smell the sweet perfume rising.
Sift the all‑purpose flour and salt together, then fold them into the butter‑sugar‑egg mixture using a spatula. The batter should look thick but spreadable, with no dry flour pockets. If you notice streaks, gently tap the bowl on the counter a few times to settle the batter. This is the moment of truth — the batter must be smooth for an even crust.
Spread the batter evenly across the prepared pan, using the back of a spoon or an offset spatula to smooth the surface. The edges should be about a quarter inch higher than the center; this will create the classic “raised edge” that holds the cherry topping without spilling over.
Now comes the chill: place the pan in the refrigerator for exactly 15 minutes. This cooling step firms up the butter, preventing the bars from spreading too much during baking. Watch Out: If you skip this, the crust will become overly thin and may burn at the edges while the center stays undercooked.
Watch Out: Leaving the batter out at room temperature for too long can cause the butter to melt, leading to a greasy crust.While the pan chills, gently warm the cherry pie filling in a saucepan over low heat, just until it becomes pourable but not bubbling. This ensures the cherries stay intact and the filling spreads evenly. Add a pinch of extra vanilla if you love that aromatic lift, but be careful not to over‑flavor.
Remove the pan from the fridge and spoon the warm cherry filling over the chilled batter, spreading it gently with a spatula. Aim for a uniform layer; the cherries should be visible in a beautiful ruby‑red sea. The contrast between the pale crust and the deep red topping is what makes these bars Instagram‑worthy.
Kitchen Hack: If you want a glossy finish, brush the top of the cherry layer with a thin glaze made of 1 tbsp apricot jam diluted with 1 tsp water just before baking.Slide the pan into the preheated oven and bake for 30‑35 minutes, or until the edges turn a deep golden brown and a toothpick inserted into the crust (away from the cherry center) comes out clean. You’ll know it’s done when the cherry topping starts to bubble gently and the crust pulls away from the sides of the pan, creating that coveted “crackly edge.”
Allow the bars to cool in the pan for 10 minutes, then transfer the parchment overhang to a cutting board. Slice into squares while still warm; the bars will set as they cool, giving you clean, tidy pieces. Serve them warm for that gooey cherry experience, or let them come to room temperature for a firmer bite. That first bite? It’s the kind of moment that makes you whisper, “I’m never buying store‑bought again.”
That's it — you did it. But hold on, I've got a few more tricks that'll take this to another level...
Insider Tricks for Flawless Results
The Temperature Rule Nobody Follows
Never bake these bars straight from the freezer. If you’ve pre‑made the batter ahead of time, let it sit at room temperature for 10 minutes before the 15‑minute chill. This ensures the butter is firm enough to hold shape but soft enough to spread evenly. A friend once tried to bake frozen batter and ended up with a soggy center and a burnt edge — a lesson learned the hard way.
Why Your Nose Knows Best
Instead of obsessing over a timer, trust the aroma. When the crust starts to smell nutty and the cherry topping releases a sweet perfume, you’re within the golden window. This sensory cue prevents over‑baking, which can turn the cherries into a leathery mess. I’ve found that the “toasty‑but‑not‑burnt” scent appears about 2‑3 minutes before the timer dings.
The 5‑Minute Rest That Changes Everything
After removing the bars from the oven, let them rest uncovered for exactly five minutes before slicing. This short pause lets the juices redistribute, preventing the cherry topping from spilling out when you cut. It also allows the crust to firm up just enough to hold its shape, giving you clean edges and a professional look.
The Glaze Finish
A light glaze of apricot jam (as mentioned earlier) adds a subtle shine that makes the bars look as good as they taste. Warm the jam, thin it with a splash of water, and brush it on while the bars are still warm. The glaze sets as the bars cool, creating a glossy finish that catches the light during holiday gatherings.
The Double‑Layer Secret
For an extra burst of cherry, swirl a second thin layer of cherry filling on top after the first layer has set (about 10 minutes into baking). This creates a layered effect where the top layer caramelizes slightly, adding depth to the flavor. Just be careful not to overload; a thin veil is all you need.
Creative Twists and Variations
This recipe is a playground. Here are some of my favorite ways to switch things up:
Cranberry‑Cherry Fusion
Swap half of the cherry filling for cranberry sauce. The tartness of cranberries pairs beautifully with the buttery crust, and the red‑purple hue adds a festive pop. Perfect for those who love the classic cranberry sauce on their holiday table.
Chocolate‑Swirl Delight
Before adding the cherry topping, drizzle melted dark chocolate over the crust and use a knife to create a marble effect. The bitterness of the chocolate balances the sweet cherries, creating a sophisticated flavor combo that’s great for adult palates.
Almond‑Infused Crunch
Fold a quarter cup of finely chopped toasted almonds into the batter. The nuts add a pleasant crunch and a nutty aroma that complements the cherries. It also gives the bars a lovely golden speckled appearance.
Spiced Holiday Version
Add a pinch of ground cinnamon, nutmeg, and a dash of clove to the batter. These warm spices echo traditional holiday flavors and make the bars taste like a cozy winter night by the fire.
Mini Bar Bites
Press the batter into a mini muffin tin for bite‑size treats. This makes serving at parties a breeze and gives each piece a crisp edge. Just reduce the baking time to 15‑18 minutes, watching closely for that golden hue.
Vegan Swap
Replace butter with coconut oil, use flaxseed “eggs,” and choose a plant‑based cherry filling (many are now available). The texture changes slightly, becoming a bit denser, but the flavor remains festive and delicious for vegan guests.
Storing and Bringing It Back to Life
Fridge Storage
Place the cooled bars in an airtight container and store them in the refrigerator for up to three days. The butter crust stays tender, and the cherry topping retains its glossy sheen. If you notice the bars drying out, cover them with a sheet of parchment before sealing the container.
Freezer Friendly
Wrap each bar individually in plastic wrap, then place them in a freezer‑safe zip‑top bag. They’ll keep for up to two months. When you’re ready to serve, thaw overnight in the fridge, then reheat gently in a 300°F oven for 10 minutes — add a tiny splash of water to the pan to steam the crust back to perfection.
Best Reheating Method
For a fresh‑out‑of‑the‑oven experience, reheat individual bars on a skillet over low heat, covered, for 3‑4 minutes. Add a teaspoon of water to the skillet and cover; the steam will revive the crumb while keeping the cherry topping juicy. This method avoids the sogginess that can happen with microwave reheating.