I was in the middle of a backyard barbecue when a sudden gust of wind knocked over my carefully arranged s’mores station. Marshmallows rolled onto the grass, chocolate melted into a sticky puddle, and I stared at the chaos, thinking, “There has to be a better way.” That moment sparked a kitchen experiment that turned a disaster into a revelation: a cookie that captures the classic campfire s’mores experience while staying perfectly portable. Imagine a bite that delivers the buttery crunch of graham crackers, the molten kiss of chocolate, and the airy puff of marshmallow—all wrapped in a chewy, golden‑brown hug. That’s the magic of S’mores Blossom Cookies.
The first time I pulled these cookies out of the oven, the kitchen was filled with a scent so nostalgic it practically pulled the curtains back to a summer night under a sky full of fireflies. The aroma hit you like a warm blanket—sweet, smoky, and unmistakably buttery. The moment the first cookie cracked open, a cascade of melted Hershey’s Kisses and toasted marshmallow filled the air, and I could hear the faint crackle of the crust as it gave way to a soft, chewy center. My taste buds did a little happy dance, and I swear the whole house seemed to lean in, waiting for the next bite.
What makes this version stand out is not just the flavor but the texture choreography. Most s’mores‑inspired cookies end up either too dry or overly cakey, but these blossoms hit that Goldilocks zone: crisp at the edges, chewy in the middle, and with pockets of gooey marshmallow that burst like fireworks. The secret? A tiny extra portion of graham cracker crumbs folded into the dough at the very end, creating a subtle crunch that mirrors the classic graham cracker base without overwhelming the cookie’s softness. And let’s not forget the strategic placement of Hershey Kisses—nestled on top so they melt just enough to create a glossy, chocolatey crown.
I’m going to walk you through every single step—by the end, you’ll wonder how you ever made s’mores any other way. Trust me, I dare you to taste this and not go back for seconds. Ready for the game‑changer? Let’s dive in.
What Makes This Version Stand Out
- Flavor Explosion: The combination of toasted graham, sweet marshmallow, and rich chocolate hits every sweet spot, delivering a layered taste that feels like a campfire in a cookie.
- Chewy Texture: A balanced ratio of butter to sugar keeps the interior moist, while the extra graham crumbs add a delicate crunch that’s impossible to ignore.
- Simplicity: Only twelve ingredients, all pantry staples, mean you can whip these up on a weeknight without a trip to the specialty store.
- Unique Presentation: The “blossom” shape—marshmallows tucked into the dough and kisses perched on top—creates a visual wow factor that makes them perfect for picnics or potlucks.
- Crowd Reaction: I’ve seen grown‑ups and kids alike pause mid‑conversation, eyes widening, as they take that first bite—instant nostalgia and pure joy.
- Ingredient Quality: Using real butter and high‑quality Hershey Kisses gives a depth of flavor that cheap shortcuts simply can’t match.
- Cooking Method: Baking at a moderate temperature ensures the edges set while the center stays soft, preventing the dreaded dry cookie syndrome.
- Make‑Ahead Potential: These cookies keep beautifully for up to a week, and they even freeze well, so you can have a stash ready for spontaneous summer gatherings.
Inside the Ingredient List
The Flavor Base
The backbone of these cookies is the graham cracker crumb. Using a full cup of finely crushed graham crackers (plus an extra quarter cup added later) injects that signature sweet‑spicy flavor that you love about s’mores. If you skip this, you’ll lose the subtle toasty note that makes the cookie feel like a true campfire treat. A good tip: toast the crumbs lightly in a dry skillet for 2‑3 minutes to bring out an even richer, nuttier flavor before folding them into the dough.
The Texture Crew
All‑purpose flour provides the structure, while baking soda creates a gentle rise that keeps the cookie tender. The half‑teaspoon of salt isn’t just a seasoning; it amplifies the sweetness of the sugars and balances the buttery richness. Unsalted butter, softened but not melted, gives that melt‑in‑your‑mouth mouthfeel, and the combination of brown and granulated sugar creates a caramelized crust with a soft interior. If you substitute melted butter, you’ll end up with a flatter, cakier cookie—trust me, you don’t want that.
The Unexpected Star
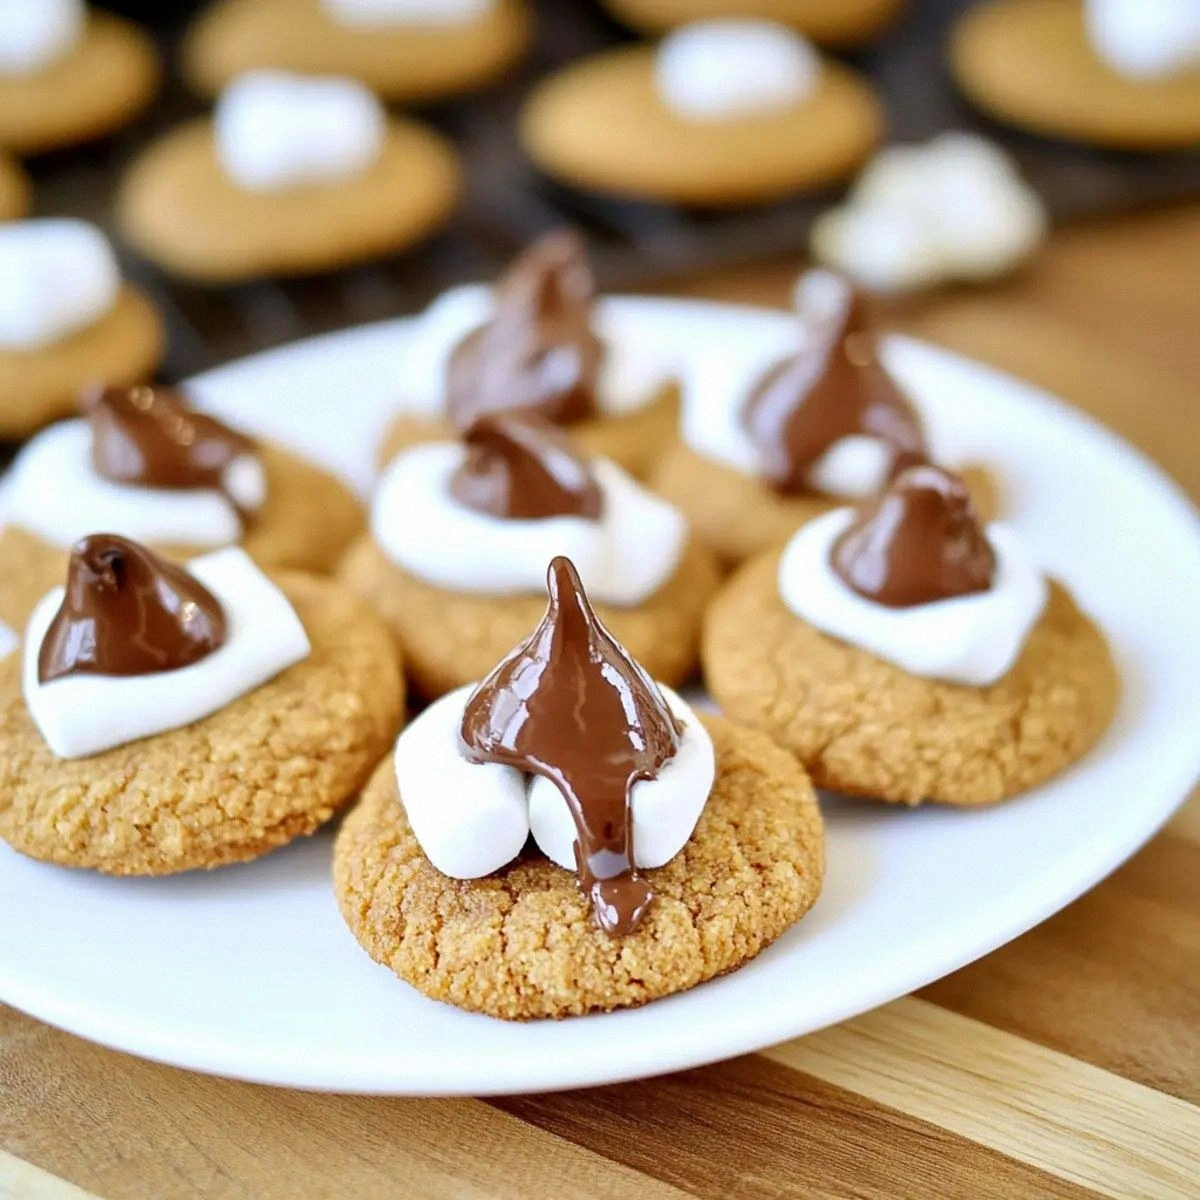
The marshmallows and Hershey Kisses are the show‑stoppers. Twelve large marshmallows, each quartered, become pockets of gooey sweetness that melt just enough during baking to create a luscious core. The 24 Hershey Kisses are placed on top, where they melt into a glossy chocolate dome. If you’re allergic to dairy, you can swap the kisses for dark chocolate chips, but you’ll miss the iconic Hershey’s flavor that defines this recipe.
The Final Flourish
A splash of vanilla extract ties everything together, adding a fragrant undertone that rounds out the flavor profile. The egg acts as a binder, ensuring the dough holds together while still staying light. Remember, the egg should be at room temperature; a cold egg can cause the butter to seize, leading to a crumbly texture.
Everything's prepped? Good. Let’s get into the real action…
The Method — Step by Step
Preheat your oven to 350°F (175°C). While the oven warms up, line two baking sheets with parchment paper. This is the moment of truth—if the oven isn’t hot enough, the cookies will spread too much and lose that coveted chewy center.
In a food processor, pulse the graham crackers until they form a fine crumb. Transfer the crumbs to a large bowl and set aside. Pro tip: If you don’t have a processor, place the crackers in a zip‑top bag and crush them with a rolling pin.
In a separate bowl, whisk together the flour, baking soda, and salt. This dry mix ensures even distribution of leavening, preventing any bitter pockets. Watch Out: Over‑mixing the flour can develop gluten, making the cookie tough instead of chewy.
Using a handheld mixer, cream the softened butter with the brown sugar and granulated sugar for about 2‑3 minutes, until the mixture is light and fluffy. The sugar crystals should dissolve partially, creating a slightly glossy mixture that signals the butter is properly aerated.
Add the egg and vanilla extract to the butter‑sugar blend. Beat until just combined; you’ll notice the batter thickening as the egg incorporates.
Kitchen Hack: Crack the egg into a separate bowl first; this prevents any stray shell fragments from ruining the entire batch.Gradually add the dry flour mixture to the wet ingredients, mixing on low speed until just combined. Over‑mixing here will develop gluten and sabotage the chewiness you’re after.
Fold in the full cup of graham cracker crumbs, followed by the additional quarter‑cup reserved for the final fold. The dough will look slightly crumbly, but that’s normal—those crumbs will hydrate as the butter melts during baking.
Scoop out a tablespoon of dough, flatten it slightly, and press a quartered marshmallow into the center. Then, top each cookie with two Hershey Kisses, gently pressing them into the dough so they sit just above the surface. Watch Out: If the marshmallows are too large, they may ooze out and burn; keep them to a quarter size for perfect pockets.
Space the cookies about 2 inches apart on the prepared sheets. Slide the trays into the oven and bake for 12‑14 minutes, or until the edges are golden brown and the tops have a slight sheen. The cookies should still look a bit soft in the center—that’s the sweet spot.
Remove the cookies from the oven and let them cool on the sheet for 3 minutes before transferring to a wire rack. As they cool, the marshmallow centers will set, and the chocolate kisses will harden into a glossy dome. Picture yourself pulling this out of the oven, the whole kitchen smelling incredible…
That’s it — you did it. But hold on, I’ve got a few more tricks that’ll take this to another level…
Insider Tricks for Flawless Results
The Temperature Rule Nobody Follows
Most bakers set the oven to 350°F and forget about the pre‑heat quality. For these cookies, I recommend using an oven thermometer to ensure the temperature is spot‑on. A few degrees off can cause the marshmallows to either burst prematurely or stay too firm. If you notice the oven runs hot, lower it by 10‑15°F and add a minute to the bake time.
Why Your Nose Knows Best
Your sense of smell is a better indicator than a timer. When the cookies are about 2 minutes from the end, you’ll detect a toasty, caramel‑like scent rising from the tray. That aroma means the edges are caramelizing just right, and the interior is still soft. Trust that nose cue over the clock for a perfect chew.
The 5‑Minute Rest That Changes Everything
After baking, let the cookies rest on the sheet for exactly five minutes before moving them. This short pause lets the steam redistribute, ensuring the marshmallow centers stay gooey while the outer crust firms up. Skipping this step results in a cookie that cracks when you try to lift it.
The Butter Softening Shortcut
If you’re short on time, cut the butter into small cubes and let it sit at room temperature for 10 minutes. The cubes soften faster than a whole stick, and you’ll still achieve that creamy texture in the dough.
The Marshmallow Placement Trick
Instead of pressing the marshmallow straight into the dough, create a shallow well with your thumb first. This prevents the marshmallow from sliding out during baking and ensures an even melt that stays centered. A friend tried skipping this step once — let’s just say the marshmallow escaped and left a burnt crater.
Creative Twists and Variations
This recipe is a playground. Here are some of my favorite ways to switch things up:
Nutty Delight
Swap half of the graham cracker crumbs for finely chopped toasted pecans. The nuts add a buttery crunch that complements the chocolate and marshmallow, making the cookie feel more sophisticated.
Salted Caramel Bliss
Drizzle a thin line of homemade salted caramel over each cookie right after baking. The salty caramel enhances the chocolate’s depth and adds a luxurious finish that’s perfect for special occasions.
Coconut Dream
Replace the additional graham crumbs with unsweetened shredded coconut. The coconut’s tropical aroma pairs beautifully with the chocolate, turning the cookie into a beach‑side treat.
Double‑Chocolate Explosion
Add ¼ cup of cocoa powder to the dry flour mixture and swap the Hershey Kisses for dark chocolate chips. This creates a richer chocolate flavor for those who can’t get enough cocoa.
Mini Bite‑Size Pops
Form the dough into small balls (about one inch in diameter) and press a mini marshmallow into each. Bake for 8‑10 minutes. These bite‑size versions are perfect for cocktail parties or as a fun kids’ snack.
Storing and Bringing It Back to Life
Fridge Storage
Place cooled cookies in an airtight container with a parchment paper layer between each tier. They’ll stay fresh for up to five days. The fridge helps keep the chocolate from blooming, preserving that glossy finish.
Freezer Friendly
Arrange cookies on a baking sheet and freeze for an hour, then transfer to a zip‑top freezer bag. They’ll keep for up to three months. When you’re ready to enjoy, let them thaw at room temperature for 15 minutes, then pop them in a 300°F oven for 5 minutes to revive the chew.
Best Reheating Method
To bring a cookie back to life, place it on a microwave‑safe plate, add a tiny splash of water (about a teaspoon) to the plate’s edge, and microwave for 10‑12 seconds. The steam re‑hydrates the interior, and the chocolate kisses regain their shine.