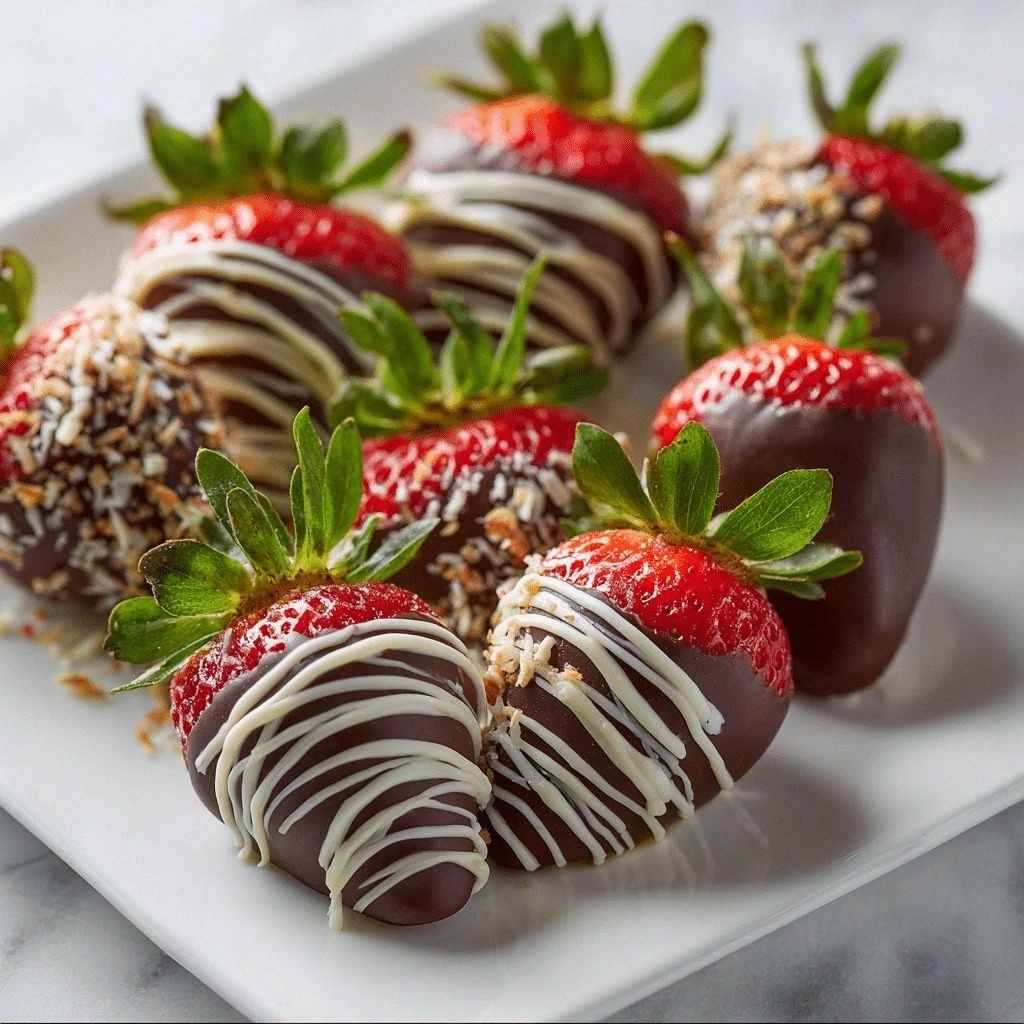
Chocolate Covered Strawberries
Picture this: the kitchen is a chaotic symphony of sizzling pans, a stray flour cloud, and that unmistakable scent of chocolate drifting from the oven. I was halfway through a dessert that had gone from glossy to gloopy, when a friend dared me to make the best chocolate‑covered strawberries in the world. I laughed, grabbed a handful of fresh berries, and decided to turn that kitchen mishap into a culinary triumph. If you’ve ever stared at a batch of strawberries and wondered why they’re not as perfect as a chocolate‑coated dream, you’re in the right place.
The moment I first tasted a perfectly dipped berry, the world seemed to shift. The chocolate was silky, not clumpy, and it clung to the berry like a velvet glove. The strawberry’s sweet juiciness burst against that rich, slightly bitter coating, creating a dance of flavors that left me craving a second bite. That bite? I dare you to taste this and not go back for seconds. I’ll be honest — I ate half the batch before anyone else got to try it.
What sets this version apart is that it’s not just about chocolate and fruit; it’s about technique, timing, and the small tweaks that elevate a simple snack into a showstopper. From the precise melting process that keeps the chocolate smooth to the strategic use of coconut oil for a glossy finish, every element is crafted to perfection. I’ve spent countless evenings tweaking this recipe, and the result is hands down the best version you’ll ever make at home. If you’ve ever struggled with this, you’re not alone — and I’ve got the fix.
Now, let’s dive into the details. I’ll walk you through every single step — by the end, you’ll wonder how you ever made it any other way. Picture yourself pulling this out of the fridge, the whole kitchen smelling incredible, and the first bite sending a wave of chocolate bliss through your senses. Stay with me here — this is worth it.
What Makes This Version Stand Out
- Texture: The chocolate coating is silky smooth, not gritty, thanks to the addition of coconut oil which lowers viscosity and creates a glossy finish that melts in your mouth.
- Flavor: A pinch of sea salt balances the natural sweetness of the strawberries, adding depth and a subtle brininess that elevates the chocolate’s richness.
- Speed: The entire process takes under 45 minutes, making it the perfect quick dessert for last‑minute parties or spontaneous cravings.
- Versatility: The recipe is a blank canvas — you can drizzle white chocolate, sprinkle nuts, or dust powdered sugar for endless variations.
- Make‑ahead: Once dipped, the berries stay fresh for up to 24 hours in the fridge, letting you prep ahead for a busy day.
- Health‑Friendly: Using dark chocolate with 70% cacao and fresh strawberries keeps the dessert indulgent yet balanced, offering antioxidants and vitamin C.
- Visual Appeal: The glossy finish and vibrant red of the strawberries make for a stunning presentation that feels like a luxury treat.
- Kid‑Friendly: The process is simple enough for kids to help, turning dessert into a fun, interactive activity.
Alright, let's break down exactly what goes into this masterpiece...
Inside the Ingredient List
The Flavor Base
Fresh strawberries are the star of this dessert. Their natural sweetness and bright acidity balance the bitterness of dark chocolate. If you’re in season, choose berries that are firm yet slightly soft to the touch; this gives them the best mouthfeel. Skipping the strawberries would turn this into a generic chocolate bar, losing the juicy burst that defines the dish.
The Chocolate Crew
Dark chocolate chips with at least 70% cacao provide a robust flavor that cuts through the fruit’s sweetness. The higher cacao content also means less sugar, keeping the dessert lighter. If you’re a white chocolate fan, you can swap half the dark chips for white chocolate, but the final flavor will be noticeably sweeter.
The Unexpected Star
Coconut oil is the secret weapon that gives the coating a glossy sheen and helps the chocolate set without a glossy sheen. It also lowers the melting point of the chocolate, preventing it from becoming too hard. If you don’t have coconut oil, a small amount of butter works, but the finish will be slightly duller.
The Final Flourish
Sea salt is the finishing touch that awakens the chocolate’s complexity. A tiny pinch on each berry creates a subtle contrast that makes each bite more memorable. If you prefer a sweeter finish, you can omit the salt entirely, but you’ll lose that savory lift.
Everything's prepped? Good. Let's get into the real action...
The Method — Step by Step
- Step 1: Gather all ingredients and tools: a heat‑proof bowl, a saucepan of simmering water, parchment paper, a spatula, and a cooling rack. Clean the strawberries by rinsing under cold water and patting them dry with a paper towel. The berries need to be completely dry; any moisture will cause the chocolate to seize. This is the moment of truth, so stay focused and keep the berries ready for dipping.
- Step 2: Prepare your double boiler. Place the saucepan on the stove and bring the water to a gentle simmer. The heat should be low enough that the water does not boil vigorously, which would cause steam to escape and the chocolate to cool too fast. This controlled environment keeps the chocolate from scorching and ensures a smooth finish.
- Step 3: Add the dark chocolate chips to the heat‑proof bowl and let them melt, stirring occasionally. The chocolate should reach a glossy, smooth consistency. If you notice any lumps, keep stirring until they dissolve. The key is patience; rushing the melt can lead to a gritty coating.
- Step 4: Stir in the coconut oil. This not only adds flavor but also reduces the viscosity of the chocolate, giving it a shiny sheen. The mixture should feel silky to the touch. If it’s too thick, add a splash of water or milk to thin it out; if it’s too thin, let it cool slightly.
- Step 5: Dip each strawberry into the chocolate, holding it by the stem. Use a spoon or fork to help coat the berry evenly, ensuring no air pockets. Let the excess chocolate drip back into the bowl before placing the berry on parchment. Watch out: if the chocolate is too hot, it will melt the berries and create a sticky mess. Keep the temperature steady to avoid this.
- Step 6: Arrange the dipped strawberries on a parchment‑lined tray, spacing them so they don’t touch. This allows the chocolate to set without merging. If you’re in a hurry, you can place them on a cooling rack to speed up the setting process.
- Step 7: Before the chocolate sets, sprinkle a pinch of sea salt over each berry. The salt will caramelize slightly, adding a subtle crunch and enhancing the chocolate’s depth. This is where the flavor really takes off, so don’t skip this step.
- Step 8: Chill the tray in the refrigerator for 15–20 minutes, or until the chocolate has hardened. The berries will feel firm to the touch and ready to serve. If you prefer a firmer set, let them chill longer; if you like a softer coating, take them out sooner.
- Step 9: Optional: If you’re feeling adventurous, drizzle a second layer of melted chocolate over the set berries or sprinkle chopped nuts for extra texture. This step transforms a simple dessert into a gourmet treat.
- Step 10: Serve immediately or store in an airtight container in the fridge for up to 24 hours. The berries will stay fresh and the chocolate will keep its glossy finish. Now you’re ready to impress friends, family, or that picky dessert lover who thinks they’ve seen it all.
That's it — you did it. But hold on, I've got a few more tricks that'll take this to another level...
Insider Tricks for Flawless Results
The Temperature Rule Nobody Follows
The chocolate’s temperature is the single most critical factor. Aim for 90–95°F (32–35°C) for dipping. A quick way to test is to touch the chocolate; it should feel warm but not hot. If it’s too cool, the coating will be thick and clumpy; if it’s too hot, it will melt the berries and lose its shine. I once tried a double boiler and ended up with a gummy coating — lesson learned.
Why Your Nose Knows Best
Smell the chocolate before dipping. A rich, nutty aroma signals proper cacao content. If the chocolate smells flat or burnt, it’s time for a fresh batch. A strong scent indicates that the chocolate will deliver depth of flavor that will complement the strawberry’s brightness.
The 5-Minute Rest That Changes Everything
After melting the chocolate, let it rest for 5 minutes before dipping. This pause allows bubbles to settle, resulting in a smoother coating. Think of it as giving the chocolate a moment to calm down before it takes the plunge. Trust me, the difference is noticeable.
Use a Cooling Rack for Even Setting
Placing the dipped berries on a rack instead of parchment can speed up the setting process by allowing air to circulate. The result is a more even, glossy finish. I’ve found that the chocolate sets faster on a rack, saving precious minutes when serving a crowd.
Keep the Berries Dry and Separate
Even the slightest moisture can cause the chocolate to seize. Pat the berries dry with a paper towel and keep them separated until the chocolate sets. If you’re in a rush, place a piece of parchment between each berry to keep them from sticking.
Creative Twists and Variations
This recipe is a playground. Here are some of my favorite ways to switch things up:
White Chocolate Whisper
Swap half the dark chocolate for white chocolate chips. The result is a creamy, sweet coating that pairs beautifully with the tartness of the strawberry. Great for guests who prefer a sweeter finish.
Nutty Crunch
Sprinkle chopped pistachios or almonds over the set berries for a satisfying crunch. The nuts add texture and a nutty aroma that elevates the dessert. Perfect for a sophisticated dessert bar.
Minty Fresh
Add a few drops of peppermint extract to the melted chocolate. The mint undertone gives the coating a refreshing bite, ideal for a summer gathering. The contrast between mint and strawberry is a classic that never fails.
Spiced Surprise
Stir in a pinch of cinnamon or a dash of cayenne pepper to the chocolate. The spices introduce warmth and a hint of heat that balances the fruit’s sweetness. This variation is a bold twist that will spark conversation.
Chocolate Ganache Glaze
After the initial coating, drizzle a thin layer of chocolate ganache over the berries. The ganache adds a silky, glossy finish and a richer chocolate flavor. It’s a quick upgrade that feels indulgent.
Berry Burst
Add a few frozen blueberries or raspberries to the mix. The frozen berries release a burst of juice when bitten, creating a juicy surprise. This variation is perfect for a fruit‑filled dessert experience.
Storing and Bringing It Back to Life
Fridge Storage
Store the dipped strawberries in an airtight container in the refrigerator for up to 24 hours. Keep the container on a flat surface so the chocolate doesn’t melt into a mess. If you’re storing for longer, consider using a silicone mat to keep them separated.
Freezer Friendly
For longer storage, place the berries on a parchment‑lined tray and freeze for up to one week. Once frozen, transfer them to a freezer bag. When ready to serve, let them thaw at room temperature for 15 minutes before enjoying.
Best Reheating Method
To revive the chocolate’s glossy finish, place the strawberries on a parchment sheet and microwave on low for 10–15 seconds. Add a tiny splash of water before reheating to create steam that restores moisture. This trick keeps the chocolate from becoming dry or brittle.