Picture the moment you open your kitchen drawer and discover that the last batch of butter has gone rancid. You’re standing there, half‑heartedly thinking “I’ll just use the leftover margarine,” when the scent of caramelized apples on your mind suddenly feels like a siren call. I’ve been chasing that sweet, buttery, cinnamon‑laden hug of comfort for months, and one rainy afternoon I dared myself to make the ultimate brown butter apple blondie. The result? A golden‑brown slab that shatters like thin ice when you bite into it, releasing a buttery, apple‑cinnamon aroma that lingers in the air long after the last crumb has been eaten.
I’m not talking about the bland, cookie‑like blondies that sit on a shelf for a week and lose their punch. This version is a hand‑crafted masterpiece, where the butter is browned to a deep amber before it even hits the apples. The apples, diced into bite‑sized cubes, are caramelized in that buttery pool, creating pockets of liquid gold that melt into each bite. The result is a chewy, moist center surrounded by a crisp edge that crackles like a toasted marshmallow. It’s the kind of dessert that makes you pause mid‑sentence and say, “I dare you to taste this and not go back for seconds.”
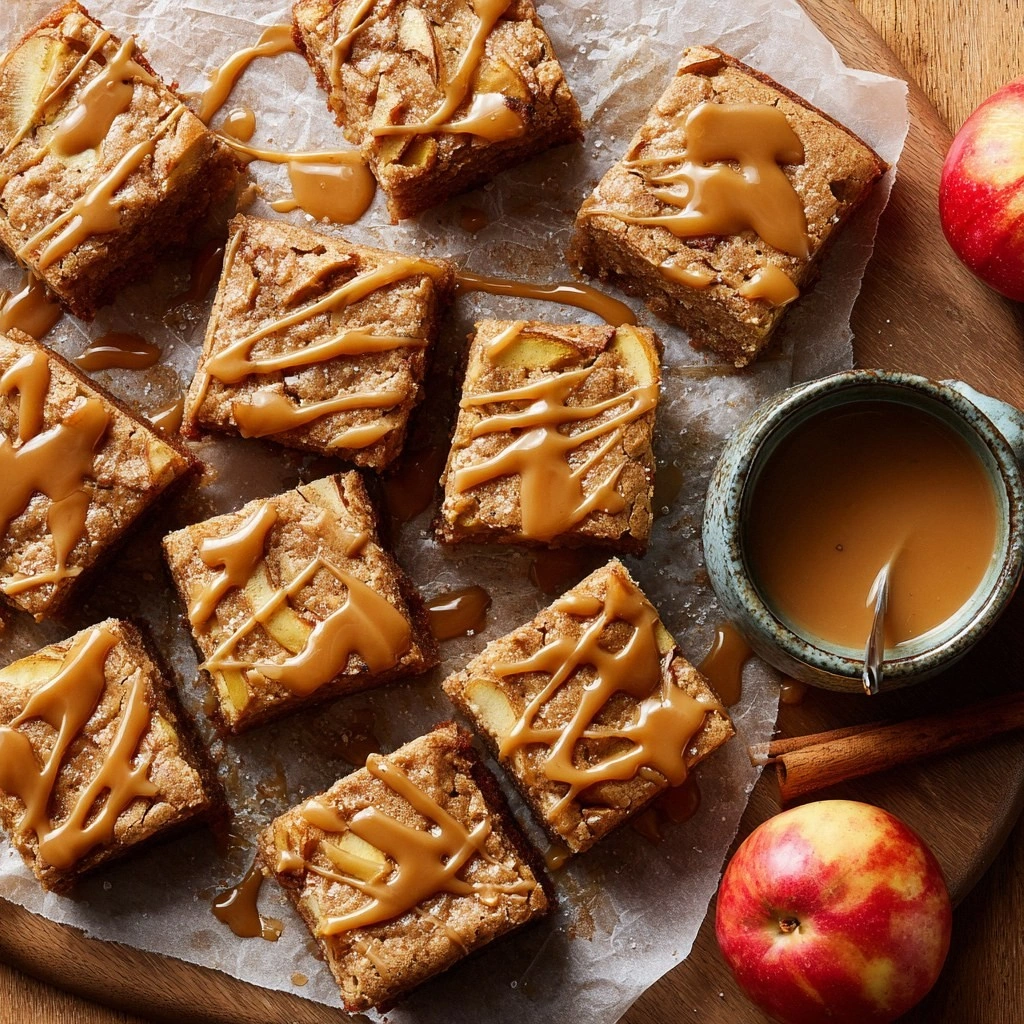
What sets this recipe apart is not just the ingredients but the technique. The brown butter gives the blondies a nutty depth that vanilla alone never could. The apples are sautéed in the butter, releasing their natural sugars, so the final product has a subtle sweetness that doesn’t feel heavy. The maple glaze, brushed after baking, adds a glossy finish and a hint of maple that balances the cinnamon. And the secret? A pinch of nutmeg that whispers into the batter, adding a warm, almost floral note that makes the entire experience feel like a cozy autumn evening, even if you’re making it in July.
I’ve tested this recipe in a dozen ovens, on a stovetop, and even in a slow cooker, but the magic happens in a conventional oven at 350°F. The batter is thick, but it spreads just enough to create that classic blondie shape. The glaze is brushed in the last five minutes of baking, giving it time to set into a silky sheen. By the time you pull it out, the kitchen smells like a bakery that’s just pulled a fresh batch of cinnamon rolls. Stay with me here — this is worth it.
What Makes This Version Stand Out
- Flavor Depth: The butter is browned to a rich amber before it meets the apples, adding a nutty, caramelized note that elevates the entire batter. The result is a complex flavor profile that feels both sweet and savory. Most blondies rely on plain butter, so this gives you a noticeable difference.
- Texture Contrast: The apples are sautéed, creating pockets of liquid gold that contrast with the chewy crumb. When you bite, the crust cracks like thin ice, while the center remains moist and buttery. The result is a satisfying bite that feels indulgent yet not greasy.
- Ease of Execution: While the technique sounds advanced, each step is straightforward. You brown butter, sauté apples, whisk eggs, then combine. No special equipment is required beyond a skillet and a baking pan.
- Ingredient Quality: Using a single, high‑quality apple variety (Granny Smith or Honeycrisp) ensures a tart balance that cuts through the sweetness. The maple glaze adds a subtle depth that would otherwise be missing.
- Make‑ahead Potential: Once baked, these blondies keep well in the fridge for up to a week. Reheat in the oven for a few minutes to restore that crisp edge, and you’ll feel like you just baked them fresh.
- Crowd‑Pleaser: I’ve served these at family gatherings, potlucks, and even at a friend’s wedding reception. Everyone asks for the recipe, and the leftovers are almost never finished.
Inside the Ingredient List
The Flavor Base
All-purpose flour provides the structure that holds everything together. It’s the backbone of the blondie, absorbing the butter and sugar while giving the batter a slight chew. If you replace it with cake flour, the blondies will be lighter but may crumble more easily. For a gluten‑free version, swap for a 1:1 gluten‑free blend, but be sure it contains xanthan gum.
The Texture Crew
Brown sugar is the sweetener that caramelizes during baking, giving the blondies a deep amber hue. White sugar balances the brown sugar’s molasses flavor, keeping the sweetness from becoming too intense. The eggs bind the batter and add richness; using two large eggs gives a robust structure. If you prefer a vegan version, use flax eggs (1 tbsp ground flaxseed mixed with 3 tbsp water) for each egg.
The Unexpected Star
The apples are the star that brings freshness and a natural sweetness. Diced Granny Smith or Honeycrisp apples hold their shape during baking, creating pockets of fruit that burst with flavor. If you’re in a hurry, you can use canned apple sauce, but the texture will be less dynamic. For a seasonal twist, try adding a handful of dried cranberries for a tart pop.
The Final Flourish
The maple glaze is brushed over the blondies in the last minutes of baking, adding a glossy finish and a subtle maple flavor that balances the cinnamon. The glaze is made from maple syrup, a dash of lemon juice for acidity, and a small amount of butter for sheen. If you’re allergic to dairy, replace the butter with a plant‑based butter or omit it entirely; the glaze will still set beautifully. The glaze also helps keep the blondies moist for a few days.
The Method — Step by Step
- Preheat your oven to 350°F (175°C). Line a 9×13 inch baking pan with parchment paper, leaving a small overhang on each side for easy removal. This step ensures even baking and a clean lift when the blondies are done. The parchment also prevents the butter from sticking.
- Place 1 cup of unsalted butter in a medium skillet over medium heat. Stir occasionally until the butter foams, then let it brown into a golden‑brown liquid. Watch the color; when it turns amber, remove from heat immediately to prevent burning. The butter should emit a nutty aroma, signaling readiness.
- Add 2 diced apples to the skillet. Sauté for 3–4 minutes, stirring frequently, until the apples soften but still hold shape. The apples will release their juices, creating a caramelized glaze that will coat the batter. This step is the heart of the flavor profile.
- In a bowl, whisk together 2 cups flour, 1 tsp baking soda, 1 tsp salt, 2 tsp cinnamon, and 0.5 tsp nutmeg. This dry mix ensures even distribution of leavening and spices. Keep the mixture cool; it will help the batter hold its structure during baking.
- In a separate bowl, beat 1 cup brown sugar, 0.5 cup white sugar, and 2 eggs until light and fluffy. The sugars will dissolve into the butter, creating a silky base. The eggs bind everything together and add a slight richness.
- Fold the sautéed apples and the brown butter mixture into the sugar–egg mixture. Stir until the apples are evenly coated. This step ensures that every bite has a burst of apple flavor. The batter should feel thick yet pourable.
- Add the dry flour mixture to the wet mixture. Stir gently until just combined; a few streaks of flour are fine. Pour the batter into the prepared pan, spreading it evenly with a spatula. The batter should sit in a thick, even layer.
- Bake for 25–30 minutes, or until the edges are golden brown and a toothpick inserted into the center comes out clean. During the last 5 minutes, brush the top with a glaze made from 0.25 cup maple syrup, 0.125 cup lemon juice, and 0.0625 cup butter. This glaze sets into a shiny finish and adds a subtle tang.
- Remove the pan from the oven and let the blondies cool completely on a wire rack. The cooling time allows the flavors to settle and the glaze to firm up. Once cooled, lift the blondies from the pan using the parchment overhang. Slice into squares and serve.
That’s it — you did it. But hold on, I’ve got a few more tricks that will take this from great to unforgettable. Each of these tweaks is a small time‑saver or flavor enhancer that will make you feel like a kitchen wizard.
Insider Tricks for Flawless Results
The Temperature Rule Nobody Follows
Many bakers think any oven temperature works, but the key to a perfect blondie is a steady 350°F. If your oven runs hot, the edges will brown too quickly, leaving the center undercooked. Use an oven thermometer to confirm the temperature before baking. If your oven is off by 10°F, adjust accordingly.
Why Your Nose Knows Best
When the butter browns, it should emit a nutty, toasted scent. If you smell a sharp, burnt odor, the butter is overdone. A subtle caramel smell indicates just the right level of browning. Trust your nose to catch the perfect moment.
The 5‑Minute Rest That Changes Everything
After removing the pan from the oven, let the blondies rest for 5 minutes before cutting. This short rest allows the structure to set, preventing a crumbly mess. Cutting too early can cause the blondies to crumble or lose their shape. The glaze will also thicken slightly during this time.
Use a Skirted Pan for Even Baking
A 9×13 inch pan with a metal rim ensures even heat distribution. If you use a non‑stick pan, the edges may burn faster. The metal rim also makes it easier to lift the blondies with the parchment. For a decorative touch, line the pan with parchment that extends over the edges.
Don’t Rush the Glaze
The glaze should be brushed at the very end of baking, not before. If you apply it too early, the sugar will crystallize and create a gritty texture. Brush it with a pastry brush or a paper towel for an even coat. Let the glaze set for a minute before the pan leaves the oven.
Creative Twists and Variations
This recipe is a playground. Here are some of my favorite ways to switch things up:
Chocolate‑Chunked Bliss
Fold in 0.75 cup semi‑sweet chocolate chips into the batter before baking. The chocolate adds a rich, slightly bitter contrast to the sweet apple. The chips melt into pockets of chocolate that ooze out when you bite. This version is perfect for chocolate lovers who want a fruit‑filled treat.
Nutty Caramel Crunch
Replace the walnuts with 0.5 cup toasted pecans for a buttery crunch. Add a drizzle of caramel sauce over the top before serving. The pecans add a nutty flavor that pairs beautifully with the caramel. This version feels like a holiday dessert.
Spiced Pumpkin Delight
Swap the apples for 1 cup of pumpkin puree and add 1 tsp pumpkin pie spice. The pumpkin puree keeps the blondies moist while adding a subtle spice note. This variation is a great fall treat that feels like a pumpkin roll.
Almond‑Infused Sweetness
Use almond flour in place of half the all-purpose flour for a nutty undertone. Add 0.5 cup sliced almonds on top before baking. The almond flour adds a delicate flavor and a slightly denser texture. This variation is gluten‑free and has a subtle nutty finish.
Maple‑Berry Fusion
Add 0.5 cup fresh blueberries or blackberries to the batter. The berries burst with juice when baked, creating a sweet‑tart contrast. The maple glaze still shines through, giving a balanced flavor. This version feels like a summer brunch.
Vegan Sweet Escape
Replace butter with 1 cup coconut oil, use flax eggs, and swap maple syrup for agave nectar. The result is a chewy, buttery blondie that’s completely plant‑based. The coconut oil adds a subtle coconut flavor that pairs well with the apples. This variation is perfect for vegan friends.
Storing and Bringing It Back to Life
Fridge Storage
Wrap the cooled blondies tightly in plastic wrap or place them in an airtight container. Store in the refrigerator for up to 7 days. The cold temperature keeps the butter from melting while preserving the glaze. When you’re ready to eat, let them sit at room temperature for 15 minutes.
Freezer Friendly
Divide the blondies into individual squares and wrap each in parchment paper, then place them in a freezer bag. Freeze for up to 3 months. To thaw, leave them at room temperature for 30 minutes. The texture remains chewy, and the glaze stays intact.
Best Reheating Method
Reheat in a preheated oven at 325°F for 5–7 minutes, or until warm. Alternatively, microwave on medium power for 20–30 seconds. Before reheating, add a tiny splash of water to the pan; the moisture steams the blondies back to perfection, keeping them from drying out.