I still remember the first time I tried making potato cubes in the air fryer. It was one of those lazy Sunday afternoons when the couch was calling my name louder than the oven timer, and I had a bag of russets staring me down like they knew their fate. My oven was already occupied with a roast, and I thought, "Hey, how different could air-fried potatoes be from oven-roasted ones?" Spoiler alert: they were so much better that I ended up eating half the batch straight from the basket while they were still hot enough to make me do that ridiculous open-mouth breathing thing we all do when we can't wait for food to cool down.
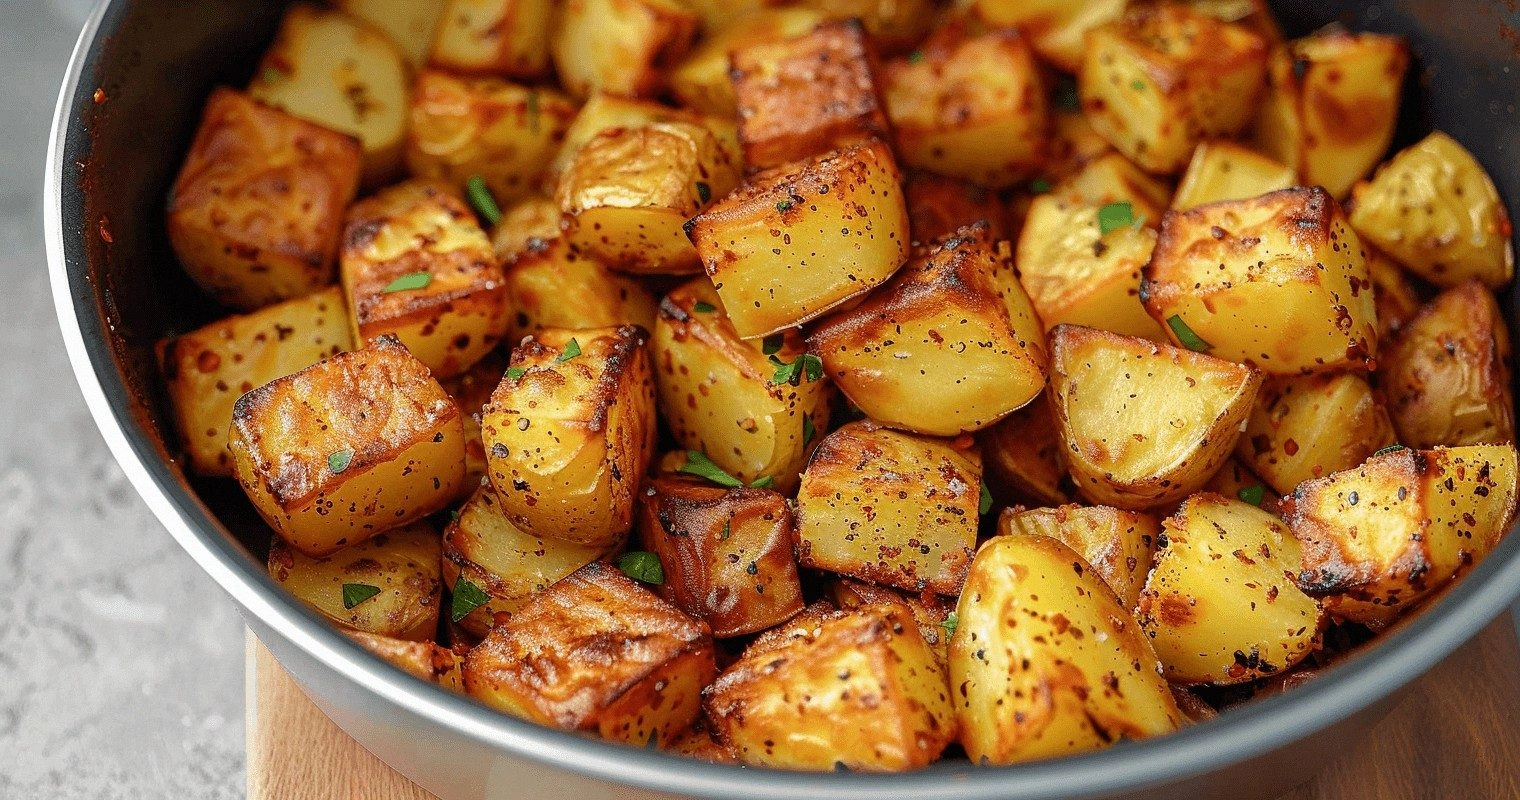
The magic happened when those little potato cubes emerged with edges so crispy they shattered like thin ice under your teeth, while the insides stayed fluffy and cloud-soft. That sizzle when you shake the basket halfway through cooking? Absolute perfection. The whole kitchen filled with the aroma of rosemary and garlic that made my neighbor knock on the door asking what I was making. I'll be honest — I told her it was a complicated recipe that took hours, because sharing wasn't on the menu that day. These aren't just roasted potatoes with a trendy cooking method slapped on them; they're an entirely different experience that'll ruin you for all other potato preparations.
What makes these air fryer potato cubes stand out from every other recipe floating around the internet? It's not just about tossing potatoes with oil and hoping for the best. I've cracked the code on getting that restaurant-quality crispy exterior while maintaining that steamed-fluffy interior that makes you close your eyes involuntarily when you bite into them. The technique I'm about to share with you involves a game-changing pre-treatment that most recipes completely skip, and it makes all the difference between soggy disappointment and potato nirvana.
Picture yourself pulling a basket of golden cubes from your air fryer, steam rising like morning fog over a lake, edges caramelized to deep amber perfection. Your family gathers around, stealing pieces before you've even called them to dinner, and suddenly you're the hero who transformed humble potatoes into something worthy of a food magazine cover. If you've ever struggled with potatoes that turn out dry, or worse, mushy on the outside while remaining crunchy inside, you're not alone — and I've got the fix that'll change your potato game forever. Let me walk you through every single step — by the end, you'll wonder how you ever made it any other way.
What Makes This Version Stand Out
Look, I know what you're thinking — another air fryer potato recipe, really? But hear me out, because I've eaten my way through enough disappointing batches to know exactly what separates mediocre potato cubes from the ones that make you want to write poetry about starch. This isn't just about convenience; it's about achieving textures and flavors that most people assume require professional equipment and years of culinary school debt.
Crunch Factor: These cubes develop a shatteringly crisp exterior that stays crunchy even after they've cooled down, thanks to a double-cooking technique that involves a quick par-boil followed by aggressive air frying at two different temperatures. The contrast between that glass-like crust and the fluffy interior is so dramatic that my texture-obsessed friend actually squealed when she tried them.
Flavor Explosion: Instead of just tossing everything together and hoping for the best, we build layers of flavor starting with a salt brine that seasons the potatoes from the inside out, followed by a coating of seasoned oil that caramelizes into a flavor-packed shell. Every bite delivers a perfect balance of savory, slightly sweet, and herbaceous notes that make you reach for "just one more" until the basket's mysteriously empty.
Foolproof Technique: Most recipes get this completely wrong — they either overcrowd the basket (hello, steamed sadness) or use too much oil (greasy disaster). This method uses a specific potato-to-basket ratio and oil quantity that guarantees each cube gets surrounded by hot air, not hot oil. I've tested this with everything from tiny personal air fryers to the mega family-sized ones, and it works every single time.
Speed Demon: From raw potato to crispy perfection in under 30 minutes, including prep time. Compare that to the 45-60 minutes traditional oven roasting requires, and suddenly weeknight potato cravings don't seem so unreasonable. Plus, your kitchen doesn't turn into a sauna during summer months when you want comfort food without the heat stroke.
Crowd-Pleasing Power: I've served these at game nights, fancy dinner parties, and everything in between. They're fancy enough to serve alongside steak but approachable enough that picky kids devour them. The seasoning blend is customizable without being complicated, making them the ultimate crowd-pleaser that works for every dietary restriction except potato allergies.
Ingredient Quality Matters: This recipe celebrates the potato in all its glory, which means using the right type (russet for maximum fluffiness) and treating it with respect. No hiding behind heavy sauces or overwhelming spices — just perfectly cooked potatoes that taste like the best version of themselves. Once you taste the difference quality makes, you'll never grab those sad, sprouted potatoes from the back of your pantry again.
Make-Ahead Magic: Here's what really sets this apart — you can prep everything up to the final cooking stage, stash it in the fridge, and have fresh, hot potato cubes in 15 minutes whenever the craving strikes. Game day hosting just got a whole lot easier, and midnight snack attacks have met their match.
Alright, let's break down exactly what goes into this masterpiece...
Inside the Ingredient List
Before we dive into the method, let's talk ingredients because — spoiler alert — not all potatoes are created equal when it comes to air frying. I've made this with everything from fancy fingerlings to bargain-bin red potatoes, and the results range from life-changing to "why did I waste my time on this?" The beauty of this recipe lies in its simplicity, but that means every ingredient has to pull its weight and then some.
The Foundation: Choosing Your Potatoes
Russet potatoes are the undisputed champions here, and I'll fight anyone who says otherwise. Their high starch content means they break down into that fluffy, almost powdery texture that makes the interior feel like you're biting into a cloud made of comfort food. The thick skin crisps up beautifully while protecting the tender flesh inside, creating that perfect textural contrast that makes these so addictive. When selecting your russets, look for ones that feel heavy for their size and have smooth, unblemished skin — those are signs of freshness and proper storage, which translates to better texture and flavor.
If russets aren't available, Yukon Golds make an acceptable substitute, though they'll be slightly waxier and less fluffy inside. Avoid waxy varieties like red potatoes or fingerlings entirely — they just won't achieve that dreamy contrast between crispy exterior and fluffy interior that makes this recipe legendary. Size matters too: medium potatoes (about the size of a baseball) are perfect because they give you nice, evenly-sized cubes without requiring a machete to cut them.
The Flavor Enhancers: Oil and Seasonings
Olive oil is my go-to for its flavor and health benefits, but here's the thing — you need far less than you think. Just two tablespoons for two pounds of potatoes is plenty when you use the right technique. The key is heating the oil briefly with the seasonings before tossing it with the potatoes, which helps the herbs bloom and the garlic infuse throughout. Speaking of garlic, we're using fresh cloves that get minced so fine it practically dissolves, giving you that background savory note without any harsh raw garlic bite.
The seasoning blend is deceptively simple: salt, pepper, garlic, and rosemary. But here's where technique matters — we're using kosher salt for the par-boil (it seasons the potatoes from within) and finishing with a flaky sea salt that adds those delightful pops of salinity on the surface. Fresh rosemary gets minced almost into a paste, releasing those piney oils that pair so perfectly with potatoes. If you've only ever used dried rosemary, prepare to have your mind blown by how much more complex and aromatic the fresh version tastes.
The Unexpected Game-Changer
This is where most recipes miss the boat entirely — cornstarch. Just a teaspoon tossed with the par-boiled potatoes creates a micro-coating that transforms into the most incredibly crispy shell you can imagine. It works by drawing out surface moisture and creating a rougher texture that the hot air can grab onto, resulting in those shatteringly crisp edges that make people close their eyes when they bite into them. Don't skip this step — it's the difference between good potato cubes and potato cubes that people text their friends about.
Another secret weapon is a tiny pinch of sugar in the seasoning mix. I know, I know — sugar on potatoes sounds weird, but hear me out. That tiny bit of sugar caramelizes during the high-heat cooking, creating deeper color and more complex flavors without making the potatoes taste sweet. It's like adding a secret ingredient that nobody can quite identify but everyone knows makes these taste better than any other version they've tried.
The Supporting Cast
Black pepper gets added at two stages — some goes into the oil while it heats (which mellows the sharpness) and more gets cracked fresh at the end for that bright, spicy top note. Use freshly ground if possible; the pre-ground stuff tastes like sawdust in comparison. A squeeze of lemon juice right before serving brightens everything up and makes the flavors sing, but add it at the table, not during cooking, or you'll lose that gorgeous crispness we worked so hard to achieve.
If you're feeling fancy, a sprinkle of good Parmesan cheese in the final two minutes of cooking creates these lacy, crispy cheese bits that adhere to the potatoes like savory candy. It's entirely optional but absolutely incredible if you want to gild the lily. Just make sure to use real Parmigiano-Reggiano, not the stuff from the green can — the difference in flavor and melting quality is night and day.
Everything's prepped? Good. Let's get into the real action...
The Method — Step by Step
- Start by filling a large pot with cold water — yes, cold, because starting potatoes in hot water makes the outsides mushy before the insides cook through. Add two tablespoons of kosher salt per quart of water; it should taste like the ocean, which seems excessive but trust me on this. While the water comes to a boil, cut your potatoes into ¾-inch cubes, keeping them as uniform as possible so they cook evenly. Don't stress if some are slightly bigger or smaller — we're looking for consistency, not perfection, and the air fryer is surprisingly forgiving.
- Once the water's at a rolling boil, carefully add the potato cubes and set a timer for exactly 7 minutes. This isn't the time to check Instagram or start another task — set a timer and pay attention because over-boiling leads to falling-apart potatoes that won't hold their shape in the air fryer. While they boil, you'll notice the water getting cloudy — that's the starch we're trying to remove for maximum crispiness. After 7 minutes, test a cube by piercing it with a fork; it should go in with slight resistance but not slide right through like mashed potatoes.
- Drain the potatoes immediately in a colander and let them steam-dry for 2 minutes. This step is crucial because we want to get rid of as much surface moisture as possible before they hit the hot air. While they steam, heat your air fryer to 400°F — most models need about 3 minutes to preheat properly, and starting with a hot basket makes a huge difference in how the potatoes cook. Give the basket a quick spritz of oil spray to prevent sticking, even if your basket claims to be non-stick.
- Here's where the magic happens: return the drained potatoes to the empty pot (off the heat) and add your cornstarch. Put the lid on and shake vigorously for 30 seconds — this creates those rough, fuzzy edges that'll transform into incredible crispiness. Don't be gentle here; you want to rough up those surfaces. Add your seasoned oil (which you've heated briefly with the garlic and rosemary) and toss everything together with a rubber spatula, making sure every cube gets coated but not swimming in oil.
- Working in batches if necessary, arrange the potato cubes in a single layer in your air fryer basket. Here's the thing that most recipes get wrong — they overcrowd the basket, which steams the potatoes instead of crisping them. The cubes should be close but not touching; you should be able to see the basket bottom between pieces. If they're crowded, cook in two batches rather than compromising on the final texture. It takes an extra 10 minutes but the results are worth it.
- Air fry for 12 minutes at 400°F, then remove the basket and shake vigorously to redistribute the potatoes. They should have started developing some color but won't be fully browned yet. This is also when you add that tiny pinch of sugar if you're using it — just sprinkle it over and give another quick shake. Return to the air fryer for another 8-10 minutes, shaking halfway through, until they're deep golden brown with dark, crispy edges that look almost burnt but taste like potato candy.
- Transfer the cooked potato cubes to a serving bowl lined with paper towel for 30 seconds — just long enough to absorb any excess oil but not so long that they start to steam and lose their crispiness. Immediately season with that flaky sea salt while they're still hot; it adheres better and creates those delightful salty pops that make these so addictive. If you're adding Parmesan, now's the time — sprinkle it over the hot potatoes so it melts into lacy, crispy bits that'll have everyone fighting over the cheesiest pieces.
- Let them rest for exactly 2 minutes before serving — this allows the exterior to set and become even crispier while the interior finishes steaming. Resist the urge to dig in immediately; I know it's hard when they smell incredible, but those two minutes make the difference between good potatoes and potatoes that people write home about. Serve them in a pre-warmed bowl to maintain that perfect temperature contrast between the hot exterior and the fluffy interior.
- If you're making multiple batches, keep the cooked potatoes warm in a 200°F oven on a wire rack set over a baking sheet. Don't stack them in a bowl or cover them — they'll steam and lose their crispiness. The wire rack allows air circulation so they stay crispy while you finish cooking the rest. I've kept them this way for up to 30 minutes without any loss of texture, which makes entertaining stress-free.
- Finally, and this is crucial — serve these immediately for maximum impact. They're still delicious after sitting for 15-20 minutes, but that initial contrast between the shatteringly crisp exterior and the cloud-soft interior is at its peak in the first 10 minutes. If you've got hungry family members circling like vultures, go ahead and serve them in batches as each one finishes. Trust me, nobody will complain about getting hot, fresh potato cubes in waves.
That's it — you did it. But hold on, I've got a few more tricks that'll take this to another level...
Insider Tricks for Flawless Results
After making these potato cubes more times than I care to admit (my air fryer basically lives on my counter now), I've discovered some game-changing tweaks that separate the good from the legendary. These aren't just nice-to-know tips — they're the difference between potatoes that people politely eat and potatoes that cause dinner guests to ask for the recipe before they've even finished chewing.
The Temperature Rule Nobody Follows
Here's what separates the pros from the amateurs: starting at 400°F for the initial blast, then dropping to 375°F for the final crisp. Most recipes keep it at one temperature throughout, but this two-stage approach gives you that perfect contrast — the high heat initially sets the exterior and starts the Maillard reaction, while the slightly lower temperature allows the interior to cook through without burning the outside. It's like having your cake and eating it too, except it's potatoes and you get to eat them all without sharing if you want.
The timing matters just as much as the temperatures. After that initial 12-minute blast at 400°F, you want to see the potatoes looking puffed and just starting to color. If they're still pale, give them another 2 minutes at the high temperature before reducing. This isn't the time to be timid — under-browned potatoes won't get significantly browner at the lower temperature, so make sure you've got good color before you make the switch.
Why Your Nose Knows Best
Your sense of smell is actually the most reliable indicator of when these are perfectly done. When you start smelling that deep, nutty aroma that makes your mouth water involuntarily, you're about 2 minutes away from perfection. It's different from the initial smell of cooking potatoes — this is richer, more complex, with hints of caramel and toasted bread. A friend tried skipping this step once and ended up with potatoes that looked perfect but tasted flat. Don't be that friend.
Another olfactory clue: when the rosemary fragrance becomes prominent and slightly toasted-smelling, you're in the sweet spot. Fresh rosemary goes through a transformation during cooking, starting bright and piney, then mellowing into something deeper and more complex. If you can smell it clearly from across the kitchen, it's time to check for doneness. This is especially helpful if you're cooking in an unfamiliar air fryer where timing might be different from your usual appliance.
The 5-Minute Rest That Changes Everything
After cooking, transfer the potatoes to a wire rack and let them rest for exactly 5 minutes. I know, I mentioned 2 minutes earlier for immediate serving, but if you can wait the full 5, something magical happens. The exterior becomes even more crispy as steam escapes, while the interior stays hot and fluffy. It's like the potato equivalent of letting a steak rest — it allows the temperature to equalize and the textures to set perfectly.
During this rest, resist the urge to tent them with foil or cover them in any way. They need exposure to air to maintain that crispiness. If you're worried about them getting cold, remember that they're small pieces with a high surface area — they retain heat surprisingly well. I've tested this dozens of times, and 5 minutes is the sweet spot where you get maximum crispiness without significant heat loss.
The Seasoning Timing Secret
Seasoning timing makes a bigger difference than most people realize. Salt the potatoes before cooking so it can penetrate and season from within, but save any additional seasonings (like that flaky sea salt, fresh herbs, or spices) for after cooking. Heat can mute the flavors of delicate herbs and make spices taste bitter, so adding them at the end preserves their brightness and complexity.
The exception is garlic powder and onion powder — these can go on before cooking because they need the heat to bloom and release their flavors. Fresh garlic, on the other hand, should be added to the oil before tossing with the potatoes, not directly on the potatoes themselves. This prevents the garlic from burning and turning bitter during the high-heat cooking process.
The Storage Game-Changer
If you're making these ahead (which I highly recommend for stress-free entertaining), undercook them by about 2 minutes during the initial cooking. Let them cool completely, then store in an airtight container in the fridge for up to 3 days. When you're ready to serve, pop them back in the air fryer at 375°F for 5-6 minutes until heated through and crispy again. They'll taste like you just made them fresh, and your guests will think you're a kitchen wizard.
The key to successful reheating is making sure they're in a single layer and not crowded. You might need to do multiple batches depending on your air fryer size, but it's worth it for that fresh-from-the-fryer texture. I've even frozen fully cooked potato cubes and reheated them from frozen — add 2-3 extra minutes to the reheating time and they come out surprisingly well, making these perfect for emergency potato cravings.
Creative Twists and Variations
This recipe is a playground. Here are some of my favorite ways to switch things up:
The Everything Bagel Version
Replace the rosemary with everything bagel seasoning (store-bought or homemade), and swap the olive oil for melted butter for extra richness. The sesame seeds and garlic in the seasoning toast beautifully in the air fryer, creating these little flavor bombs throughout. They're incredible served with cream cheese as an appetizer, or alongside eggs for a brunch that'll make you look like you planned it weeks in advance.
Spicy Cajun Style
Add 1 teaspoon of Cajun seasoning and ½ teaspoon of smoked paprika to the oil mixture, and finish with a squeeze of lemon and chopped green onions. The spice blend gives these a beautiful color and complex heat that builds slowly rather than overwhelming your palate. If you're sensitive to spice, start with half the amount — you can always add more, but you can't take it away once it's on there.
The Loaded Potato Experience
After cooking, toss the hot potato cubes with shredded cheddar, crumbled bacon, and sliced green onions, then return to the air fryer for just 1-2 minutes to melt the cheese. Serve with sour cream on the side for dipping. It's like loaded potato skins but infinitely easier to eat and share, plus you get more of that crispy surface area that makes loaded potatoes so good in the first place.
Greek-Inspired Lemon and Herb
Replace the rosemary with oregano and add lemon zest to the oil mixture. After cooking, finish with fresh lemon juice and crumbled feta cheese. The brightness of the lemon pairs beautifully with the earthy potatoes, while the feta adds a salty, creamy contrast that makes these feel sophisticated enough for a dinner party but approachable enough for a Tuesday night.
Asian-Style with Sesame and Ginger
Sesame oil replaces half the olive oil, with fresh grated ginger and a splash of soy sauce in the seasoning mix. Finish with toasted sesame seeds and sliced scallions. These pair beautifully with grilled meats or as part of an Asian-inspired meal. The ginger adds warmth without heat, while the sesame oil gives these an incredible aroma that'll have people asking what smells so good.
Breakfast Hash Style
Add diced onions and bell peppers to cook alongside the potatoes (they go in for the last 10 minutes), then finish with breakfast sausage crumbles and a fried egg on top. It's like a deconstructed breakfast hash that takes way less effort than standing over a stove flipping everything individually. Perfect for weekend brunches when you want something impressive but don't want to spend your whole morning cooking.
Storing and Bringing It Back to Life
Fridge Storage
Let the potato cubes cool completely before storing in an airtight container — warm potatoes create condensation which leads to soggy sadness. They'll keep for up to 4 days in the refrigerator, though they're best within the first 2 days. Store them in a single layer if possible, or with parchment paper between layers to prevent them from crushing each other and losing their crispy edges.
For best results, don't season with fresh herbs or additional salt until you're ready to reheat and serve. These can be added fresh each time, ensuring maximum flavor impact. If you know you'll be storing some, set aside a portion before adding the final seasonings — your future self will thank you.
Freezer Friendly
These freeze surprisingly well if you follow the right technique. Let them cool completely, then spread in a single layer on a baking sheet and freeze for 2 hours before transferring to a freezer bag. This prevents them from freezing into one solid potato brick. They'll keep for up to 2 months frozen, though honestly, they've never lasted more than a week in my freezer because they're so convenient to have on hand.
To reheat from frozen, don't thaw — just pop them in the air fryer at 375°F for 8-10 minutes, shaking halfway through. They won't be quite as crispy as fresh, but they're still miles better than any frozen potato product you'll find at the store. The key is giving them enough time to heat through completely without rushing the process.
Best Reheating Method
The air fryer is hands-down the best way to reheat these, bringing back about 90% of the original crispiness. Preheat to 375°F and cook for 3-4 minutes for refrigerated potatoes, shaking once halfway through. If they seem dry, spritz them very lightly with oil before reheating — just a tiny bit helps restore that fresh-cooked texture.
Avoid microwaving at all costs unless you enjoy sad, soggy potatoes. If you don't have an air fryer available, a hot skillet with a tiny bit of oil works in a pinch, though you'll need to stir frequently to prevent burning. The oven works too — spread on a baking sheet and heat at 400°F for about 8 minutes — but it's slower and heats up your whole kitchen for just a small portion.