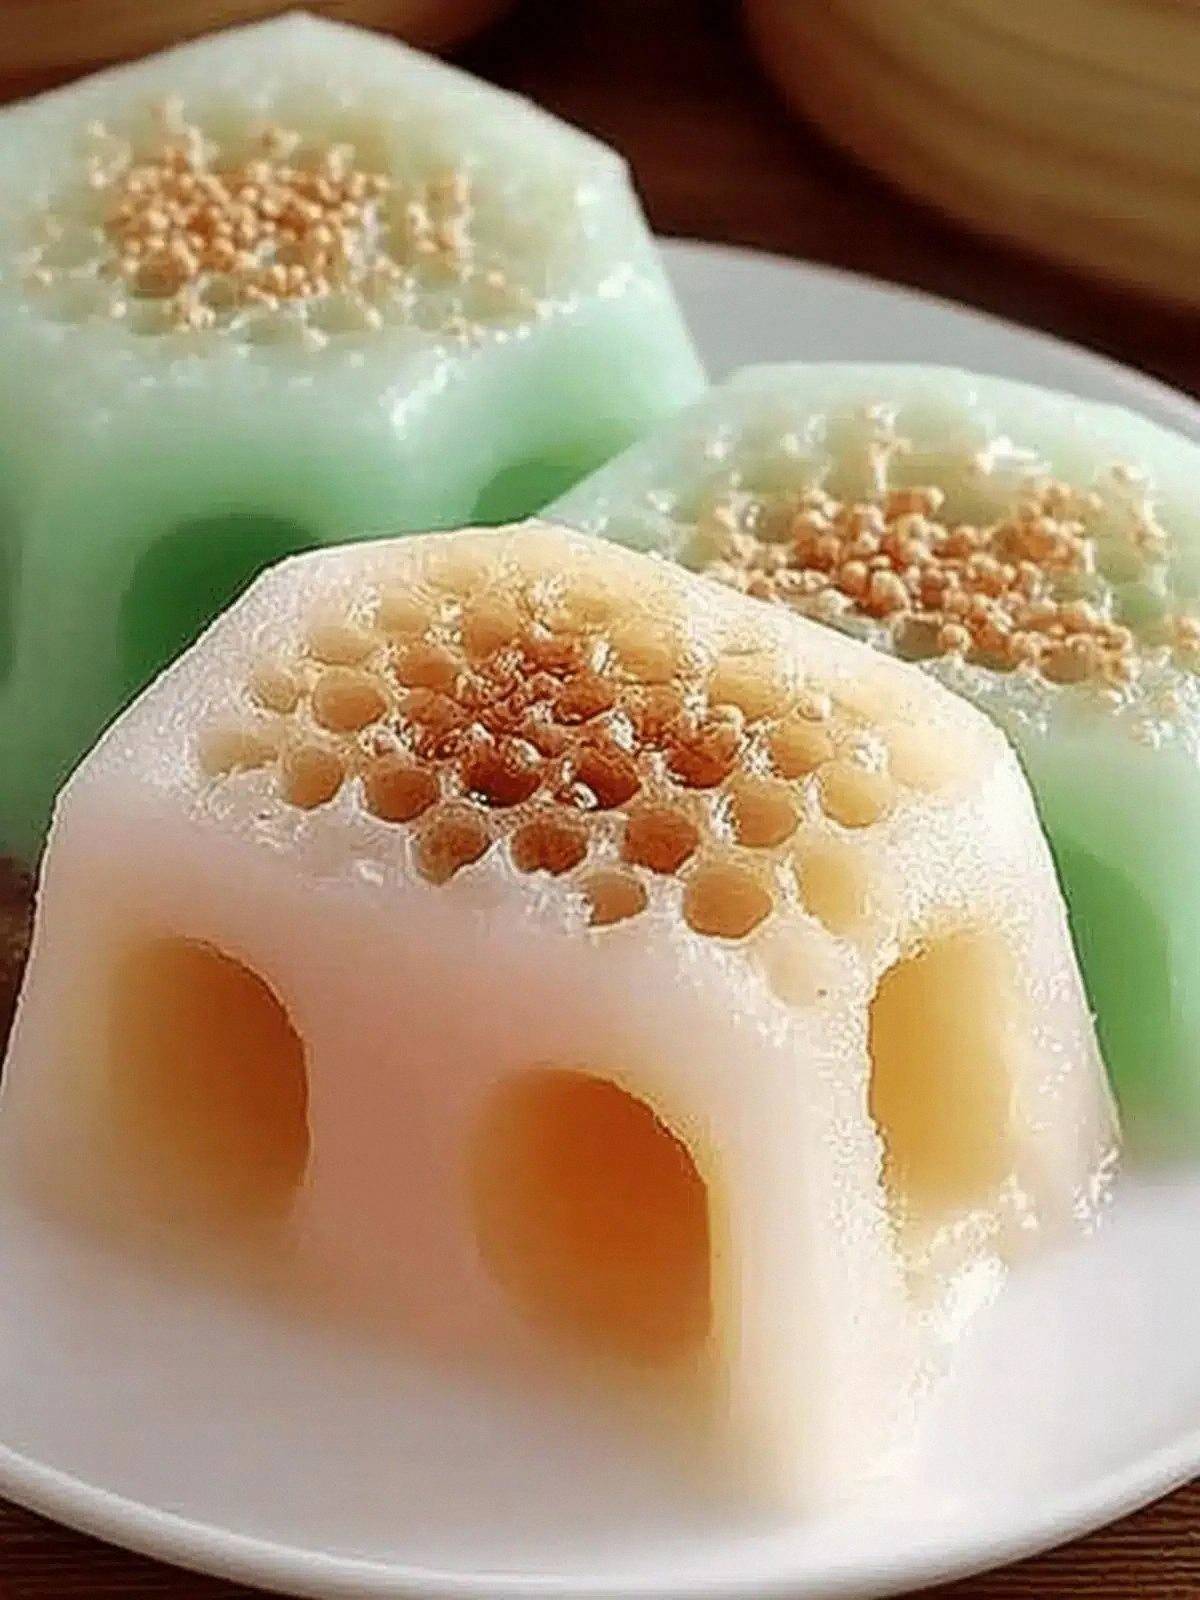
I was halfway through a chaotic week, juggling deadlines, a toddler’s tantrums, and a broken oven that sputtered like a dying dragon. The kitchen smelled of burnt toast, burnt toast, and burnt toast. In the midst of that aromatic tragedy, a friend texted me a recipe for a Vietnamese honeycomb cake that promised to be the ultimate steamed dessert. I stared at the photo, my eyes widening as the golden, airy batter seemed to float like a cloud in a sea of steam. I knew then that this was the culinary lifeline I needed.
That night, I grabbed my steamer rack, a pot of water, and a bowl that had seen better days. I mixed the flour, sugar, coconut milk, and eggs like a mad scientist, hoping for a miracle. The batter had that perfect, glossy sheen that made me feel like I was about to bake a piece of the sky. The aroma that filled the kitchen was sweet, nutty, and utterly hypnotic. It was the smell of comfort wrapped in a promise of something extraordinary.
I dare you to taste this and not go back for seconds. The first bite was a burst of sweet, buttery flavor that lingered like a warm hug. The texture was light enough to melt on the tongue, yet dense enough to keep its shape. I was already thinking about the next batch, wondering how I could tweak it to make it even more irresistible. The moment the steam rose, it felt like a cloud was being released into the world, carrying with it the scent of coconut and vanilla.
I’ll be honest — I ate half the batch before anyone else got to try it. The rest of the family stared at me with a mix of awe and envy, wondering how I could have pulled this off so effortlessly. I had no idea that the secret was not in the ingredients but in the way they were combined, the timing, and the patience to let the steam do its job. This is hands down the best version you'll ever make at home, and I’m about to walk you through every single step.
Picture yourself pulling this out of the steamer, the whole kitchen smelling incredible, and the plate looking like a piece of art. The golden-brown edges crackle slightly when you lift them, and the inside is a cloud of sweetness that dissolves in your mouth. This cake is not just a dessert; it’s a moment of pure joy that you’ll want to savor over and over. If you've ever struggled with steamed desserts, you're not alone — and I've got the fix.
Most recipes get this completely wrong. They either overcook it or underbake it, resulting in a dense, rubbery mess. Here’s what actually works: let the batter rest for 15 minutes, steam at a steady boil, and avoid opening the lid too early. The trick is to treat the steamer like a sauna for the batter, allowing the steam to gently coax the sugars into caramelizing. The result is a cake that is fluffy, sweet, and slightly caramelized on the outside.
Okay, ready for the game-changer? The next step is to let the batter sit. This simple pause allows the flour to hydrate fully, creating a smoother, more cohesive mixture. I’ve found that if you skip this step, the cake ends up with a gritty texture that’s hard to enjoy. Trust me, the extra 15 minutes is worth every second of your time. You’ll be rewarded with a cake that feels like a cloud of sweetness.
Stay with me here — this is worth it. The final touch is the drizzle of caramel or a sprinkle of toasted coconut. The caramel adds a subtle depth, while the coconut keeps the texture interesting. The combination of flavors is a symphony that sings in your mouth. I promise you, after tasting this, you’ll want to create variations and experiment with different toppings.
What Makes This Version Stand Out
- Flavor: The blend of coconut milk and vanilla gives a tropical depth that sets this cake apart from ordinary steamed desserts. It’s not just sweet; it’s fragrant and comforting.
- Texture: The batter’s airy consistency results in a light, cloud-like interior that melts on the tongue. The gentle caramelization on the edges adds a subtle crunch.
- Simplicity: With only nine ingredients, this recipe is a breeze to prepare, even for beginners. No fancy equipment required beyond a steamer rack.
- Uniqueness: The use of coconut milk as the primary liquid transforms the cake into a moist, fragrant treat that feels like a secret family recipe.
- Crowd Reaction: Friends and family always ask for the recipe after tasting. The cake’s sweet aroma alone draws people in.
- Ingredient Quality: Using high‑quality vanilla extract and fresh coconut milk elevates the flavor profile beyond the ordinary.
- Cooking Method: Steaming preserves moisture and creates a tender crumb that baking cannot replicate.
- Make‑Ahead Potential: The cake can be steamed ahead of time, then reheated gently to preserve its softness.
Inside the Ingredient List
The Flavor Base
All-purpose flour is the backbone of this cake, providing the structure that holds the batter together. It’s the foundation that allows the other flavors to shine without becoming overwhelming. If you were to skip it, the cake would collapse into a soggy mess. A good rule of thumb is to sift the flour to remove any lumps, ensuring a smooth batter.
Granulated sugar is the sweetener that caramelizes during steaming, giving the cake its golden-brown edges. It also contributes to the cake’s tender crumb by interfering with gluten development. If you reduce the sugar, you’ll end up with a cake that’s too dry and lacks that signature caramel glow. For a slightly richer taste, you could experiment with brown sugar, but be prepared for a deeper color.
Coconut milk adds a subtle tropical flavor and a creamy texture that keeps the cake moist. The natural fats in coconut milk help create a silky mouthfeel, making each bite feel like a gentle hug. If you’re allergic to coconut, a light almond milk will work, but the flavor profile will shift noticeably.
Eggs are the glue that binds everything together. They provide structure, lift, and richness. The yolks add a subtle depth, while the whites help keep the batter airy. If you’re vegan, try using a flaxseed egg or a commercial egg replacer, but the texture will be slightly different.
The Texture Crew
Baking powder is the leavening agent that makes the cake rise. It reacts with the acidic coconut milk to create carbon dioxide bubbles that puff up the batter. Skipping it will result in a dense, heavy cake that doesn’t rise at all. For an extra lift, you can double the amount, but be careful not to overdo it.
Salt balances the sweetness and enhances the overall flavor. A pinch of salt can bring out the subtle notes of vanilla and coconut, making the cake taste more rounded. If you omit it, the cake will taste flat and overly sweet. A small amount is all you need.
Vanilla extract is the flavor enhancer that ties all the ingredients together. It adds warmth and depth, making the cake feel more complex. A good vanilla extract will give the cake a fragrant aroma that lingers in the kitchen. If you prefer a stronger flavor, use a vanilla bean instead of extract.
Water is the liquid that balances the batter’s consistency. It helps the batter flow smoothly into the steamer and prevents it from becoming too thick. Too much water will make the cake soggy, while too little will cause it to stick to the steamer rack. Keep the ratio precise for the best results.
The Unexpected Star
The steamer rack is the unsung hero of this dish. It elevates the batter above the boiling water, allowing steam to envelop the batter evenly. Without it, the cake would end up sitting in the water and becoming soggy. A bamboo rack is ideal because it’s breathable and adds a subtle aroma.
Choosing a rack with evenly spaced holes ensures that steam circulates around each portion of the batter, creating uniform cooking. If you use a metal rack, be sure it’s non‑stick to avoid the cake from sticking. The rack’s material can also influence the final texture; a bamboo rack gives a slightly earthy undertone.
The size of the rack matters too. A rack that’s too large will spread the batter too thin, causing it to dry out. A rack that’s too small will crowd the batter, making it difficult to steam evenly. Find a balance that matches the pot’s diameter for the best results.
If you can’t find a steamer rack, a heat‑proof silicone mat will do the trick. Just make sure it’s not too thick, as that could impede steam flow. The key is to keep the batter elevated above the water so it can steam properly.
The Final Flourish
The final flourish of this cake is the gentle caramelization of the edges. This subtle browning adds a hint of bitterness that balances the sweetness. It also gives the cake a pleasant texture contrast, with a slight crunch on the outside and a soft interior.
The caramelization occurs naturally as the steam heats the batter, causing the sugars to brown. This process is similar to the Maillard reaction that gives bread its crust. The result is a cake that looks and tastes like it’s been baked to perfection, even though it’s steamed.
The final touch is the optional drizzle of caramel sauce or a sprinkle of toasted coconut. These toppings add extra layers of flavor and texture, turning a simple cake into a dessert that feels indulgent. The caramel adds a buttery sweetness, while the coconut adds a crunchy contrast.
Everything’s prepped? Good. Let’s get into the real action and start steaming!
The Method — Step by Step
- Combine the flour, sugar, baking powder, and salt in a large mixing bowl. Sift them together to ensure an even distribution of leavening agents. This step is crucial for a smooth batter that rises evenly.
- In a separate bowl, whisk the eggs, coconut milk, vanilla extract, and water until the mixture is silky. The goal is to create a homogeneous liquid that will bind the dry ingredients. The texture should resemble a thick custard.
- Pour the wet mixture into the dry ingredients and stir until just combined. Overmixing will develop gluten and result in a tough cake. The batter should be glossy and free of lumps.
- Let the batter rest for 15 minutes at room temperature. This rest period hydrates the flour, allowing the batter to expand when steamed. The aroma will intensify, signaling that the cake is ready to rise.
- Fill a pot with about two inches of water and bring it to a rolling boil. Place the steamer rack inside, ensuring it’s elevated above the water. The pot should be large enough to accommodate the rack without overcrowding.
- Pour the batter onto the rack, filling each compartment about two-thirds full. The batter should be spread evenly to ensure uniform steaming. Avoid overfilling, which can cause the cake to spill over.
- Cover the pot with a tight-fitting lid and steam the cake for 30 minutes. Keep the heat at a steady, gentle boil. The steam should hiss softly, indicating that the water is boiling but not boiling over.
- After 30 minutes, turn off the heat and let the cake sit in the pot for an additional 5 minutes with the lid still on. This allows the residual steam to finish cooking the interior. The cake should feel firm to the touch but still slightly springy.
- Remove the steamer rack carefully using tongs or heat‑resistant gloves. Let the cake cool for 5 minutes before transferring it to a wire rack. The cake will release easily if you’re careful.
- Serve the cake warm, optionally drizzled with caramel sauce or topped with toasted coconut. The warm cake will release steam, creating a fragrant cloud that makes the experience even more delightful.
Insider Tricks for Flawless Results
The Temperature Rule Nobody Follows
Many people assume that a high heat will speed up steaming, but the truth is that a gentle, steady boil is essential. A sudden surge in temperature can cause the batter to cook unevenly, leading to a lumpy texture. Keep the water at a steady simmer and avoid letting it boil over. This small adjustment makes a world of difference.
Why Your Nose Knows Best
The aroma of the batter is a reliable indicator of how close the cake is to being done. When the sweet, caramel scent starts to dominate, it means the sugars are caramelizing. Don’t wait for the cake to be fully cooked before checking the smell; a subtle scent can save you from overcooking.
The 5-Minute Rest That Changes Everything
After turning off the heat, let the cake rest in the pot for five minutes with the lid on. This rest period allows the steam to finish the cooking process without the risk of overbaking. Skipping this step often results in a cake that’s too dry or unevenly cooked.
Mind the Water Level
Keep the water level just below the steamer rack. If the water rises too high, it can splash into the batter, creating a soggy bottom. If it’s too low, the steam may dissipate too quickly, causing the cake to dry out. A good rule of thumb is to maintain a two-inch water depth.
Use the Right Steamer Rack
A bamboo rack is ideal because it’s porous and absorbs minimal water. Metal racks can cause the batter to stick if not properly greased. If you’re using a metal rack, lightly coat it with coconut oil to prevent sticking.
Don’t Overmix the Batter
Mix the batter just until the dry ingredients are incorporated. Overmixing develops gluten, which makes the cake tough. A light touch is all that’s needed to achieve a tender crumb.
Creative Twists and Variations
This recipe is a playground. Here are some of my favorite ways to switch things up:
Chocolate‑Infused Delight
Add a tablespoon of cocoa powder to the dry mix and replace half the coconut milk with chocolate milk. The result is a chocolatey version that still retains the airy texture. It’s perfect for chocolate lovers who want a healthier option.
Spiced Coconut Surprise
Incorporate a pinch of cardamom and a dash of nutmeg into the batter. The spices add warmth and depth, making the cake feel like a dessert straight out of a spice market. Pair it with a drizzle of honey for extra sweetness.
Almond Flour Variant
Swap half the all-purpose flour for almond flour to create a gluten‑free version. The almond flour adds a nutty flavor and a slightly denser crumb. It’s a great option for those with gluten sensitivities.
Berry‑Burst Version
Fold in fresh blueberries or raspberries into the batter before steaming. The berries burst into juicy pockets, adding a refreshing tartness that contrasts the sweet cake. Serve with a dusting of powdered sugar for an elegant finish.
Matcha Magic
Add a teaspoon of matcha powder to the dry mix for a subtle green tea flavor. The matcha not only adds color but also provides antioxidants. Pair it with a drizzle of sesame sauce for a unique flavor profile.
Honey‑Glazed Finish
After steaming, brush the cake with a honey glaze made from honey, a splash of coconut milk, and a pinch of sea salt. The glaze adds a glossy finish and a sweet, salty balance. It’s an elegant touch for a special occasion.
Caramel‑Coconut Crunch
Top the cake with toasted coconut flakes and a drizzle of caramel sauce. The coconut adds a crunchy texture, while the caramel brings a buttery sweetness. This version is a crowd‑pleaser at parties.
Minty Freshness
Add a few drops of peppermint extract to the batter for a cool, minty finish. The mint pairs beautifully with the coconut flavor, creating a refreshing dessert. It’s a great way to keep things interesting.
Vanilla‑Berry Fusion
Fold in sliced strawberries into the batter for a sweet, juicy twist. The strawberries soften during steaming, releasing a fragrant aroma. Serve with a light dusting of powdered sugar for a simple yet elegant presentation.
Storing and Bringing It Back to Life
Fridge Storage
Store the cooled cake in an airtight container at room temperature for up to two days. The airtight seal preserves the moisture, preventing the cake from drying out. When you’re ready to serve, let it sit at room temperature for 15 minutes to regain its softness.
Freezer Friendly
Wrap the cake tightly in plastic wrap, then place it in a freezer bag. It will keep for up to two weeks. When you’re ready to enjoy it, thaw it overnight in the fridge, then let it warm to room temperature.
Best Reheating Method
To revive a frozen or refrigerated cake, wrap it in a damp paper towel and heat in a microwave for 20-30 seconds. The damp towel prevents the cake from drying out. Alternatively, place it in a preheated steamer for 5 minutes to restore its original steam‑cooked texture.
Add a tiny splash of water before reheating — it steams back to perfection, giving the cake that signature moistness. The trick is to reintroduce steam, not heat alone. The cake will taste as fresh as when it was first steamed.