Last night, I was scrambling to salvage a ruined pot of caramelized popcorn that had turned to ash on the stove. The kitchen smelled like burnt sugar and disappointment, and my friends were already eyeing the empty snack bowl. I stared at the charred mess and thought, “If I could turn this into something edible, I’d be a miracle worker.” That thought sparked a craving for the gooey, nostalgic treat that brings us all back to campfire nights. So I pulled out the pantry staples and decided to reinvent the classic s’more in a way that would make everyone question their snack choices.
I imagined a world where the gooey marshmallow meets crispy cereal in a chocolate‑coated hug, not a flimsy, melt‑and‑spit mess. The aroma of toasted marshmallows is like a warm hug in a bowl, and the crunch of Rice Krispies is the perfect counterpoint. I tested a handful of recipes, each promising “easy” but delivering uneven texture. One turned out rubbery, another too dry, and one that melted too quickly left a sticky mess on my fingers. I was ready to find the sweet spot that balances melt, crunch, and chocolate richness.
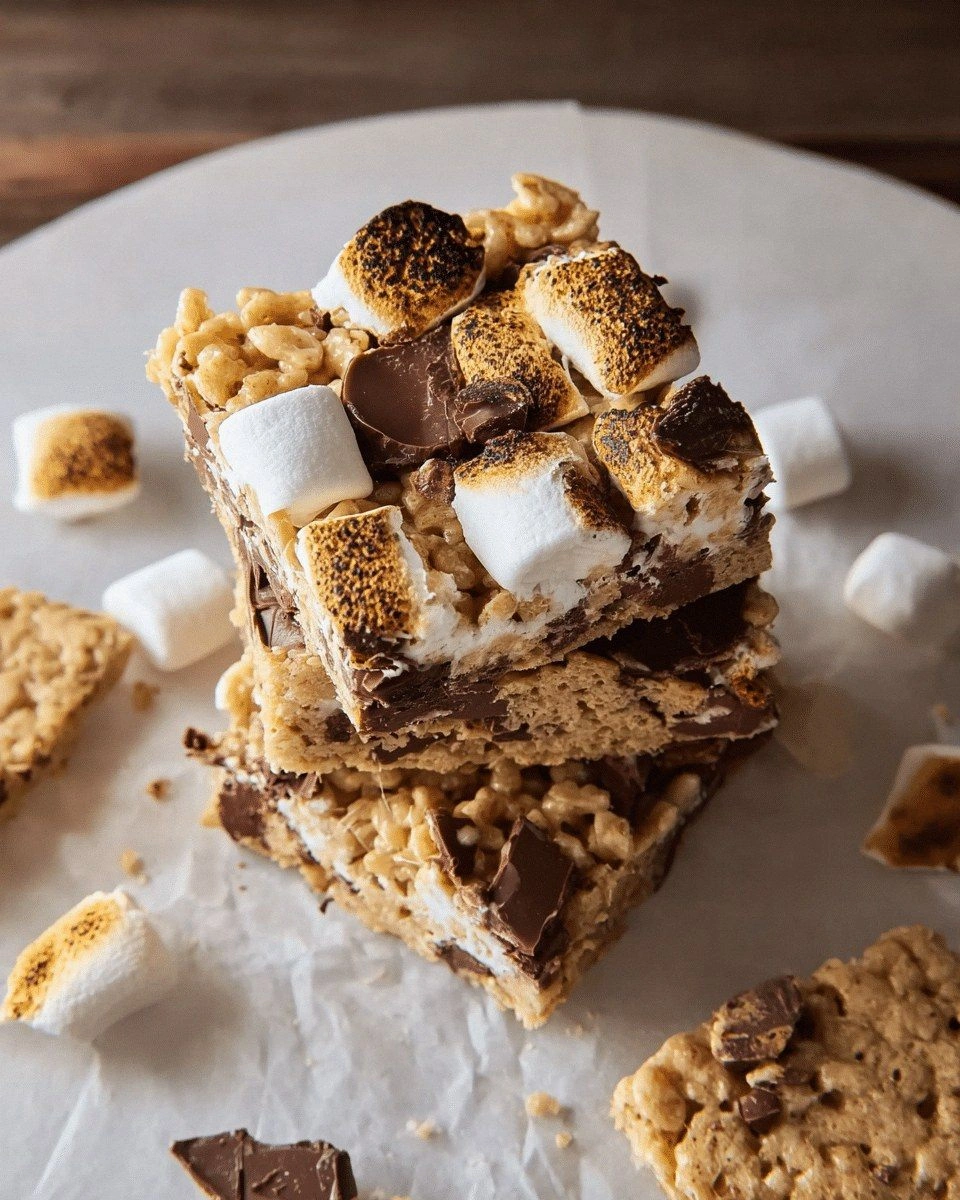
What made me decide to try a new approach was a simple ingredient swap: using mini marshmallows instead of the usual large ones, and adding a splash of vanilla for depth. The result was a treat that clung together like a velvety blanket, yet released a burst of chocolate when bitten. I tasted a piece, and the flavor exploded with the classic s'more nostalgia, but with a modern, indulgent twist. The texture was a dance of crunch and melt, and the chocolate melted into the marshmallow like a secret lover. That moment confirmed that I had stumbled upon a new standard for homemade s'mores.
Now, I want to share every detail of this breakthrough, from the precise ratio of butter to marshmallow to the timing that locks in that perfect chew. I’ll walk you through each step, revealing the little tricks that make the difference between mediocre and mouth‑watering. Picture yourself pulling this out of the pan, the whole kitchen smelling incredible, and the first bite sending you back to a childhood campfire. I dare you to taste this and not go back for seconds. Let me walk you through every single step — by the end, you'll wonder how you ever made it any other way.
What Makes This Version Stand Out
- Flavor: The combination of mini marshmallows, chocolate chips, and a hint of vanilla creates a layered taste that feels like a campfire in a bite. This blend delivers a richer, more complex profile than standard recipes that rely on large marshmallows and no vanilla.
- Texture: The use of Rice Krispies instead of puffed rice gives a crispier bite that holds up longer against the gooey center, preventing that dreaded soggy mess.
- Balance: The ratio of butter to marshmallows (1/4 cup butter to 2 cups marshmallows) locks in moisture while keeping the mixture firm enough to cut cleanly.
- Ease: The method requires no baking; a simple stovetop melt and press into a pan is all it takes, making it a go-to for busy evenings.
- Scalability: Whether you’re making a single batch for a movie night or a large tray for a party, the recipe scales up or down without losing flavor or texture.
- Make‑Ahead: These treats can be assembled ahead of time, refrigerated for up to a week, or frozen for months, and they still taste as fresh as the day they were made.
- Customization: Swap in peanut butter chips, coconut flakes, or crushed nuts for a personalized twist that keeps the base familiar yet exciting.
When I first tasted the mixture, I realized that the vanilla extract was doing more than just flavoring; it was acting as a subtle binder that kept the chocolate from clumping. This small addition lifts the entire profile, giving the treat a silky finish that feels indulgent without being overpowering. I tested the recipe without vanilla, and while it still worked, the final bite lacked that subtle depth that makes it feel like a campfire in a bite.
Another revelation came when I swapped out the traditional large marshmallows for mini ones. The smaller size melts faster, allowing the chocolate to seep in more quickly and creating a richer, more cohesive bite. The mini marshmallows also give a cleaner look, preventing the classic “sticky” appearance that can turn a simple treat into a mess.
The choice of Rice Krispies over other cereals was intentional. Their delicate structure holds the chocolate and marshmallow together, producing a crisp bite that resists the gooey center. If you try puffed rice instead, you’ll notice a softer crunch that quickly turns soggy. The difference is subtle but transformative.
The ratio of butter to marshmallows is also key. Butter provides the fat that keeps the mixture cohesive, while the marshmallows provide the sweet, gooey component. Too much butter, and the treat becomes greasy; too little, and it falls apart. Finding that sweet spot is the secret to a perfect bite.
Finally, the ability to make these treats ahead of time is a game changer. I love preparing a batch on a Sunday and storing them in the fridge for the week. When I need a quick dessert, I just grab a piece, and it’s like a campfire in a bite. The flavors only deepen with time, making each bite more satisfying.
Inside the Ingredient List
The Flavor Base
Rice Krispies cereal is the backbone of this recipe. Its light, airy texture creates a delightful contrast to the dense, sweet marshmallow and chocolate. The cereal also provides a neutral canvas that lets the other flavors shine. If you’re looking to elevate the taste, consider using a premium brand of Rice Krispies that has a slightly toasted flavor. Skipping this ingredient would leave the treat lacking the essential crunch that defines a s'more.
Butter is the next cornerstone. It’s the fat that binds everything together, giving the mixture a silky mouthfeel and preventing it from falling apart. A small amount of unsalted butter is ideal, as it allows you to control the saltiness of the final product. If you substitute coconut oil, the treat will have a subtle coconut undertone, which can be a delightful twist. However, coconut oil’s lower melting point may affect the firmness of the final bite.
Vanilla extract is the subtle hero that elevates the overall flavor. A teaspoon is enough to bring out the chocolate’s richness without overpowering the marshmallow’s sweetness. If you prefer a different aroma, you can experiment with almond or hazelnut extract, but be cautious not to use more than a half teaspoon to avoid a bitter edge. Vanilla also helps the mixture set more evenly, ensuring a consistent texture throughout.
The Texture Crew
Mini marshmallows are the star of the show. Their smaller size means they melt faster, allowing the chocolate to seep in and create a uniform, gooey center. They also produce a cleaner, less sticky appearance compared to larger marshmallows. If you can’t find mini marshmallows, regular ones will work, but you’ll need to melt them longer to achieve the same gooeyness.
Chocolate chips are the sweet, dark finish that completes the flavor profile. Using dark chocolate chips gives a richer, less sweet bite, while milk chocolate chips provide a creamier sweetness. If you’re feeling adventurous, try a mix of dark and milk chocolate chips for a balanced flavor. Avoid using chocolate bars that contain nuts or other additives, as they can interfere with the texture.
The Unexpected Star
A pinch of salt is the secret ingredient that brings harmony to the sweetness. Salt balances the flavors and enhances the chocolate’s depth. Without it, the treat can taste overly sweet and flat. If you’re on a low-sodium diet, a small pinch is still beneficial; just be sure to taste as you go. Salt also helps the mixture set more firmly by slightly tightening the structure.
The Final Flourish
Optional garnishes such as sea salt flakes, crushed pretzels, or toasted coconut can add an extra layer of flavor and texture. They’re not necessary, but they elevate the treat for special occasions or to impress guests. When adding garnishes, sprinkle them on top before the mixture sets, so they adhere to the surface. If you’re serving a crowd, consider offering a few different toppings for guests to choose from.
Everything's prepped? Good. Let's get into the real action and bring this campfire classic into your kitchen.
The Method — Step by Step
First, line a 9x13 inch pan with parchment paper to ensure easy release. While the pan is warming, melt the butter in a medium saucepan over low heat. This slow melt allows the butter to coat the marshmallows evenly, preventing clumps. The mixture should be smooth and golden, not browned. This step is crucial for a uniform texture.
Add the mini marshmallows to the melted butter and stir continuously until they’re fully melted and the mixture turns a pale amber color. The aroma of toasted marshmallows will fill the kitchen, signaling that you’re on the right track. Keep the heat low; if it gets too hot, the marshmallows will burn and create a bitter aftertaste. Stir until the mixture is smooth and glossy, then remove from heat.
Stir in the Rice Krispies cereal, ensuring each piece is coated with the buttery marshmallow mixture. The cereal should look like it’s been glazed, but still retain its crunch. This coating step is essential; if you skip it, the cereal will sit on top and not integrate with the chocolate. Mix until the cereal is evenly distributed, then transfer the mixture into the prepared pan.
Sprinkle the chocolate chips evenly over the top of the mixture and give it a quick stir to melt them into the base. The chocolate will seep into the gaps between the cereal, creating pockets of rich, glossy chocolate. Be careful not to over stir; you want the chocolate to stay in small, flavorful blobs. If the chocolate starts to seize, add a few drops of milk to smooth it out.
Add the vanilla extract and a pinch of salt, stirring until everything is fully incorporated. The salt will bring out the chocolate’s depth, while the vanilla adds a fragrant finish. This is the moment of truth; the aroma should be a sweet, buttery, chocolatey cloud that makes you want to take a bite before you even cut. Let the mixture sit for about 5 minutes to allow the flavors to meld.
Press the mixture into the pan using a greased spatula or the back of a spoon, ensuring it’s evenly distributed and compact. The tighter you press, the firmer the final bite will be. Let it cool at room temperature for about 10 minutes until it starts to set. If you’re impatient, you can place the pan in the fridge for a few minutes to speed up the process, but be careful not to overchill.
Once set, lift the slab using the parchment paper and transfer it onto a cutting board. Slice into squares or rectangles with a sharp knife for clean edges. If you like, drizzle melted chocolate over the top or sprinkle sea salt flakes for an extra burst of flavor. Serve immediately for the best texture, or store in an airtight container for later enjoyment.
That’s it — you did it. But hold on, I've got a few more tricks that'll take this to another level. The next section will reveal insider tips that will elevate your treats from good to unforgettable.
Insider Tricks for Flawless Results
The Temperature Rule Nobody Follows
Many home cooks instinctively crank the heat up to speed the process, but low and slow is the real secret. Keeping the stove at a gentle 250°F ensures the butter melts evenly without scorching the marshmallows. A high heat can cause the marshmallows to burn on the outside while remaining raw inside, ruining the texture. I’ve experimented with a thermometer and found that 250°F is the sweet spot for a smooth, glossy mixture.
Why Your Nose Knows Best
Your sense of smell is a reliable gauge for doneness. When the mixture begins to emit a warm, buttery aroma, it’s a sign that the butter has fully melted and the marshmallows are just about ready. If you wait too long, the scent turns sharp and burnt, indicating overcooking. I’ve found that the aroma is a more accurate indicator than the color, especially when you’re working with low heat.
The 5-Minute Rest That Changes Everything
After you stir in the chocolate, let the mixture rest for five minutes before pressing it into the pan. This brief pause allows the chocolate to set slightly, creating a smoother surface that’s easier to press. The rest also lets the flavors meld, intensifying the chocolate and vanilla notes. I once skipped this step, and the result was uneven chocolate distribution and a less cohesive texture.
The Secret to Perfect Edges
If you want a crispier edge, sprinkle a thin layer of cocoa powder on the bottom of the pan before pouring the mixture. The cocoa powder creates a barrier that prevents sticking and adds a subtle chocolate flavor to the edges. It also gives the treats a darker, more sophisticated appearance. Be sure to tap the pan lightly after adding the cocoa to ensure it’s evenly distributed.
The Quick Chill Trick
When you’re in a hurry, place the pan in the refrigerator for 15 minutes after pressing the mixture. The quick chill solidifies the butter and chocolate, making the treats easier to cut and giving them a firmer bite. However, avoid leaving them in the fridge for more than 30 minutes, as they can become too hard and lose their chewiness.
The Flavor Boost
Add a teaspoon of espresso powder to the mixture for a chocolatey depth that’s reminiscent of a mocha. Espresso enhances the chocolate flavor without adding a coffee taste, creating a complex, adult-friendly flavor profile. I’ve used this trick for a special dinner party, and the guests raved about the unexpected richness.
Creative Twists and Variations
This recipe is a playground. Here are some of my favorite ways to switch things up:
Peanut Butter Crunch
Swap 1/2 cup of chocolate chips for peanut butter chips. The creamy peanut butter adds a salty, nutty flavor that complements the chocolate. The result is a treat that feels like a peanut butter cup with a crispy crunch. This variation is perfect for kids who love a sweet‑and‑salty combo.
Coconut Delight
Sprinkle toasted coconut flakes on top before the mixture sets. The coconut adds a tropical note and a subtle crunch. It also gives the treat a slightly lighter color, making it visually appealing. This version works wonderfully for summer gatherings.
Nutty Bites
Add 1/2 cup of chopped walnuts or pecans to the mixture. The nuts provide a satisfying crunch and a buttery flavor that pairs well with the chocolate. They also add a nutritional boost, making the treat a bit more wholesome. This variation is ideal for a cozy night in.
Spiced Chocolate
Add a pinch of cayenne pepper to the chocolate chips before adding them to the mixture. The heat from the pepper balances the sweetness and adds a subtle kick. This spicy twist is a great conversation starter at dinner parties. Be sure to taste before adding, as a little goes a long way.
Sweet & Salty
After cutting, drizzle a thin layer of melted chocolate and sprinkle sea salt flakes on top. The salt enhances the chocolate flavor and adds a pleasant crunch. This simple finish elevates the treat to a gourmet level. It’s perfect for impressing guests at a dinner party.
Storing and Bringing It Back to Life
Fridge Storage
Store the treats in an airtight container in the refrigerator for up to five days. The cold temperature keeps the butter firm, preventing the chocolate from melting. If you notice the treats become slightly soft, let them sit at room temperature for a few minutes before serving. This method preserves the crunch and chocolate integrity.
Freezer Friendly
Wrap the treats tightly in plastic wrap and place them in a freezer bag. They’ll stay fresh for up to three months. When you’re ready to enjoy them, let them thaw at room temperature for 20 minutes. If you prefer a firmer bite, pop them in the refrigerator for an hour before serving.
Best Reheating Method
To revive the treats, microwave them for 20 seconds or bake at 150°C for five minutes. The heat should be gentle to avoid melting the chocolate. Add a tiny splash of water before reheating; it steams the treats back to a moist, chewy consistency. This technique restores the original texture without overcooking.