Picture this: a quiet Sunday morning, the kettle whistling like a tiny steam engine, and you standing in front of a burnt batch of cake that looked more like a charcoal sculpture than a dessert. I swear the oven door was a portal to the underworld, and I was about to trade that charred disappointment for something that would make your taste buds do the cha‑cha. That was the moment I realized I needed a new recipe, one that would give me that buttery, spiced hug without the fear of a kitchen apocalypse. I found the recipe for a Flourless Chai Spice Cake You’ and, honestly, I was skeptical—how could a cake without flour taste so good? But the first bite was a revelation: warm cinnamon, subtle cardamom, a hint of ginger, all wrapped in a moist crumb that melted like silk. I dared you to taste this and not go back for seconds, and I’m telling you, you will.
From the moment the almond flour hits the bowl, the kitchen smells like toasted bread and fresh spices, a scent that feels like a hug from an old friend. The Greek yogurt adds a creamy tang that balances the natural sweetness of honey, while the coconut oil or butter keeps the crumb tender. The eggs bind everything together, creating a structure that holds the spices without making the cake dense. When you bake it, the edges caramelize slightly, forming a golden crust that cracks like a fresh shell when you lift the cake. The aroma that fills the air is so intoxicating that you’ll hear your neighbors calling, “What’s that smell?”
Most people think flourless cakes are a gimmick, but this one is a testament to the power of almond flour’s nutty flavor and the complexity of chai spices. The secret is in the balance—too much spice and you drown the sweetness, too little and it feels flat. I’ve tested dozens of variations, and this version is hands down the best you’ll ever make at home. The crumb is airy, the flavor is layered, and the finish is silky. It’s the kind of cake that makes you pause, savor, and then immediately want a second slice. I’ll be honest—by the time I finished the first cake, I had already eaten a half before anyone else even had a chance to try it.
If you’ve ever struggled with a cake that turns out dry or too heavy, you’re not alone, and I’ve got the fix. The trick is to let the almond flour soak in the wet ingredients long enough to release its full potential, but not so long that it starts to clump. This recipe keeps the ratio just right, so the cake rises evenly and stays moist. Picture yourself pulling this out of the oven, the whole kitchen smelling incredible, and the first bite feels like a warm blanket on a crisp winter morning. It’s a moment you’ll want to capture and share, so grab your apron, because we’re about to dive into the details that make this cake a masterpiece.
Okay, ready for the game‑changer? Let me walk you through every single step—by the end, you’ll wonder how you ever made it any other way. I’ll keep it simple, playful, and packed with the kind of kitchen wisdom that turns a good recipe into a great one. From the first whisk to the final dusting of powdered sugar, you’ll learn the exact timing, the sensory checkpoints, and the small hacks that save time and avoid common pitfalls. And trust me, there’s a trick that most recipes get wrong, but I’ve nailed it, so you’re in for pure magic. Stay with me here—this is worth it.
What Makes This Version Stand Out
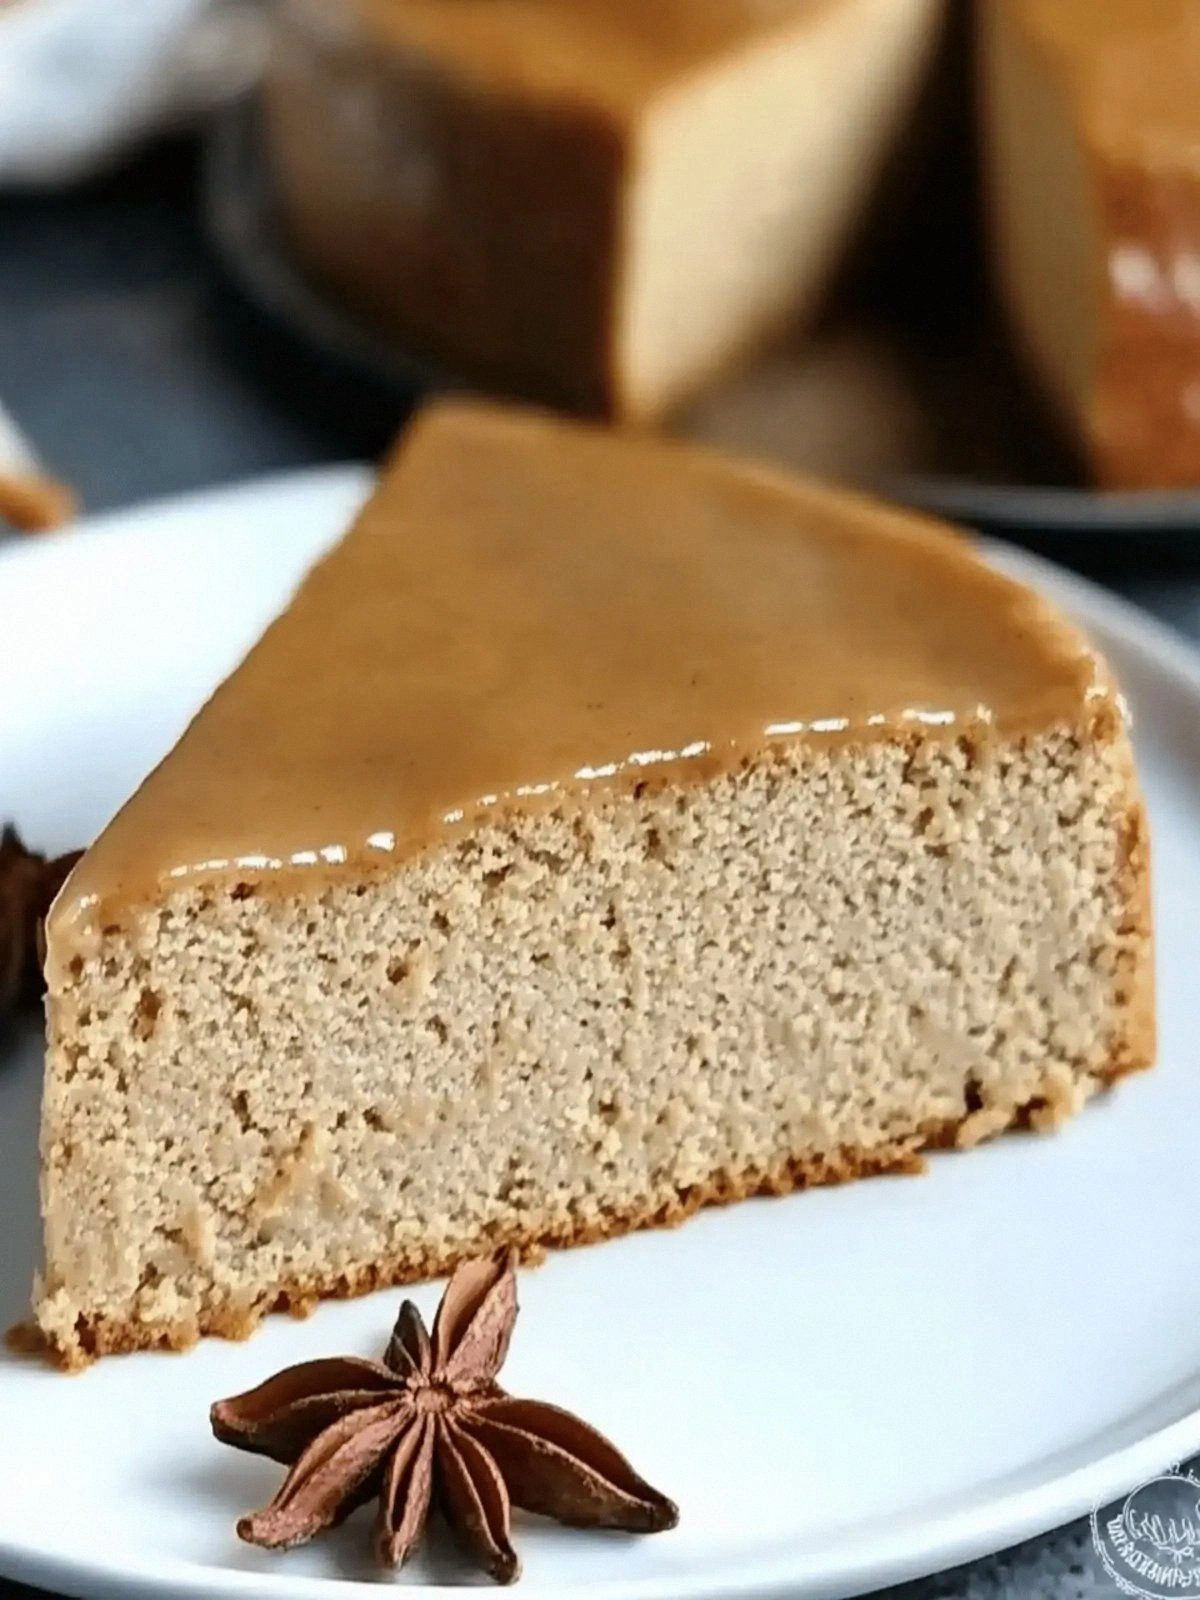
- Flavor: The blend of chai spices—cinnamon, cardamom, ginger, nutmeg, and cloves—creates a complex, aromatic profile that feels like a cozy blanket. Each spice is measured precisely to ensure no single one overpowers the others. The result is a cake that tastes like a chai latte with a hint of spice.
- Texture: Almond flour gives a light, airy crumb without the heaviness of wheat flour. The combination of Greek yogurt and eggs creates moisture that keeps the cake from drying out. When you bite into it, it practically melts in your mouth.
- Health: By swapping flour for almond flour, you cut out refined carbs and add healthy fats and protein. The honey or maple syrup provides natural sweetness without the spike in blood sugar. This cake feels indulgent but is actually a wholesome treat.
- Ease: No pre‑baked crust or separate frosting needed—everything is baked in one go. The batter is simple to mix, and the spices are all pre‑measured. Even a first‑time baker can follow along.
- Versatility: The spices can be tweaked to match any season or mood. Swap in pumpkin puree for a fall twist, or add a splash of almond milk for a dairy‑free version. The cake adapts to your pantry.
- Make‑ahead: The cake keeps wonderfully in the fridge or freezer, and reheats to perfection with a splash of water. It’s a great option for parties, potlucks, or a weekend dessert that can be made ahead.
Alright, let’s break down exactly what goes into this masterpiece…
Inside the Ingredient List
The Flavor Base
Cinnamon, cardamom, ginger, nutmeg, and cloves are the backbone of this cake, each bringing its own character. Cinnamon offers warmth and sweetness, while cardamom adds a subtle citrusy note that lifts the flavor. Ginger provides a gentle heat that keeps the cake from feeling too sweet, and nutmeg adds earthiness. Cloves, used sparingly, give a deep, almost medicinal aroma that completes the chai profile. If you skip any of these spices, the cake loses its signature depth, becoming either too flat or too one‑dimensional.
The Texture Crew
Almond flour is the star of the show, delivering a nutty flavor and a moist crumb that rivals traditional cakes. It’s high in healthy fats and protein, which keeps the cake tender and reduces the need for extra wet ingredients. Greek yogurt adds a tang that balances sweetness and provides a tenderizing effect, making the cake softer. Eggs act as the binder, giving structure and helping the cake rise evenly. Coconut oil or butter adds richness and a subtle buttery taste that enhances the overall mouthfeel.
The Unexpected Star
Honey or maple syrup is the natural sweetener that brings everything together. Honey offers floral undertones that complement the spices, while maple syrup gives a richer, caramel-like sweetness. The choice between the two can change the cake’s flavor profile subtly—honey for a lighter finish, maple for a deeper, more robust taste. If you’re vegan, opt for maple syrup; if you prefer a more traditional sweetness, honey is the way to go. Either way, the liquid sweetener ensures the cake stays moist and flavorful.
The Final Flourish
Baking powder is the leavening agent that makes the cake rise. A single teaspoon is enough to create a light, airy structure without making the cake too fluffy. Salt is essential for balancing the sweetness and enhancing the spices’ flavors; a pinch is all you need. Without salt, the cake would taste flat and overly sweet. This final flourish brings harmony to the entire batter, ensuring each bite is perfectly balanced.
Everything’s prepped? Good. Let’s get into the real action…
The Method — Step by Step
- Preheat your oven to 350°F (175°C) and line a 9‑inch round cake pan with parchment paper. The parchment ensures easy release and a neat finish. As the oven warms, let the almond flour sit in a bowl; it will absorb some of the wet ingredients later. This small step saves you from a sticky mess at the end. The temperature is crucial—too high, and the cake will brown too quickly; too low, and it won’t set properly.
- In a separate bowl, whisk the eggs, Greek yogurt, honey (or maple syrup), vanilla extract, and melted coconut oil until the mixture is smooth and glossy. The wet ingredients should blend seamlessly before adding the dry mix. This creates a uniform batter that prevents lumps. If you’re using butter, melt it gently to avoid a greasy texture. The mixture should feel silky to the touch.
- Sift the almond flour, spices, baking powder, and salt together in a large bowl. Sifting removes clumps and ensures even distribution of spices. The spices should be fragrant before you mix them in; a quick sniff will confirm they’re fresh. This step is where the cake’s aroma begins to develop. Once sifted, pour the wet mixture into the dry and fold gently with a silicone spatula. Do not overmix; a few lumps are fine.
- Transfer the batter to the prepared pan, smoothing the top with a spatula. Tap the pan gently on the counter to release any air pockets. The batter should look glossy and even. Place the pan in the preheated oven and bake for 30 minutes. The edges will start to pull away from the parchment, signaling doneness.
- Remove the cake from the oven and let it cool in the pan for 10 minutes. After 10 minutes, run a knife around the edges to loosen it from the parchment. Then, turn the cake onto a wire rack to cool completely. The cooling process is essential for the cake to set properly; a rushed cool can lead to a soggy center. The aroma at this stage should be intoxicating.
- Once cooled, dust the top with powdered sugar for a simple finish. Alternatively, drizzle a light glaze made from honey and a splash of almond milk. The glaze adds shine and a slight sweetness that complements the spices. If you prefer a more decadent finish, top with a dollop of whipped cream. The powdered sugar is the classic choice for a clean look.
- Slice the cake into wedges and serve at room temperature. The cake tastes best when it’s not too hot or cold. If you’re serving it at a party, let the cake sit out for 30 minutes before cutting to allow the flavors to bloom. Pair it with a cup of chai or a splash of almond milk for an extra special touch. Enjoy the moment of pure bliss.
That’s it—you did it. But hold on, I’ve got a few more tricks that’ll take this to another level. The next section will give you insider tips that most people overlook, from temperature nuances to resting times. These small adjustments can elevate the cake from good to unforgettable.
Insider Tricks for Flawless Results
The Temperature Rule Nobody Follows
Many bakers assume that a higher oven temperature will give a better rise, but in reality, a steady 350°F (175°C) is optimal for this cake. The lower heat allows the spices to release their aromas slowly, creating a richer flavor profile. A quick test: if the edges start to brown too quickly, reduce the temperature by 10–15°F. Consistency is key, so always preheat the oven for at least 10 minutes before placing the pan inside.
Why Your Nose Knows Best
As the cake bakes, you’ll notice a sweet, spicy aroma that signals doneness. If the smell feels too sweet, it’s probably overbaked; if it’s more like raw spices, you need to bake a few minutes longer. Trust your nose—it's a reliable judge of texture and flavor. If you’re unsure, insert a toothpick into the center; if it comes out clean, you’re done. This sensory checkpoint saves you from a burnt or undercooked cake.
The 5‑Minute Rest That Changes Everything
After removing the cake from the oven, let it rest for exactly five minutes before turning it out of the pan. This brief rest allows the structure to set, preventing the cake from falling apart when you slice it. A common mistake is to remove the cake immediately, causing a soggy crumb. The five‑minute pause also lets the spices settle, enhancing their flavor. Trust me, this simple step makes a noticeable difference.
Use a Silicone Spatula to Prevent Overmixing
When folding the wet and dry ingredients, a silicone spatula gives you better control than a wooden spoon. The flexible blade slides under the batter, reducing the risk of overmixing, which can make the cake tough. Overmixing activates gluten in almond flour, leading to a dense texture. A gentle fold is all you need—just enough to combine the ingredients. This small tweak ensures a tender crumb.
Add a Splash of Water Before Reheating
If you’re reheating a leftover cake, add a tiny splash of water to the top before microwaving. The water creates steam that rehydrates the cake, restoring its moisture. Microwave for 15–20 seconds, then let it sit for a minute to allow the steam to spread. This trick works well for both the cake and any glaze you might have added. It’s a game‑changer for those who love leftovers.
Use a Loaf Pan for a Different Shape
If you prefer a rectangular cake, simply transfer the batter to a 9x5 inch loaf pan lined with parchment. The baking time will increase by about 10 minutes, so keep an eye on the edges. A loaf shape is great for serving slices at a brunch or for gifting. The cake will still rise beautifully, and the shape allows for easy portioning. Experimenting with pan sizes adds variety to your baking repertoire.
With these insider tricks in your arsenal, you’ll consistently produce a cake that looks, smells, and tastes like a masterpiece. Each tip is a small investment of time that pays off in flavor and texture. Now that you’re armed with the knowledge, you’re ready to experiment and create your own variations.
Creative Twists and Variations
This recipe is a playground. Here are some of my favorite ways to switch things up:
Pumpkin Spice Delight
Add 1 cup of pumpkin puree to the batter for a fall twist. The pumpkin adds moisture and a subtle sweetness that pairs beautifully with the spices. Replace the honey with maple syrup for a richer flavor. This version is perfect for Thanksgiving or a cozy autumn afternoon. The cake will have a deeper orange hue and a slightly denser crumb.
Coconut‑Infused Bliss
Swap the coconut oil for shredded coconut and add 1/4 cup toasted coconut flakes on top. The coconut adds a tropical note that complements the chai spices. Use coconut milk instead of Greek yogurt for a dairy‑free option. The cake will have a fragrant, nutty aroma and a slightly chewy texture. This variation is great for a beach‑inspired brunch.
Vegan Variation
Replace the eggs with flaxseed meal mixed with water (1 tablespoon flaxseed + 3 tablespoons water). Use maple syrup or agave nectar as the sweetener. Substitute coconut oil for a neutral‑flavored oil like canola. The cake will still rise well and have a moist crumb. This version is ideal for vegans or those with egg allergies.
Chocolate‑Chai Fusion
Fold in 1/2 cup of unsweetened cocoa powder for a chocolatey twist. The cocoa deepens the flavor and adds a slight bitterness that balances the spices. Top with a drizzle of dark chocolate ganache for an extra indulgent finish. This version is great for chocolate lovers who also enjoy spiced desserts. The cake will have a rich, velvety texture.
Lemon‑Zest Accent
Add 1 tablespoon of lemon zest to the batter for a bright, citrusy note. The lemon cuts through the sweetness and adds freshness. Use a light glaze made from honey and a splash of lemon juice for a tangy finish. This variation is perfect for spring or summer gatherings. The cake will have a vibrant color and a zesty aroma.
Nutty Crunch Upgrade
Mix in 1/2 cup of chopped walnuts or pecans before baking. The nuts add a crunchy texture and a buttery flavor that complements the spices. Toast the nuts first for a deeper flavor profile. The cake will have a delightful crunch on every bite. This version is great for holiday parties or as a snack for kids.
Feel free to mix and match these ideas, or create your own. The beauty of this cake is that it adapts to your taste and pantry. Keep experimenting and enjoy the creative process.
Storing and Bringing It Back to Life
Fridge Storage
Wrap the cooled cake tightly in plastic wrap and store in the refrigerator for up to five days. The moisture from the fridge keeps the cake from drying out, while the wrap preserves the spices’ aroma. When ready to serve, let it sit at room temperature for about 30 minutes to restore its original texture. Avoid storing the cake in the fridge for more than a week, as it may become too dry. This method is perfect for meal prepping or for a quick dessert later in the week.
Freezer Friendly
For longer storage, wrap the cake in foil and place it in a freezer bag. The cake can be frozen for up to three months. When you’re ready to enjoy it, thaw overnight in the refrigerator and then let it come to room temperature for 20 minutes. This method keeps the cake’s flavor and texture intact. Freezing is a great option if you want to have a ready‑made dessert for a special occasion.
Best Reheating Method
To reheat, preheat the oven to 300°F (150°C) and place the cake on a baking sheet. Add a splash of water to the top to create steam, then cover loosely with foil. Heat for 10–12 minutes, or until warmed through. The steam keeps the cake moist and prevents it from drying out. Let it cool slightly before slicing, and enjoy the restored freshness.