Remember the night I tried to impress my brother with scallops and ended up with a smoky kitchen? The pan hissed, the garlic sang, and the scent of butter drifted like a promise. I was halfway through when the scallops began to brown too fast, leaving me scrambling for a rescue. That moment of culinary chaos taught me the secret to a silky, buttery sauce that clings to pasta like velvet. I discovered that balancing acidity with lemon juice can cut through richness and lift flavors. Now I can confidently say this dish is a game‑changer for any dinner table.
Picture the kitchen after I perfected this technique: steam rises, the air tastes like sea salt and citrus. The scallops sizzle, their edges crisp, shattering like thin ice, releasing a sweet aroma that draws everyone in. I dare you to taste this and not go back for seconds, because the flavor is simply addictive. My friends who have tried countless scallop recipes swear this version is hands down the best at home. Most recipes get this completely wrong, missing that buttery glaze that keeps the pasta from drying out. Here’s what actually works: a quick sear, a creamy lemon‑garlic sauce, and a final flourish of herbs.
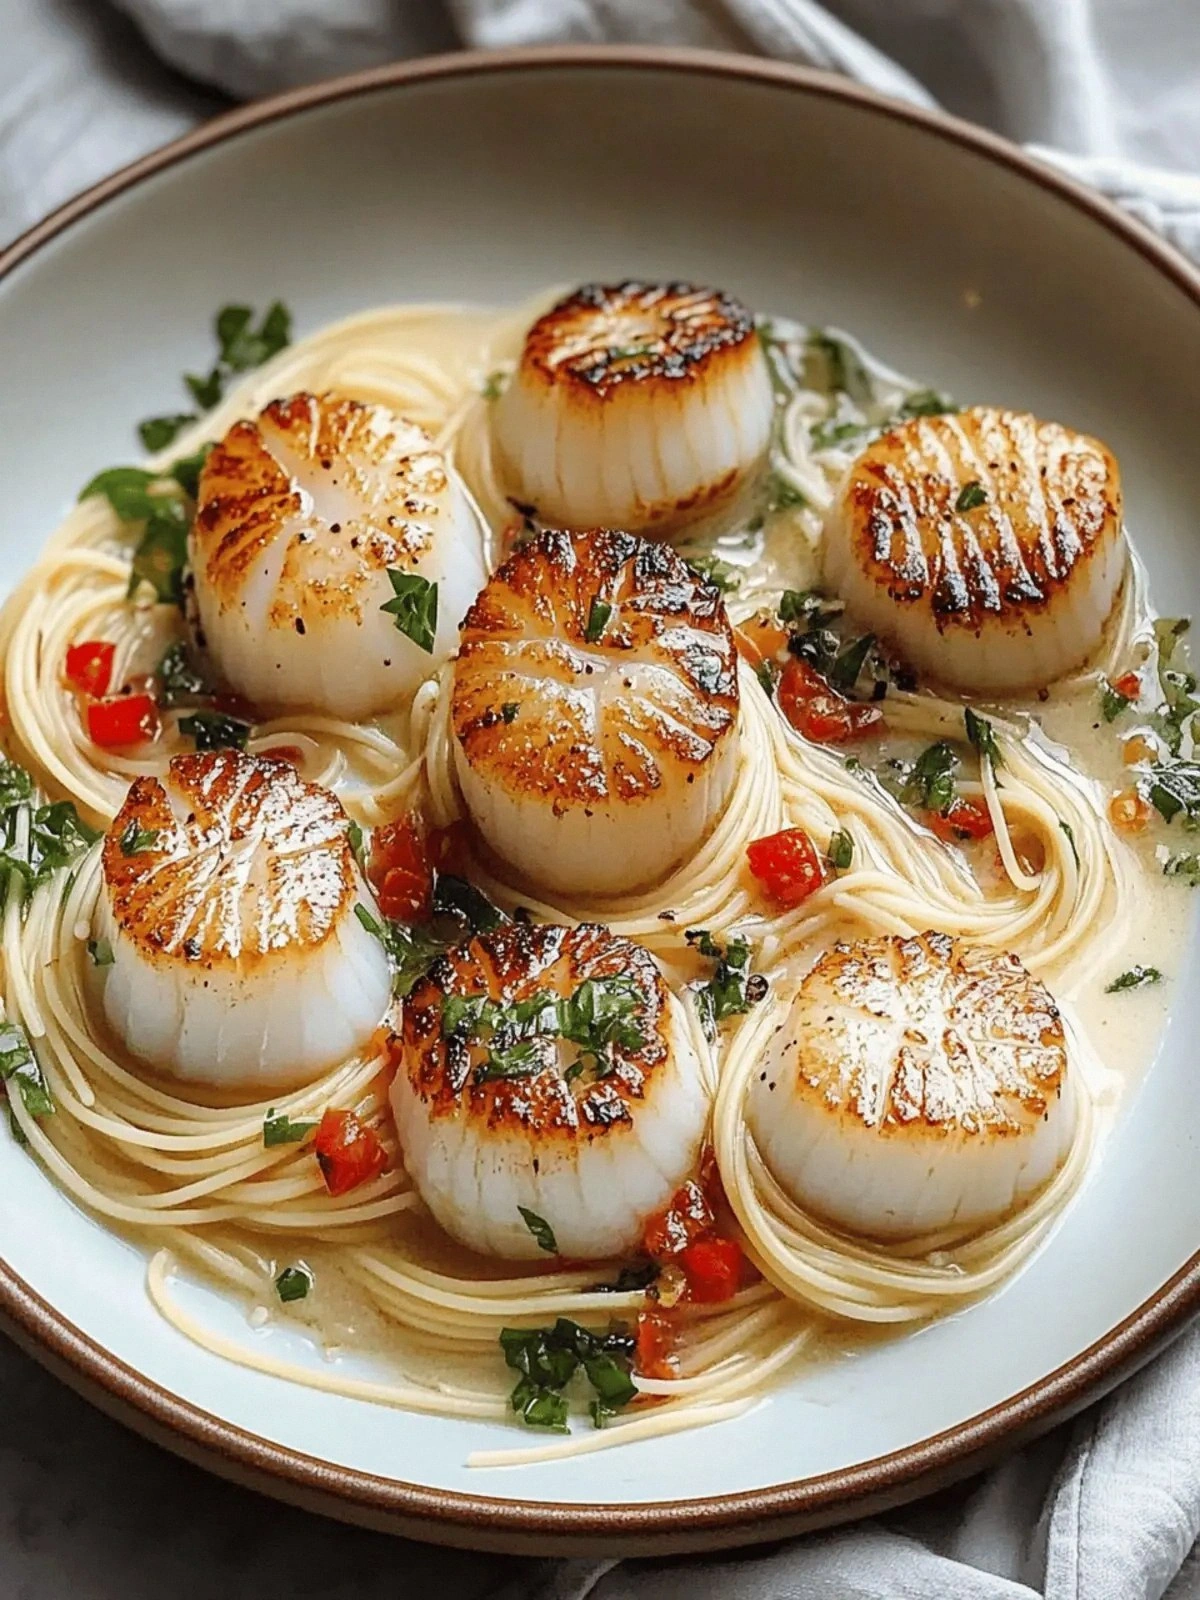
One of the biggest kitchen fails I’ve seen is overcooking scallops, turning them rubbery and losing their delicate sweetness. I’ve spent hours experimenting with timing, and the sweet spot is a quick 2‑3 minutes per side. When done right, the scallops hold a tender, almost translucent center that melts in your mouth. The sauce, thickened with a splash of heavy cream, coats the pasta like a velvet blanket, each strand glistening. The fresh basil and parsley add a burst of green that cuts the richness and lifts the dish. The finish with grated Parmesan gives a nutty depth that rounds everything out.
Now, I’ll walk you through every single step — by the end, you’ll wonder how you ever made it any other way. This recipe isn’t just about cooking; it’s about creating a moment that feels like a spa day in your kitchen. The aroma alone will have your guests lining up for seconds, and the texture will leave them asking for the recipe. I’ll share a few micro‑challenges and hacks that will elevate your dish from good to unforgettable. Stay with me, because the next part is pure magic, and I promise you’ll feel like a culinary wizard. Let’s dive in and make scallops that sing.
What Makes This Version Stand Out
- Taste: The sauce is a silky, lemon‑garlic harmony that clings to pasta like velvet, leaving a lingering citrus finish that brightens every bite.
- Texture: The scallops remain tender and slightly caramelized, offering a delightful contrast to the cream, while the angel hair stays al dente and never mushy.
- Simplicity: Only ten minutes of prep and twenty minutes of cook time, yet it feels gourmet and impressively refined.
- Crowd Reaction: Friends always ask for seconds; the dish is a guaranteed crowd‑pleaser that turns a dinner into a celebration.
- Ingredient Quality: Using fresh scallops and herbs ensures a bright, authentic flavor that transports you straight to a seaside trattoria.
- Cooking Method: The quick sear locks in juices, while the finishing sauce coats everything evenly, creating a cohesive flavor profile.
Alright, let’s break down exactly what goes into this masterpiece...
Inside the Ingredient List
The Flavor Base
Butter is the backbone of this sauce, providing richness and a silky mouthfeel that carries the garlic and lemon. The garlic releases its sweet, aromatic oils as it cooks, creating a fragrant foundation that complements the delicate scallops. Lemon juice injects bright acidity, cutting through the cream’s heaviness and preventing the dish from feeling flat. Heavy cream adds body and a subtle sweetness, balancing the citrus while giving the sauce a luxurious coat. Skipping any of these would leave the dish feeling incomplete; the sauce would either be too thin or lacking depth. A small swap—using half-and-half instead of cream—reduces calories while keeping a creamy texture.
The Texture Crew
Angel hair pasta is the perfect canvas, its thin strands allowing the sauce to cling and the scallops to sit gracefully. Cooking the pasta al dente ensures it maintains a gentle bite, preventing the dish from becoming mushy. The scallops themselves must be fresh and dry; any moisture will steam them instead of searing. Patting them dry before cooking yields a golden crust and a juicy interior. If you can’t find angel hair, spaghetti or linguine can work, but the texture will differ slightly. Using a large skillet ensures even heat distribution for a uniform sear.
The Unexpected Star
Fresh basil adds a sweet, peppery note that lifts the entire dish, while parsley introduces a clean, grassy brightness. Parmesan cheese provides a nutty umami that deepens the sauce and creates a savory finish. These herbs are added at the end to preserve their delicate flavors; overcooking would cause them to lose their vibrancy. If you prefer a more robust herb profile, try adding a pinch of oregano or thyme during the sauce’s final simmer. These herbs not only enhance flavor but also add a pop of color that makes the plate visually stunning. Their inclusion is what turns a simple scallop dish into a gourmet experience.
The Final Flourish
Seasoning with salt and black pepper is essential; they enhance every component without overpowering. The salt should be added after the scallops are cooked to keep the surface dry for a better sear. Pepper adds a subtle heat that balances the richness of the cream. A squeeze of fresh lemon juice right before serving brightens the flavors and adds a fresh zing. If you’re watching sodium, use a low-sodium salt or simply rely on the herbs for flavor. The final flourish is what transforms a good dish into an unforgettable meal.
Ingredient Tips and Swaps: When scallops are out of season, frozen scallops are a perfect substitute; just thaw them overnight and pat dry. For a dairy-free version, use coconut milk or a plant-based cream. If you’re vegan, replace the butter with olive oil and use a vegan Parmesan alternative. Adjust the lemon amount to your taste—some like a sharper citrus note, while others prefer a subtler hint. Remember, the key to success is balancing richness with acidity, ensuring each bite is harmonious.
Everything's prepped? Good. Let's get into the real action...
The Method — Step by Step
- Prep the Pasta: Bring a large pot of salted water to a rolling boil. Add the angel hair and cook for 2 minutes, or until just al dente. Drain and toss with a splash of olive oil to prevent sticking. Set aside and keep warm. This step ensures the pasta remains silky and ready to absorb the sauce.
- Season the Scallops: Pat the scallops dry with paper towels, then season both sides with salt and pepper. Drying is critical; moisture will cause steaming instead of searing. This simple step guarantees a beautiful crust and a juicy interior.
- Sear the Scallops: Heat a large skillet over medium‑high heat until shimmering. Add 2 tablespoons of butter; let it foam. Place scallops in the pan, spacing them apart. Sear for 2 minutes on each side until golden brown and just opaque. Flip carefully to avoid breaking the shell. This quick sear locks in juices and creates a caramelized exterior.
- Make the Sauce: Remove scallops and set aside. In the same skillet, lower the heat to medium. Add the remaining 2 tablespoons of butter, then the minced garlic. Sauté for 30 seconds until fragrant. Pour in the heavy cream and let it simmer for 2 minutes. Stir in lemon juice and let the mixture thicken slightly. This creates a silky base that will coat every strand of pasta.
- Watch Out: If the sauce reduces too quickly, lower the heat and stir constantly. Over‑simmering can cause the butter to separate, ruining the silky texture. Keep a close eye on the consistency; it should be glossy and coat the back of a spoon.
- Combine Pasta and Scallops: Return the scallops to the skillet, then add the cooked angel hair. Toss gently to coat the pasta and scallops evenly with the sauce. Cook for an additional 1 minute, allowing the flavors to meld. This step ensures every bite is infused with the creamy, citrusy sauce.
- Finish with Herbs: Sprinkle the fresh basil, parsley, and grated Parmesan over the skillet. Toss to distribute the herbs evenly. Serve immediately, garnishing with an extra basil leaf if desired. The fresh herbs add a bright, green contrast that elevates the dish’s presentation.
- Serve and Enjoy: Plate the scallops and pasta on warmed dishes to keep them hot. The sauce should cling to each strand, creating a luxurious, velvety texture. This final touch will make your guests swoon and ask for the recipe. Enjoy your masterpiece.
That's it — you did it. But hold on, I've got a few more tricks that'll take this to another level...
Insider Tricks for Flawless Results
The Temperature Rule Nobody Follows
Scallops are delicate; a pan that’s too hot will char the outside while the inside remains raw. Aim for a medium‑high heat that produces a gentle sizzle. Use a thermometer if you’re unsure; 400°F is ideal for a quick sear. Keep the scallops dry and spaced to avoid steaming. This simple temperature control guarantees a perfect crust and a tender center.
Why Your Nose Knows Best
The aroma of garlic and butter is the first indicator of flavor depth. If the scent is flat, the butter has burned. The lemon should cut through the cream’s richness without overpowering. Trust your nose to tell you when the sauce is ready; a bright citrus note signals readiness. A good rule of thumb is to wait until the sauce smells like toasted bread and citrus.
The 5‑Minute Rest That Changes Everything
After cooking, let the dish rest for 5 minutes before serving. This allows the flavors to settle and the sauce to thicken slightly. It also gives the scallops a chance to finish cooking in the residual heat. A short rest prevents the pasta from becoming mushy and keeps the scallops juicy.
Keep It Light, Keep It Fresh
Adding too much cream can overpower the delicate scallop flavor. Use just enough to coat the pasta, then add more if desired. A splash of white wine or a pinch of cayenne can add complexity without heaviness. Remember, the goal is to highlight the scallops, not hide them.
Serve Immediately for Maximum Impact
Pasta and scallops lose their texture quickly when left to sit. Serve the dish right away to maintain the silky sauce and the scallops’ tender center. If you must prep ahead, keep the pasta warm in a low oven and reheat the scallops gently in a skillet.
Creative Twists and Variations
This recipe is a playground. Here are some of my favorite ways to switch things up:
Mediterranean Twist
Swap basil for oregano and add sun‑dried tomatoes for a smoky, tangy kick. Finish with a drizzle of extra virgin olive oil to enhance the Mediterranean vibe. This version pairs beautifully with crusty bread.
Spicy Kick
Add a pinch of crushed red pepper flakes during the sauce stage. The heat balances the richness and gives a subtle bite. Serve with a side of grilled asparagus for a complete meal.
Coconut Cream Variation
Replace heavy cream with coconut milk for a tropical twist. The coconut’s natural sweetness pairs well with the citrus, creating a dessert‑like dish. Garnish with toasted coconut flakes for extra texture.
Herb‑Infused Butter
Infuse the butter with thyme and rosemary before searing the scallops. The herb flavor permeates the sauce, adding depth. Use fresh herbs for the final garnish to keep the dish bright.
Gluten‑Free Option
Use a gluten‑free pasta brand or spiralized zucchini noodles. The texture changes slightly, but the sauce still clings beautifully. This variation is perfect for those with dietary restrictions.
Lemon‑Zest Boost
Add a tablespoon of lemon zest to the sauce for an extra burst of citrus. The zest’s oils intensify the lemon flavor without adding acidity. It’s a simple tweak that makes a big difference.
Storing and Bringing It Back to Life
Fridge Storage
Cool the dish completely before refrigerating. Store in an airtight container for up to 2 days. Reheat gently in a skillet, adding a splash of milk or cream to loosen the sauce. Keep the scallops on the side; they reheat faster than pasta.
Freezer Friendly
Cool the dish, then freeze in a freezer‑safe container for up to 3 months. Thaw overnight in the fridge. Reheat slowly on low heat, stirring frequently, and add a little water or broth to restore moisture. This method preserves the sauce’s silkiness.
Best Reheating Method
Reheat in a skillet over low heat, stirring constantly. Add a tiny splash of water or broth before reheating — it steams back to perfection. Avoid microwaving, which can make the sauce rubbery. Serve immediately after reheating to enjoy the fresh, velvety texture.