Picture this: a Friday night, the fridge is a barren wasteland, the only thing that feels like a promise is the faint scent of melted chocolate drifting from a forgotten jar. I was standing there, staring at the empty counter, when a voice from my kitchen table, a friend, shouted, “Let’s make something that will make even the most stubborn sweet tooth swoon.” That moment, that daring dare, sparked a culinary experiment that would soon become the best no‑bake chocolate cheesecake you’ll ever taste.
It started with a simple kitchen disaster – a bowl of melted chocolate that had gone cold, a handful of Oreos that had fallen into a bowl of cream, and an accidental swirl that turned into a perfect base. The sound of the spoon slapping the bowl was like a drumbeat, the aroma of cocoa and buttery crumbs filling the air, and the anticipation of that first bite was almost a physical sensation. I could almost taste the velvety coating on the rim of the cup, the way the chocolate would cling to the creamy filling, and the subtle crunch of the cookie crust beneath. This wasn’t just another dessert; it was a rebellion against the ordinary, a delicious rebellion that would set a new standard for quick, decadent treats.
I dared you to taste this and not go back for seconds. And if you’re honest, you’ll find yourself reaching for a second spoonful before the first one even hits your lips. That’s the power of this recipe: a harmony of textures, a marriage of rich chocolate and airy cream, all wrapped in a buttery cookie shell that cracks like a promise. Most recipes get this completely wrong by over‑cooking, under‑seasoning, or using the wrong type of chocolate. Here, I’ve cracked the code and poured it into a no‑bake format that’s as simple as it is spectacular.
Imagine pulling this out of the fridge, the whole kitchen smelling incredible, and serving it to friends who think they’ve tasted every chocolate dessert on the planet. I’ve poured every ounce of my love for chocolate into this version, and by the end of this post you’ll wonder how you ever settled for anything else. Let me walk you through every single step — by the end, you’ll wonder how you ever made it any other way.
What Makes This Version Stand Out
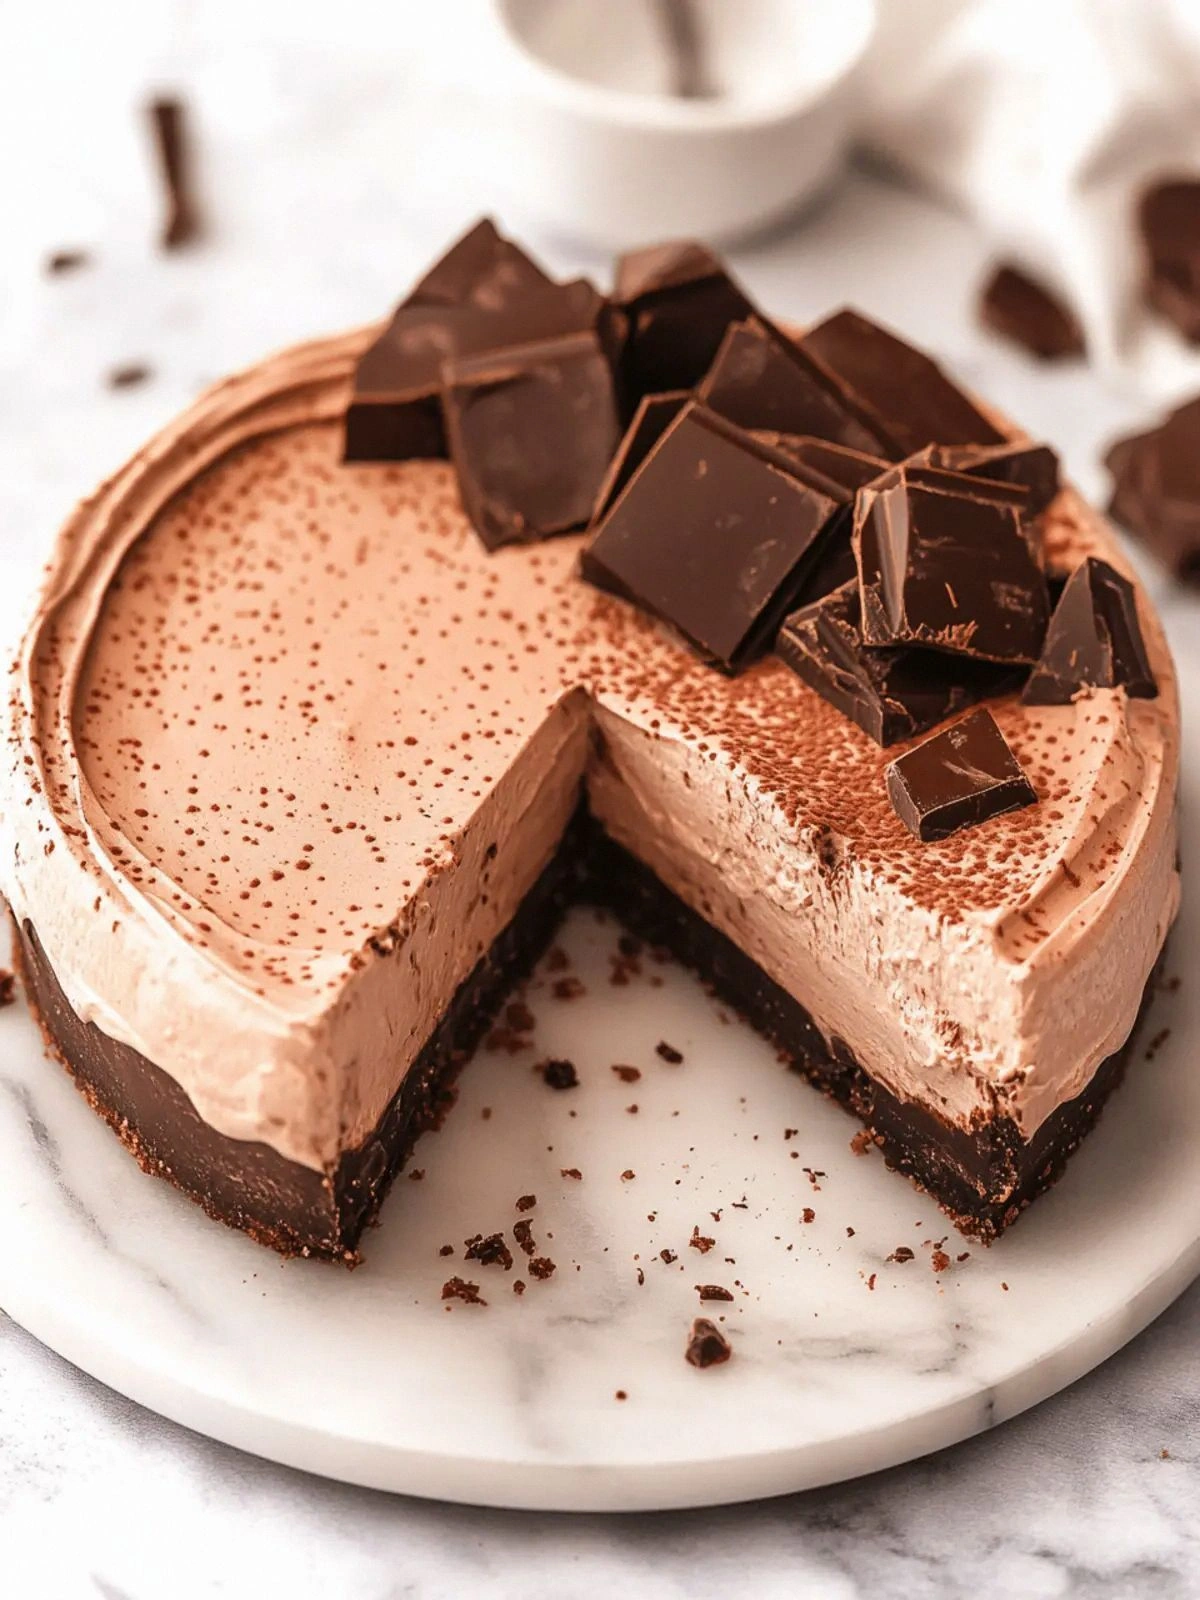
- Taste: The chocolate is not just sweet but also has a deep, slightly bitter undertone that balances the creamy filling. This duality creates a flavor profile that feels luxurious yet grounded.
- Texture: The cookie crust offers a satisfying crunch that contrasts with the silky, mousse‑like interior, providing a multi‑sensory experience with every bite.
- Simplicity: With no baking required, you can whip up this masterpiece in under 20 minutes, making it perfect for last‑minute gatherings.
- Uniqueness: The combination of melted chocolate and cream cheese in a no‑bake setting is rarely seen, giving this cheesecake a standout character.
- Crowd Reaction: Friends who’ve tasted this say it feels like a chocolate lover’s dream come true, and they can’t resist a second helping.
- Ingredient Quality: Using dark or semi‑sweet chocolate with at least 60% cocoa content elevates the depth of flavor, while fresh cream cheese adds richness.
- Cooking Method: The no‑bake approach preserves the delicate textures, preventing the cheesecake from becoming dense or rubbery.
- Make‑Ahead Potential: Prepare it the night before, refrigerate, and it still tastes fresh and indulgent the next day.
Inside the Ingredient List
The Flavor Base
The foundation of this cheesecake is a symphony of Oreos, butter, sugar, and a pinch of salt. The Oreos provide not only texture but also a subtle vanilla‑chocolate flavor that grounds the dessert. Butter, when melted, coats each crumb, adding richness and helping the crust bind together. Sugar sweetens the mixture, but it’s the small pinch of salt that amplifies every flavor, bringing out the chocolate’s depth and preventing the dessert from feeling cloying. If you skip the salt, you’ll notice the overall taste becomes flat, lacking that necessary bite that makes the chocolate sing.
When selecting Oreos, look for the classic chocolate sandwich variety; they offer the perfect balance of cookie and chocolate. A lighter or sugar‑free version would alter the taste profile significantly, resulting in a less indulgent experience. For butter, unsalted is essential because it allows you to control the salt level precisely. If you’re short on butter, a tablespoon of coconut oil can replace it, but the flavor will shift slightly toward tropical notes.
The Texture Crew
Cream cheese is the heart of the cheesecake, providing a tangy counterpoint to the sweetness of the chocolate. It also gives the filling its smooth, mousse‑like consistency. Heavy cream, on the other hand, lightens the mixture, ensuring it remains airy and not too dense. The combination of these two dairy elements creates a luscious texture that melts in your mouth like silk. Omitting either cream cheese or heavy cream will dramatically change the mouthfeel; without cream cheese, the dessert becomes more like a chocolate pudding, and without heavy cream, it can feel heavy and cloying.
When choosing cream cheese, opt for the regular full‑fat variety for maximum creaminess. If you prefer a lower‑fat version, be prepared for a slightly drier texture and a less rich taste. For heavy cream, ensure it’s at room temperature before mixing; this prevents lumps and guarantees a silky blend. A quick alternative for heavy cream is to use half-and-half, but the result will be less velvety.
The Unexpected Star
Dark or semi‑sweet chocolate is the star that elevates this dessert beyond ordinary cheesecake. A chocolate with 60% or higher cocoa content delivers a robust flavor that pairs beautifully with the creamy filling. The chocolate’s natural bitterness balances the sugar, creating a harmonious taste that feels indulgent without being overwhelming. If you use milk chocolate, the dessert will taste sweeter and less complex, which might not satisfy the most discerning chocolate lovers.
When melting chocolate, use a double boiler or a heat‑proof bowl over a pot of simmering water to avoid scorching. Stir constantly until the chocolate is smooth; this ensures a glossy finish. For those who prefer a smoother texture, you can blend the melted chocolate with a small amount of coconut oil to give it a silky sheen. If you’re experimenting, try adding a teaspoon of espresso powder to deepen the chocolate flavor without adding coffee taste.
The Final Flourish
Granulated sugar is the sweetener that keeps the dessert from being too bitter. It dissolves into the melted chocolate and cream mixture, creating a uniform sweetness that coats every bite. The amount is calibrated to balance the bitterness of dark chocolate while maintaining a pleasant mouthfeel. Too much sugar can cause the cheesecake to become overly sticky and lose its structure.
Salt, though only a pinch, is the secret weapon that brings all flavors together. It suppresses bitterness and enhances sweetness, allowing the chocolate to shine. If you’re on a low‑sodium diet, you can reduce the pinch slightly, but the result will be less vibrant. Remember, in chocolate desserts, a small amount of salt can make a world of difference.
Everything’s prepped? Good. Let’s get into the real action…
The Method — Step by Step
- Begin by crushing the 24 Oreo cookies into fine crumbs. Use a food processor or a sealed bag and a rolling pin to achieve a uniform texture. The crumbs should be small enough to coat the bottom of your dish evenly, but not so fine that they clump together. This step is crucial for a smooth crust that holds the filling in place.
- Melt 1/2 cup of unsalted butter in a small saucepan over low heat. Once melted, add 3/4 cup of granulated sugar and stir until the sugar is fully dissolved. The mixture should emit a faint caramel aroma, signaling that the butter and sugar are perfectly blended. This sweet butter base will give your crust a buttery sheen.
- Combine the melted butter-sugar mixture with the Oreo crumbs in a mixing bowl. Stir until the crumbs are evenly coated, ensuring no dry pockets remain. The mixture should feel slightly sticky but still hold together when pressed. This will create a firm foundation for the cheesecake.
- Press the crust mixture firmly into the bottom of a 9‑inch springform pan. Use the back of a spoon or a flat-bottomed glass to smooth the surface. This step is essential; a compact crust prevents the filling from seeping through and keeps the cheesecake structurally sound.
- In a separate bowl, beat 8 ounces of cream cheese until smooth and creamy. Use a hand mixer on medium speed for 2 minutes, ensuring no lumps remain. The cream cheese should be silky; if it’s still gritty, continue mixing until it’s flawless.
- Add 2 cups of heavy cream to the cream cheese and beat on low speed until the mixture is light and airy. The mixture should form soft peaks that hold when you lift the beaters. This airy texture is what gives the cheesecake its mousse‑like interior.
- Melt 1 cup of dark or semi‑sweet chocolate using a double boiler. Stir continuously until the chocolate is glossy and free of lumps. Once melted, allow it to cool slightly so it doesn’t overheat the cream mixture.
- Gently fold the melted chocolate into the cream cheese mixture. Stir until fully incorporated, ensuring the chocolate is evenly distributed. The mixture should look like a smooth, chocolate‑infused mousse.
- Fold in a pinch of salt to bring out the richness of the chocolate. The salt should be evenly distributed; a small pinch goes a long way in enhancing flavor.
- Pour the chocolate filling over the chilled crust, smoothing the top with a spatula. The filling should cascade over the edges, creating a seamless transition between crust and filling. This final step seals the dessert’s structure.
- Place the pan in the refrigerator and chill for at least 4 hours, preferably overnight. The cheesecake needs time to set, allowing the flavors to meld and the texture to firm up. During this time, the chocolate will thicken and the cream cheese will set, resulting in a luscious, sliceable dessert.
- Remove the cheesecake from the fridge, let it sit at room temperature for 10 minutes, then carefully release it from the springform pan. The cheesecake should slide out smoothly without tearing. If it sticks, allow it to chill a bit longer.
That’s it — you did it. But hold on, I’ve got a few more tricks that will take this to another level…
Insider Tricks for Flawless Results
The Temperature Rule Nobody Follows
Many people think room temperature ingredients are enough, but the key to a silky filling lies in slightly chilled dairy. Keeping both the cream cheese and heavy cream cold before mixing prevents the mixture from becoming too runny, which can compromise the set of the cheesecake. I’ve found that letting the cream cheese sit in the fridge for 30 minutes before beating works wonders. This small step ensures a denser, more stable final product.
Why Your Nose Knows Best
Before you pour the filling, give it a quick sniff. The chocolate should smell rich and slightly nutty; if it has a metallic or burnt note, it’s likely overheated. Over‑heating chocolate can introduce a bitter, acrid flavor that ruins the entire dessert. By using a double boiler and stirring constantly, you keep the chocolate at the perfect temperature, preserving its natural aroma.
The 5-Minute Rest That Changes Everything
After mixing the chocolate and cream cheese, let the batter rest for 5 minutes before pouring it over the crust. This brief pause allows the ingredients to meld, reducing the risk of separation. It also gives the chocolate a chance to slightly thicken, ensuring a more cohesive filling that sets beautifully. Trust me, this small pause pays off with a smoother mouthfeel.
Use a Silicone Mold for Easy Release
While the springform pan works great, a silicone mold can make the release process even smoother. Silicone molds are flexible, which means you can simply flex the sides to pop the cheesecake out without the risk of tearing. This trick is especially useful if you’re serving the dessert in individual portions.
Finish with a Drizzle of Ganache
For an extra layer of decadence, drizzle a simple ganache over the top right before serving. Melt 1/2 cup of chocolate with a splash of heavy cream until glossy, then pour it over the cheesecake. The ganache adds a glossy finish and a burst of chocolate intensity that elevates the entire dessert.
Creative Twists and Variations
Caramel Swirl Surprise
Swap a portion of the cream cheese with caramel sauce, then swirl it into the chocolate filling before pouring. The caramel adds a buttery sweetness and a glossy swirl that looks as good as it tastes. This variation is perfect for those who love the combination of chocolate and caramel.
Minty Fresh Twist
Add a few drops of peppermint extract to the chocolate mixture. The mint provides a refreshing contrast to the richness of the chocolate, creating a dessert that feels both indulgent and invigorating. Serve with crushed peppermint candies for an extra pop.
Almond Crunch Layer
Top the cheesecake with a layer of toasted almond slivers before chilling. The nuts add a crunchy texture and a nutty flavor that complements the chocolate. Sprinkle a pinch of sea salt on top for a balanced sweet‑salty profile.
Espresso‑Infused Delight
Replace the pinch of salt with a teaspoon of instant espresso powder. The espresso intensifies the chocolate flavor and gives the cheesecake a subtle coffee undertone. This version is ideal for coffee lovers looking for a dessert that satisfies both sweet and caffeinated cravings.
Berry Burst Variation
Fold fresh berries, such as raspberries or blueberries, into the chocolate filling. The berries provide a bright, tart contrast to the rich chocolate and cream. After chilling, top with a dusting of powdered sugar for an elegant finish.
Vegan Edition
For a vegan version, replace the cream cheese with a plant‑based cream cheese alternative and use coconut cream instead of heavy cream. Use vegan dark chocolate and ensure all ingredients are certified vegan. The result is a creamy, chocolatey cheesecake that satisfies even the most devoted vegan sweet tooth.
Storing and Bringing It Back to Life
Fridge Storage
Store the cheesecake in an airtight container in the refrigerator for up to 5 days. Keep it covered with plastic wrap or a lid to prevent it from absorbing fridge odors. If you’re serving it after a few days, let it sit at room temperature for 15 minutes before slicing to soften slightly.
Freezer Friendly
You can freeze the cheesecake for up to 2 months. Wrap it tightly in plastic wrap, then place it in a freezer bag. When ready to serve, thaw it overnight in the refrigerator. After thawing, allow it to sit at room temperature for 10 minutes before serving for the best texture.
Best Reheating Method
Reheating is optional but can revive a stale cheesecake. Warm the entire cheesecake in a low‑heat oven (about 300°F) for 10 minutes, or microwave it on low power for 15 seconds. Add a tiny splash of water before reheating to create steam, which helps the cheesecake regain its silky texture and prevents it from drying out.