It was a late‑night, post‑workout craving that turned my kitchen into a culinary battlefield. I stared at a bag of frozen wings, a jar of ranch seasoning, and an empty oven, wondering if I could ever replicate the kind of crispy, savory goodness that makes friends line up at the end of a game. I grabbed my trusty skillet, tossed in a splash of olive oil, and decided to experiment. The moment the wings hit the hot surface, a symphony of sizzles erupted—like a tiny fireworks display that promised flavor fireworks. I knew then that I was onto something that would change the way I think about wings forever.
The air filled with the unmistakable scent of toasted poultry, a perfume that made my mouth water before I even tasted a single bite. As the wings browned, the skin transformed into a golden crust that crackled when I pressed it with a fork. The sound was a satisfying crunch, a promise of a texture that would stay crisp even after a few minutes of resting. When I lifted a wing, the aroma of ranch seasoning mingled with the faint sweetness of caramelized edges, creating a heady bouquet that made the entire kitchen feel like a gourmet kitchen. I could already taste the salt, the pepper, the subtle tang of the ranch—each note dancing on my tongue in a symphony of flavor.
What makes this version stand out is not just the combination of ingredients, but the technique that turns ordinary wings into a showstopper. I’ve spent countless hours tweaking the ratio of baking powder to salt to achieve that perfect, airy crunch that shatters like thin ice. I dared you to taste this and not go back for seconds, and trust me, the first bite will have you craving more. This is hands down the best version you’ll ever make at home, and the secret lies in the simple, yet precise steps that I’m about to share. If you’ve ever struggled to get wings that aren’t greasy or soggy, you’re not alone— and I’ve got the fix.
Picture yourself pulling this out of the oven, the whole kitchen smelling incredible, the wings glistening with a buttery sheen, and the anticipation building as you reach for that first crispy bite. Let me walk you through every single step—by the end, you'll wonder how you ever made it any other way. This recipe is a game‑changer, a simple, yet masterful approach that delivers crispy, flavorful wings every time.
What Makes This Version Stand Out
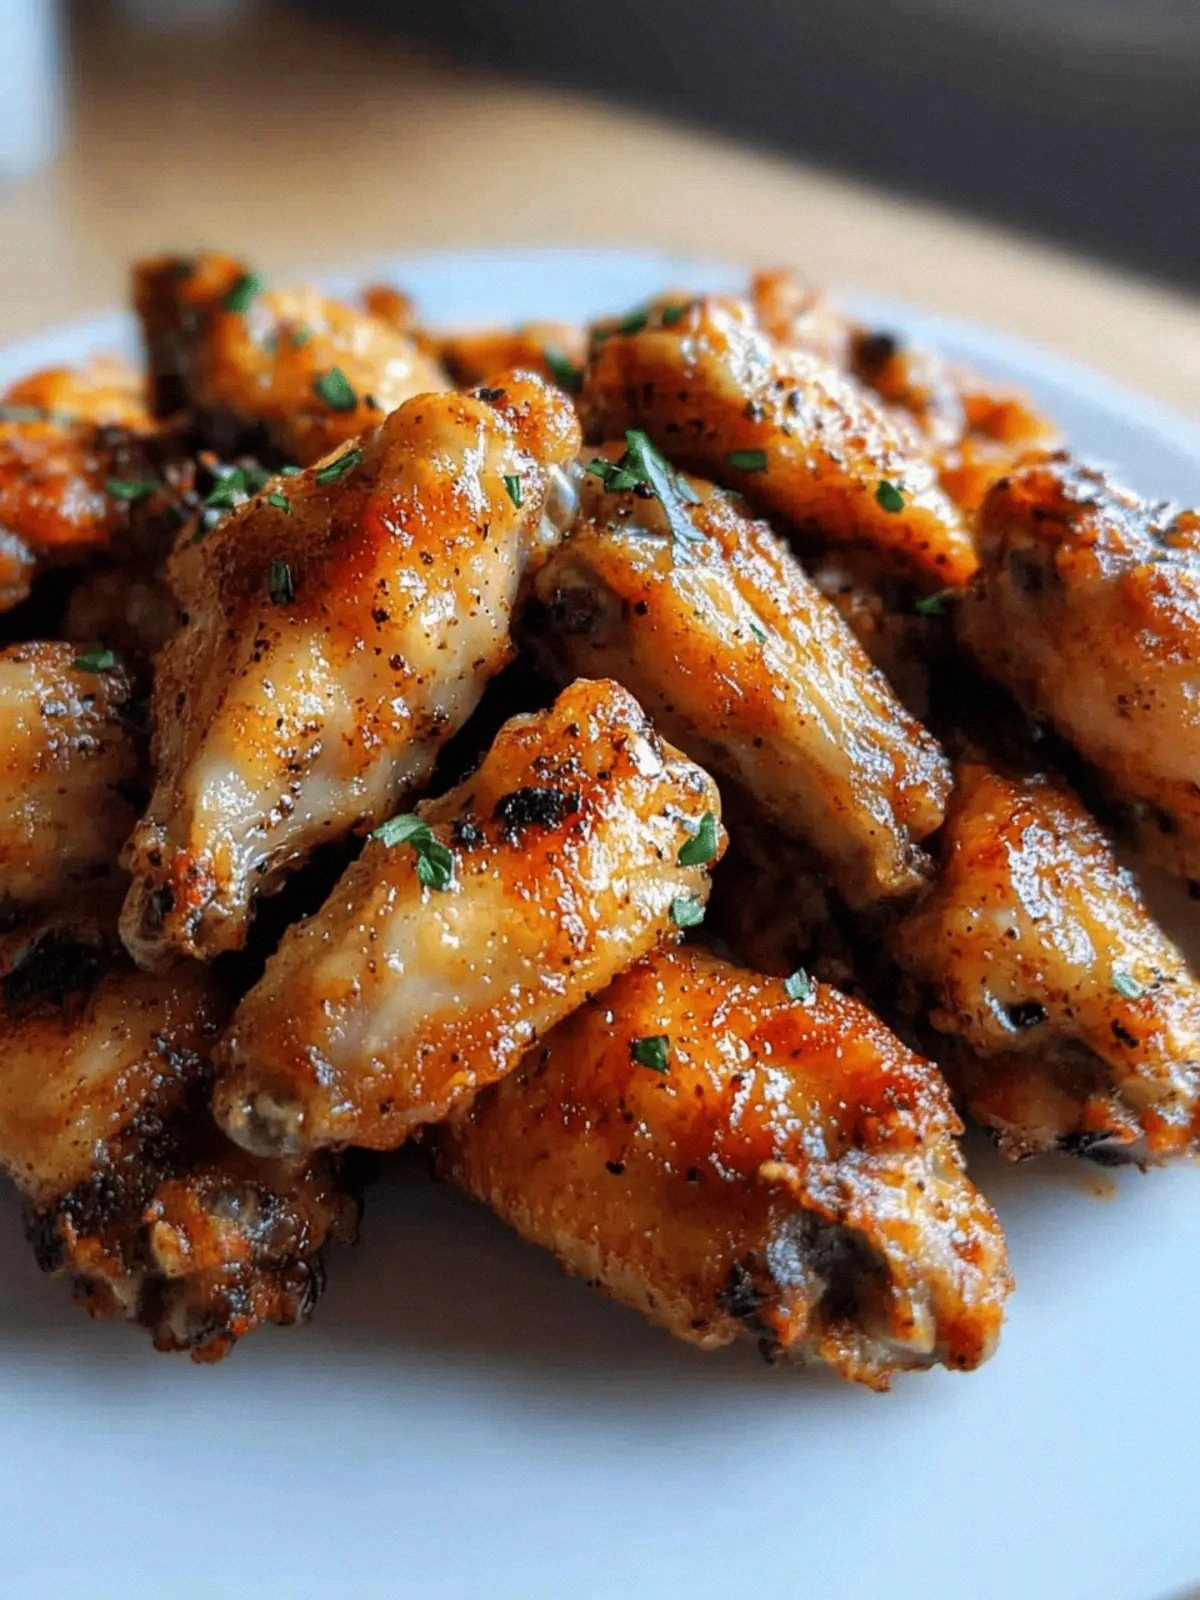
- Texture: The combination of aluminum‑free baking powder and a dry coating creates a light, airy crust that crackles with every bite. The wings stay crisp for longer, even after resting.
- Flavor: Ranch seasoning infuses the meat with a creamy, herby profile that balances the savory depth of the skin. The seasoning sticks perfectly thanks to a thin film of olive oil.
- Simplicity: No complicated marinades or double‑baking steps—just a quick toss and a single bake. This makes the recipe accessible for busy weeknights.
- Uniqueness: The use of baking powder, often overlooked in wing recipes, is the secret to that signature crunch that most recipes miss.
- Crowd‑pleaser: These wings are perfect for parties, game day, or a casual dinner. The flavor profile is familiar yet elevated.
- Ingredient Quality: Fresh, high‑quality wings and a premium ranch mix make the difference between good and unforgettable.
- Make‑Ahead Potential: The wings can be prepared ahead of time, refrigerated, and baked just before serving, saving you last‑minute prep.
- Healthier Alternative: Baking instead of frying reduces fat content while maintaining the same mouth‑watering crunch.
Inside the Ingredient List
The Flavor Base
The foundation of any great wing recipe is the seasoning. Here, a generous 3 tablespoons of ranch seasoning mix delivers a creamy, herby kick that coats every inch of the meat. The ranch mix typically contains dried herbs, garlic powder, and a touch of buttermilk for tang. If you can’t find a store brand, blend your own with dried parsley, dill, onion powder, and a splash of buttermilk or yogurt for that authentic flavor.
The Texture Crew
Aluminum‑free baking powder is the unsung hero that turns ordinary chicken skin into a flaky, golden crisp. When combined with a pinch of salt and pepper, it creates a light, airy coating that expands during baking, giving the wings a satisfying crunch. If you’re looking for a gluten‑free version, make sure to use a baking powder that is labeled gluten‑free.
The Unexpected Star
Olive oil is more than just a cooking medium—it’s a flavor carrier. A 2‑tablespoon drizzle of extra‑virgin olive oil helps the seasoning adhere to the wings while imparting a subtle fruity note. If you prefer a milder taste, swap olive oil for avocado oil or a neutral‑flavored canola oil. For an extra punch, a light dusting of smoked paprika can be added to the seasoning mix.
The Final Flourish
A half teaspoon of black pepper provides a gentle heat that balances the richness of the wings. It also enhances the overall flavor profile, making each bite more complex. If you like a bit of heat, consider adding a pinch of cayenne pepper or a dash of hot sauce to the seasoning blend.
Everything’s prepped? Good. Let’s get into the real action and bring these wings to life.
The Method — Step by Step
- Preheat and Prepare: Set your oven to 425°F (220°C) and line a large baking sheet with parchment paper. The high heat is crucial for achieving that golden, crispy skin. A clean, dry sheet ensures the wings don’t stick or steam. This step might seem trivial, but a properly preheated oven makes all the difference.
- Dry the Wings: Pat the wings dry with paper towels until they feel almost dry to the touch. Moisture is the enemy of crispiness; any water left on the skin will steam the wings, making them soggy. If you have time, let the wings sit uncovered on a rack for 15 minutes to allow the skin to dry further.
- Mix the Seasoning: In a large bowl, combine 1 tablespoon of aluminum‑free baking powder, 1 teaspoon of salt, 0.5 teaspoon of black pepper, and 3 tablespoons of ranch seasoning mix. Whisk until the mixture is uniform. The baking powder will react with the heat, creating tiny bubbles that lift the skin.
- Coat with Oil: Drizzle 2 tablespoons of olive oil over the wings. Toss them gently so every piece is lightly slicked. The oil helps the seasoning adhere and adds a subtle sheen to the finished product. If you prefer a lighter version, use a spray bottle to mist the wings lightly.
- Toss in Seasoning: Pour the seasoned mixture over the oiled wings. Toss again until each wing is evenly coated. The coating should look like a fine dusting; don’t worry if it looks a little gritty—this is normal and will crisp up in the oven. For extra flavor, you can add a splash of buttermilk or yogurt to the mixture.
- Arrange on Sheet: Spread the wings in a single layer on the prepared baking sheet, ensuring no two wings touch. This spacing allows hot air to circulate around each wing, ensuring uniform browning. If you’re cooking more than 10 wings, consider using two sheets or a double rack.
- Bake: Place the sheet in the preheated oven and bake for 35–40 minutes, flipping the wings halfway through. The wings should develop a deep golden color and a crisp skin. The internal temperature should reach 165°F (74°C) for safe consumption.
- Optional Finish: If you want a buttery glaze, brush the wings with melted butter mixed with a teaspoon of ranch seasoning during the last 5 minutes of baking. This adds a glossy finish and a deeper flavor profile. The butter also helps the seasoning stay on the skin.
- Rest: Let the wings rest for 5 minutes on a wire rack. Resting allows the juices to redistribute, keeping the meat moist. During this time, the skin will firm up a bit, enhancing the crunch.
- Serve: Plate the wings with a side of ranch dip, fresh celery sticks, and carrot ribbons. The creamy dip balances the savory crunch, while the veggies add a refreshing crunch that complements the wings. This dish is ready to be devoured immediately.
Insider Tricks for Flawless Results
The Temperature Rule Nobody Follows
Many wing recipes call for a low and slow bake, but that actually leads to soggy skin. The trick is to start with a high temperature—425°F (220°C)—and maintain it throughout. This high heat forces the moisture out of the skin rapidly, creating a crisp that locks in place. If you’re using a convection oven, reduce the temperature by 25°F to compensate for the fan’s efficiency.
Why Your Nose Knows Best
Your sense of smell is your best judge of doneness. When the wings are nearly ready, you’ll detect a nutty, toasted aroma that signals the skin is golden. If the scent is still raw or metallic, give them a few more minutes. Trusting your nose saves you from overcooking and keeps the wings juicy inside.
The 5‑Minute Rest That Changes Everything
Resting the wings for just five minutes is a game‑changer. During this short period, the juices redistribute, preventing them from spilling onto the skin and making it soggy. It also allows the skin to firm up slightly, giving that satisfying snap when you bite into it. Skipping this step will result in a less satisfying crunch.
Use a Rack for Even Heat
A wire rack placed on top of your baking sheet creates a small air gap around each wing. This promotes even heat distribution, preventing hotspots that cause uneven browning. It also lets excess fat drip away, keeping the wings lighter and crispier.
Keep the Wings Dry
Moisture is the enemy of crispiness. After patting the wings dry, let them air‑dry on a rack for 10–15 minutes if you have the time. The drier the skin, the more it will crisp up in the oven. If you’re in a rush, a quick pat with paper towels is still effective.
Creative Twists and Variations
This recipe is a playground. Here are some of my favorite ways to switch things up:
Spicy Sriracha Ranch
Add 1 tablespoon of sriracha to the seasoning mix for a fiery kick. The heat pairs wonderfully with the creamy ranch, creating a balanced flavor that’s perfect for heat‑loving crowds. Serve with cool yogurt dip to tame the heat.
Honey‑Mustard Glaze
During the last 5 minutes of baking, brush the wings with a mixture of honey and Dijon mustard. The glaze caramelizes into a sweet, tangy coating that contrasts beautifully with the savory ranch base. This variation works well for a brunch or a casual dinner.
Smoky Chipotle Ranch
Incorporate 1 teaspoon of chipotle powder into the seasoning for a smoky depth. The chipotle adds a subtle heat and earthy flavor that elevates the wings. Pair with a lime‑infused ranch dip for a fresh finish.
Herb‑Infused Olive Oil
Infuse the olive oil with fresh rosemary and thyme before drizzling it over the wings. The herbs seep into the meat, adding an aromatic layer that complements the ranch. This is ideal for a more sophisticated palate.
Asian‑Inspired Sesame Wings
Swap the ranch seasoning for a mixture of soy sauce, sesame oil, and ginger powder. Finish with a sprinkle of toasted sesame seeds and a drizzle of sriracha. The result is a fusion of sweet, salty, and spicy flavors that will wow any guest.
Low‑Calorie Version
Use a low‑fat ranch seasoning mix and replace olive oil with a light spray of cooking oil. Bake at a slightly lower temperature (400°F) to reduce the fat content while maintaining the crispy texture. This version is ideal for calorie‑conscious diners.
Storing and Bringing It Back to Life
Fridge Storage
Store leftover wings in an airtight container in the refrigerator for up to 3 days. The wings will stay moist and flavorful if you reheat them in a preheated oven at 350°F (175°C) for 10 minutes. The reheating process restores the crispness without drying out the meat.
Freezer Friendly
Freeze the wings in a single layer on a baking sheet before transferring them to a freezer bag. They’ll keep for up to 3 months. When ready, thaw in the refrigerator overnight and bake at 425°F (220°C) for 15–20 minutes. The wings will come out crisp and ready to eat.
Best Reheating Method
The secret to reheating is to let the wings sit at room temperature for 10 minutes before baking. Add a splash of water to the bottom of the pan to create steam, which keeps the wings from drying out. Finish with a quick broil for 2 minutes if you want to restore the original crispness.