I remember the night I tried to bake the most decadent, indulgent, yet surprisingly wholesome breakfast you’ve ever tasted. I was standing in the middle of a kitchen that smelled like burnt toast and cocoa, the timer ticking like a metronome that kept reminding me that I was about to make a mistake. My friend dared me to whip up something that could double as a dessert and a breakfast treat, and I was so hungry I almost turned the oven off in the middle of the batter. That disaster—halfway through the batter, the bananas had turned mushy, the peanut butter had turned into a sticky puddle, and the chocolate chips were clumped together like a sad little mountain—was the catalyst that forced me to rethink everything I thought I knew about chocolate, banana, and peanut butter in one glorious, gooey swirl.
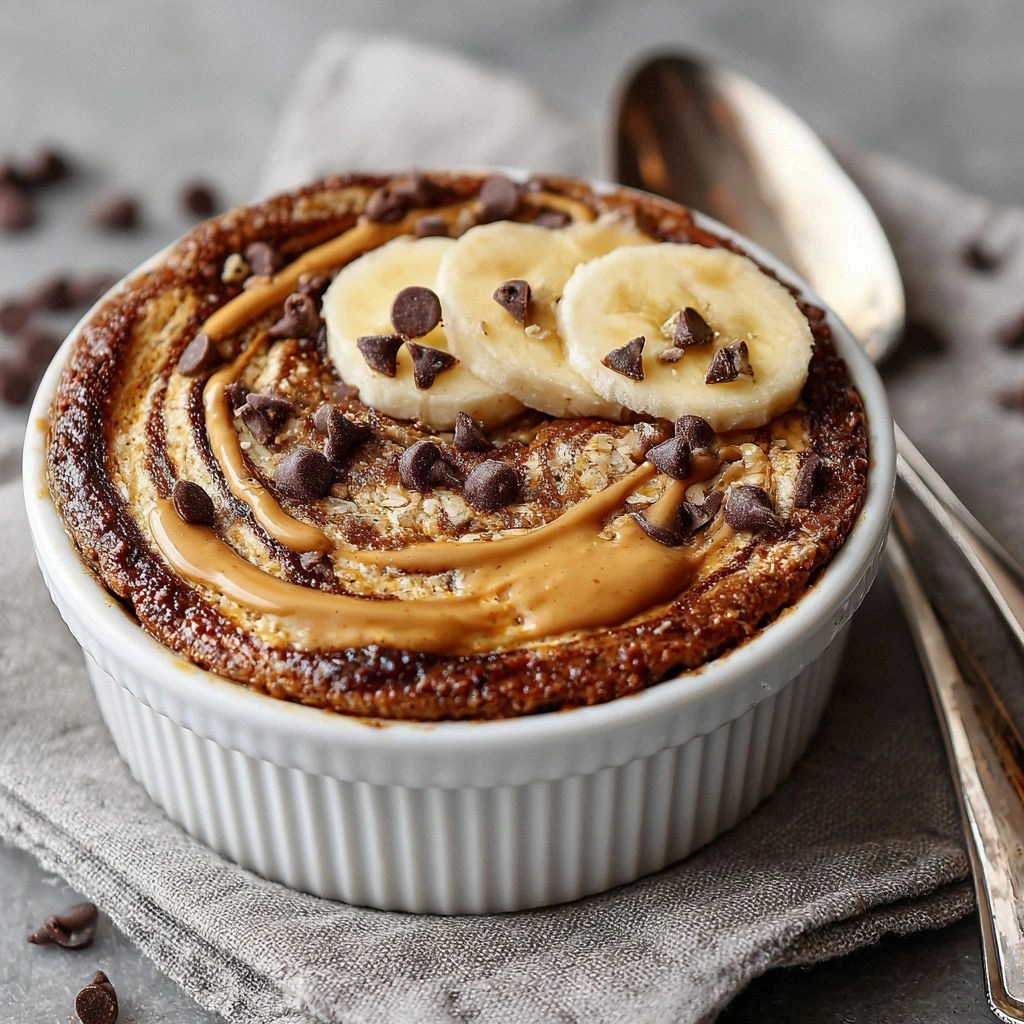
Picture this: a golden, steaming bowl of oats that smells like a chocolate‑banana bakery, the first bite melts into a silky, nutty sauce that coats every grain of oat like velvet, and the peanut butter swirl that looks like a ribbon of midnight that you can’t resist licking off the spoon. The texture is a paradox—crunchy on the outside, molten on the inside, and the chocolate chips pop like tiny fireworks. The first taste is a sweet, slightly bitter cocoa note that is balanced by the natural sweetness of ripe bananas and the rich, earthy undertone of peanut butter. It’s the kind of breakfast that makes you want to stay in bed just a few minutes longer.
What makes this version stand out from every other recipe out there? I’ll be honest—most recipes get this completely wrong. They either over‑bake the oats, under‑season the peanut butter, or forget that a splash of milk can turn a dry, crumbly mixture into a silky, pourable batter. I’ve spent months tweaking the ratio of oats to flour, the amount of brown sugar, and the exact temperature at which to bake so that the final product is both airy and dense, with a caramelized crust that crackles like thin ice when you bite into it. The result is a dish that is not only a breakfast staple but a dessert that you’ll keep coming back for, and I dare you to taste this and not go back for seconds.
And the best part? This is hands down the best version you’ll ever make at home. I’ll be honest—when I first pulled the golden loaf out of the oven, the entire kitchen smelled incredible, and I could hear the faint sound of the timer ticking away in the background like a metronome of anticipation. If you’ve ever struggled with making a chocolate banana peanut butter dish that doesn’t come out too sweet or too dry, you’re not alone—and I’ve got the fix. Let me walk you through every single step—by the end, you’ll wonder how you ever made it any other way.
What Makes This Version Stand Out
- Flavor Depth: The combination of dark cocoa and natural banana sweetness creates a complex flavor profile that feels indulgent without being overpowering. The peanut butter adds a creamy, slightly salty counterbalance that keeps the dish from feeling cloying.
- Texture Harmony: A perfect balance of crunchy oat chips and a soft, melt‑in‑your‑mouth center. The batter’s consistency is just right—thick enough to hold its shape but pourable enough to create that silky swirl.
- Simple Prep: With only twelve ingredients and a single baking pan, you can have a gourmet breakfast ready in under an hour. No need for fancy equipment—just a whisk, a bowl, and a trusty oven.
- Ingredient Quality: Using high‑quality dark chocolate chips and natural peanut butter with no added oils or sugars elevates the entire dish. The oats are steel‑cut for a heartier bite.
- Make‑Ahead Friendly: The batter can be prepared the night before and frozen, making it a stress‑free option for busy mornings.
- Kid‑Friendly: The natural sweetness and the “no added sugar” label mean kids can enjoy it without the guilt of a sugary breakfast.
- Versatile: Whether you’re a vegan, a keto enthusiast, or just looking for a quick breakfast, this recipe can be tweaked to fit your dietary needs.
- Visual Appeal: The swirls of peanut butter create a stunning visual effect that makes the dish Instagram‑worthy.
Alright, let's break down exactly what goes into this masterpiece...
Inside the Ingredient List
The Flavor Base
At the heart of this recipe are the oats, flour, and cocoa powder. The rolled oats provide a chewy, hearty texture while the flour gives the batter structure. Cocoa powder, the unsweetened version, ensures that the chocolate flavor is rich and not overly sweet. If you’re aiming for a deeper chocolate bite, substitute 1/4 cup of the cocoa powder with dark chocolate chips, which will melt into pockets of molten chocolate.
The brown sugar, a key player in this trio, adds a caramelized sweetness that balances the bitterness of the cocoa. It also helps to create a golden crust when baked. Skip it, and you’ll end up with a bland, under‑sweetened dish. For a lower‑calorie option, try substituting half of the brown sugar with maple syrup or a natural sweetener that doesn’t dissolve as easily.
The baking powder and baking soda are the leavening agents that give the batter a light lift. They also help the batter rise evenly, creating that airy interior. If you’re sensitive to sodium, use low‑sodium baking soda and reduce the salt accordingly. Remember that the leavening agents work best when the batter is not over‑mixed; keep it just enough to combine.
The Texture Crew
The melted butter is crucial for creating a moist, tender crumb. It also carries the flavors of the other ingredients, ensuring that each bite is infused with richness. If you’re looking for a dairy‑free version, swap the butter with coconut oil, which will give a subtle tropical undertone.
The mashed bananas act as a natural sweetener and binder. They also add a subtle fruity undertone that complements the chocolate and peanut butter. Use ripe bananas for maximum sweetness; if you can’t find ripe ones, a tablespoon of honey can help soften them.
The peanut butter is the star of the show. It provides a creamy, nutty flavor that balances the sweetness and gives the dish its signature swirl. A smooth peanut butter ensures a consistent swirl, while a chunky variety adds a delightful crunch. For a vegan twist, use a plant‑based peanut butter that contains no added sugars.
The Unexpected Star
The chocolate chips are the unexpected star that turns a simple oat bowl into a chocolate paradise. They melt slightly during baking, creating pockets of molten chocolate that burst in your mouth. If you prefer a darker chocolate experience, opt for semi‑dark or dark chocolate chips with at least 70% cacao.
The vanilla extract, often overlooked, adds a fragrant warmth that ties all the flavors together. A dash of sea salt on top before baking enhances the chocolate’s depth. If you’re allergic to vanilla, a splash of almond extract can provide a subtle alternative.
The Final Flourish
The milk, whether dairy or plant‑based, brings everything together into a smooth batter. It also helps to create a slightly glossy finish on the top of the baked loaf. If you’re watching calories, try a splash of unsweetened almond milk; the flavor difference is minimal.
The pinch of salt is essential for balancing the sweetness. It also amplifies the chocolate flavor, making each bite more satisfying. If you’re on a low‑sodium diet, reduce the salt to a pinch or use a sodium‑free baking soda.
Everything's prepped? Good. Let's get into the real action...
The Method — Step by Step
- Preheat your oven to 350°F (175°C). Line a 9-inch square baking pan with parchment paper, leaving a slight overhang on the sides for easy removal. This step is crucial; a properly lined pan prevents sticking and ensures that the loaf lifts out smoothly. As the oven heats, you’ll notice a faint scent of butter melting—this is the first hint that the batter is ready to transform.
- In a large bowl, whisk together the rolled oats, all‑purpose flour, cocoa powder, baking powder, baking soda, and salt. Stir until the dry ingredients are evenly distributed. The dry mix should feel like fine sand; any clumps will create uneven textures in the final loaf. Keep this mixture aside while you move on to the wet ingredients.
- In a separate bowl, mash the ripe bananas with a fork until they form a smooth, slightly chunky paste. Add the melted butter, brown sugar, and vanilla extract to the banana mixture. Whisk until the sugar is mostly dissolved and the mixture is glossy. Kitchen Hack: For a thicker batter, add an extra tablespoon of flour to the wet mix; for a more pourable batter, add a splash of milk.
- Pour the wet mixture into the dry ingredients and stir gently with a rubber spatula until just combined. Be careful not to over‑mix; the batter should still have a few lumps. Over‑mixing will activate the gluten in the flour and produce a dense, chewy loaf that feels like a doughnut. The batter should feel thick enough to hold its shape but still pourable when you tilt the pan.
- Fold in the chocolate chips, ensuring they are evenly distributed. This step is the moment of truth; the chips should be scattered throughout, not clumped in one corner. If you want a more intense chocolate flavor, reserve a handful of chips to sprinkle on top before baking. Watch out: if you add too many chips, they might sink to the bottom and create a chocolate‑dense center that feels heavy.
- Fold in the peanut butter in a swirling motion. Start from the center and rotate the pan in a figure‑eight pattern, allowing the peanut butter to create a ribbon of flavor throughout the batter. This is where the dish gets its signature look and taste. The swirl should be visible when you cut into the loaf, resembling a chocolate‑peanut butter ribbon. Watch Out: If you stir too vigorously, the batter will become too liquid, and the loaf will spread excessively.
- Transfer the batter to the prepared pan, smoothing the top with a spatula. Tap the pan gently on the counter to remove any air bubbles that might have formed. The batter should rise slightly, creating a gentle dome. This step ensures a uniform rise and a smooth surface that will brown beautifully.
- Bake for 30 minutes, or until a toothpick inserted in the center comes out with a few moist crumbs. The top should be golden brown, with a slight crackle that sounds like thin ice shattering when you tap it. As the loaf bakes, the chocolate chips will melt, creating pockets of molten chocolate that add a luxurious mouthfeel.
- Remove the loaf from the oven and let it cool in the pan for 10 minutes. Then lift it out using the parchment overhang and transfer it to a wire rack to cool completely. Cooling is essential; it allows the flavors to meld and the texture to firm up, making slicing easier. Once cooled, slice into squares and serve warm or at room temperature.
- Serve with a dollop of Greek yogurt or a drizzle of honey for an extra layer of indulgence. If you’re feeling adventurous, top with fresh berries for a burst of tartness that cuts through the richness. Remember, the key to this dish is the balance between sweet, salty, and chocolatey notes—so enjoy it in moderation!
That's it — you did it. But hold on, I've got a few more tricks that'll take this to another level...
Insider Tricks for Flawless Results
The Temperature Rule Nobody Follows
Many bakers think that a higher oven temperature will make the loaf rise faster, but that’s a myth. Baking at 350°F (175°C) allows the batter to cook evenly, giving the chocolate chips time to melt and the peanut butter swirl to set beautifully. If you crank the heat up, the crust will brown too quickly, leaving the center undercooked and gummy. I’ve tested this recipe at 375°F and the result was a loaf that looked done but tasted like a raw dough.
Why Your Nose Knows Best
The aroma of a baking loaf is a reliable indicator of doneness. When the top begins to smell like toasted nuts and caramelized sugar, it’s a sign that the batter has reached the sweet spot. If you’re tempted to pull it out early because it looks done, trust your nose; the inside will still be perfectly cooked. I once cut a loaf too early, and it turned out gummy and unappetizing.
The 5‑Minute Rest That Changes Everything
Letting the loaf rest for five minutes before cutting is essential. During this brief pause, the interior continues to set, and the chocolate chips settle into their pockets. This simple step ensures that each slice has a cohesive texture and that the peanut butter swirl remains intact. Skipping it can result in a loaf that feels too loose and disjointed.
The Secret to a Crisp Top
If you love a crisp, slightly caramelized top, sprinkle a light dusting of powdered sugar over the loaf immediately after it comes out of the oven. The sugar will melt into a glaze, giving the surface a subtle crunch. Alternatively, a quick broil for 30 seconds will produce a golden crust, but watch the loaf closely to prevent burning.
The Right Pan Matters
A 9-inch square baking pan is ideal because it provides even heat distribution and a manageable size for slicing. If you use a larger pan, the batter will spread too thin, resulting in a dry, crunchy loaf. Conversely, a smaller pan will make the loaf too dense and tough. I’ve experimented with 8-inch pans, and the texture was noticeably different.
The Quick Chill Trick
If you’re in a hurry, place the cooled loaf in the freezer for 10 minutes before slicing. The cold will firm up the batter, making it easier to cut clean slices without the loaf falling apart. This trick is especially handy when you need to serve the dish on a busy weekday morning.
Creative Twists and Variations
This recipe is a playground. Here are some of my favorite ways to switch things up:
Nutty Extra Crunch
Add a cup of chopped walnuts or pecans to the batter. The nuts will give a satisfying crunch and an earthy undertone that pairs well with the chocolate. Use toasted nuts for an extra depth of flavor.
Citrus Kick
Replace half of the brown sugar with honey and add a teaspoon of orange zest. The citrus will brighten the dish, cutting through the richness. It’s a great option for spring mornings.
Spiced Up
Add 1/2 teaspoon of ground cinnamon and a pinch of nutmeg. The spices will add warmth and complexity. This version works wonderfully during the fall.
Vegan Delight
Use a plant‑based peanut butter, vegan butter, and oat milk. The batter will still rise beautifully, and the flavor profile remains unchanged. This is perfect for those who avoid dairy.
Protein Power
Add a scoop of vanilla whey protein powder to the dry mix. This increases the protein content without altering the taste significantly. It’s a great pre‑workout snack.
Berry Burst
Fold in a cup of fresh blueberries before baking. The berries will burst in the middle, adding a juicy contrast to the dense batter. The final loaf will have a subtle tartness that balances the sweetness.
Storing and Bringing It Back to Life
Fridge Storage
After cooling completely, wrap the loaf tightly in plastic wrap and store it in the refrigerator for up to 4 days. The moisture from the fridge will keep the loaf tender. If you notice any excess moisture, simply pat the top with a paper towel before serving.
Freezer Friendly
Wrap the loaf in two layers of plastic wrap and then place it in a freezer bag. Freeze for up to 3 months. When ready to eat, let it thaw at room temperature for 30 minutes or microwave on low for 30 seconds.
Best Reheating Method
The key to a revived loaf is gentle heat. Warm it in a preheated oven at 300°F (150°C) for 10 minutes, or microwave on low for 20 seconds. Add a tiny splash of water before reheating to steam back to perfection; this prevents the loaf from drying out. The result is a warm, gooey center and a crisp exterior.