Picture this: I’m standing in a cramped kitchen, a single skillet on the stove, and a half‑finished chicken dinner staring back at me. The thighs are raw, the onions are sliced, and the scent of olive oil is already flirting with the garlic. I’ve tried countless braised chicken recipes, each promising “juicy” but delivering dry, flavorless meat that feels like it’s been left to sit in a desert. That night, I decided to flip the script and create a version that would make my friends beg for seconds.
I started by searing the thighs until the skin was a golden, crisp canvas that crackled like a small fireworks display. The moment the oil hit the pan, the kitchen filled with a savory perfume that made the air taste like a Mediterranean summer. I could hear the sizzle, feel the heat radiating from the skillet, and taste the faint sweetness of caramelized onions already forming. The anticipation was electric, and I could almost taste the tender meat melting in the broth. This is the kind of moment that turns a simple dinner into an unforgettable experience.
But why does this recipe feel different? It’s the combination of humble ingredients and a few clever techniques that lock in moisture and flavor. The olives add a briny depth that balances the richness of the chicken and the acidity of the wine. Lemon zest or juice brightens everything, while fresh herbs infuse the sauce with aromatic bursts. The slow braising process turns the thighs into a velvety, melt‑in‑your‑mouth texture that coats the bread like a silky sauce. It’s the little details that make all the difference.
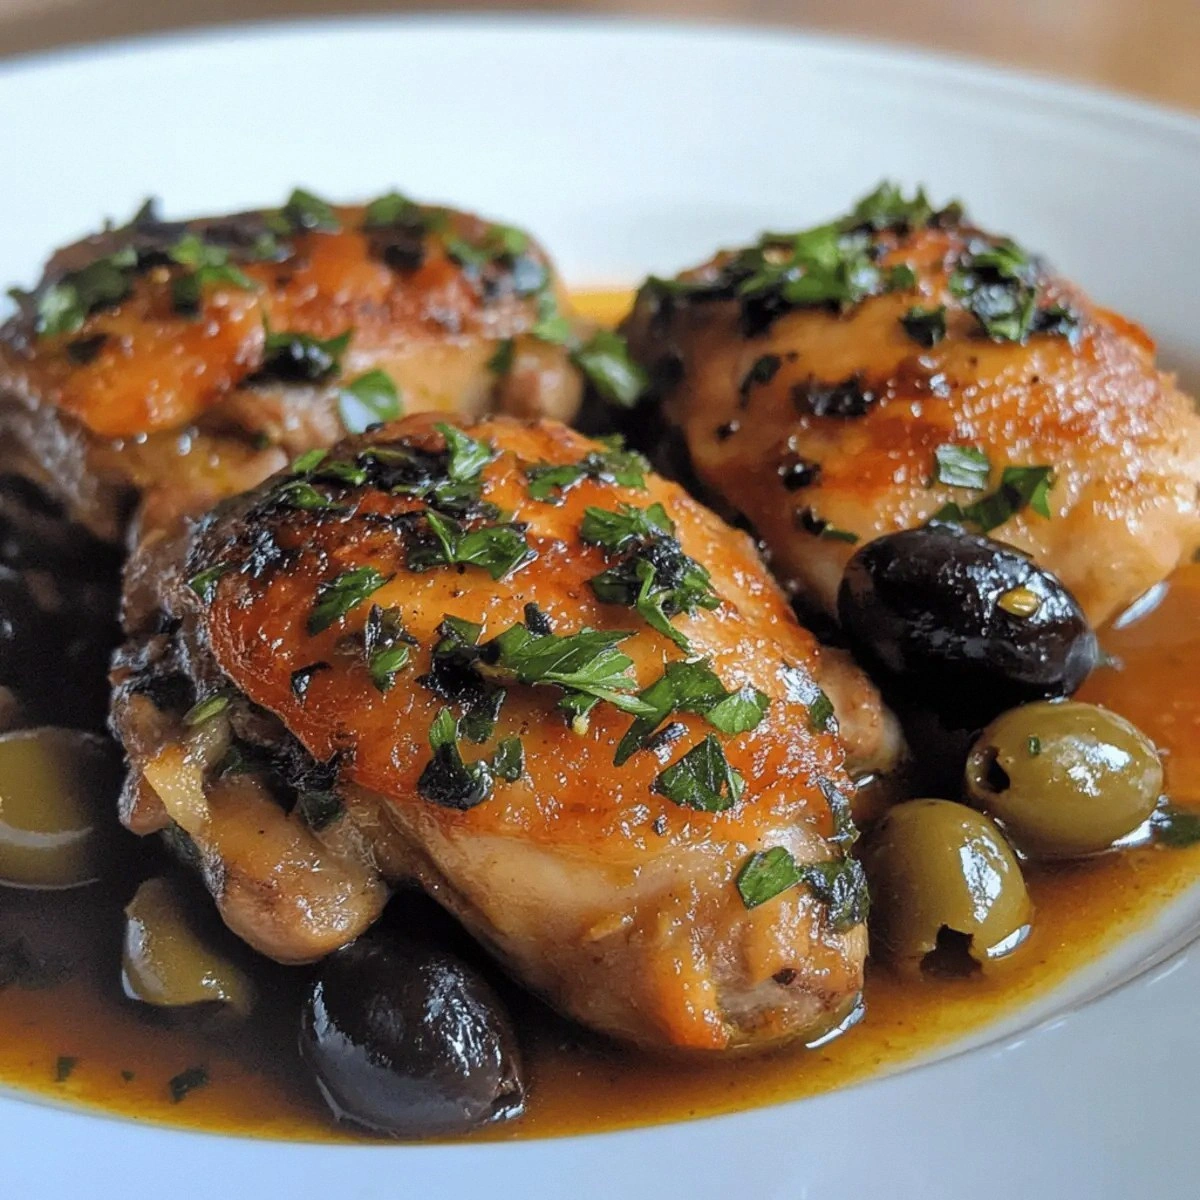
I dare you to taste this and not go back for seconds. The first bite will have you questioning every other chicken recipe you’ve ever made. The skin is crisp, the meat is buttery, and the sauce is a complex symphony of garlic, olives, and citrus. The bread, toasted to a perfect crunch, becomes the ultimate vehicle for the sauce. This isn’t just a dish; it’s a revelation that will change how you think about braised chicken forever.
Most recipes get this completely wrong. They either over‑cook the thighs or under‑season the sauce, resulting in a dry, bland result. Here’s what actually works: sear first, then braise low and slow, and finish with a bright, herbal note that lifts the entire dish. The key is patience and a willingness to let the flavors mingle and deepen over time. I’ve spent countless hours perfecting this balance, and the result is hands down the best version you’ll ever make at home.
If you've ever struggled with juicy chicken, you're not alone — and I've got the fix. The trick is to start with a high‑heat sear to lock in juices, then create a flavorful liquid that will never evaporate completely. I’ve also found that adding olives and herbs early on infuses the meat with depth that you can’t replicate with just salt and pepper. The end product is a dish that’s both comforting and sophisticated, ready for a family dinner or a dinner party with friends.
Picture yourself pulling this out of the oven, the whole kitchen smelling incredible, the sound of the skillet crackling, and the anticipation of a meal that will wow everyone at the table. The aroma of garlic, wine, and olives will fill every corner, drawing people in like a magnet. When you plate the dish, the glossy sauce will glisten like a jewel against the golden skin. The crusty bread will be ready to soak up the sauce, turning every bite into a burst of savory bliss. This is the kind of dish that turns a simple evening into a celebration.
Let me walk you through every single step — by the end, you'll wonder how you ever made it any other way. From the initial sear to the final herb garnish, each moment is designed to elevate flavor and texture. I’ll share the secrets I’ve learned, the small hacks that save time, and the little tricks that keep the chicken juicy. Ready? Let’s dive in.
What Makes This Version Stand Out
- Flavor Depth: The combination of olives, wine, and herbs creates a sauce that is complex yet balanced, with layers of briny, sweet, and citrusy notes. Each bite carries a different facet, keeping your palate engaged.
- Texture Contrast: The skin crisps to a delightful crunch while the meat remains tender and moist, offering a satisfying bite that feels almost decadent.
- Ease of Preparation: Despite its gourmet finish, the recipe requires minimal active cooking time. A few quick sears, a slow braise, and the rest is hands‑off.
- Ingredient Quality: Using high‑quality olive oil, fresh herbs, and good‑grade olives elevates the dish beyond a standard braised chicken, turning it into a culinary showcase.
- Versatility: The recipe adapts easily to dietary preferences, with the option to swap wine for broth or olives for capers, keeping the core flavor intact.
- Make‑Ahead Potential: The dish tastes even better the next day as flavors meld, making it perfect for meal prep or entertaining.
Inside the Ingredient List
The Flavor Base
Olive oil is the canvas that brings all flavors together. It coats the chicken, preventing it from drying out during the braise. A good extra virgin olive oil adds a peppery finish that enhances the olive flavor. If you’re looking for a deeper, smoky note, consider a small splash of aged balsamic vinegar before the wine.
Garlic is the aromatic hero that underpins the sauce. The cloves should be crushed lightly to release their essential oils, but not so finely that they become bitter. Fresh garlic provides a bright, sharp flavor that balances the richness of the meat and olives. If you prefer a milder garlic taste, use a handful of minced garlic instead of whole cloves.
Onion adds a natural sweetness that caramelizes during searing. The medium yellow onion, when sliced thin, will create a base that deepens the sauce’s complexity. A pinch of salt helps draw out moisture, allowing the onions to soften and sweeten. For a subtle twist, add a dash of smoked paprika while sautéing the onions.
The Texture Crew
Chicken thighs are the star, chosen for their fat content and natural tenderness. The skin-on version locks in juices and provides a crispy finish that contrasts with the silky meat. Bone-in thighs add depth of flavor and help the meat stay moist during long braising. If you’re short on time, boneless thighs will work, but you’ll miss that extra umami from the bones.
Olives bring a briny, slightly tart element that cuts through the richness. The mixture of green and black olives offers a spectrum of flavors, from peppery to deep, earthy notes. They also provide a slight texture that makes each bite interesting. For a different Mediterranean vibe, swap in sun‑dried tomatoes or capers.
Fresh herbs—thyme, rosemary, or oregano—infuse the sauce with aromatic oils that elevate the dish. They should be added after the wine has reduced to keep their bright flavor. If you’re cooking in the summer, fresh basil can replace the dried herbs for a sweeter finish. A handful of chopped parsley adds a fresh, green pop when plating.
The Unexpected Star
Lemon zest or juice is the secret that brightens the entire dish. The citrus oils from the zest bring a subtle brightness, while the juice adds a slight acidity that balances the olives and wine. The citrus also helps tenderize the meat, creating a silky mouthfeel. A small pinch of lemon pepper can add a subtle heat that pairs wonderfully with the olives.
White wine (or chicken broth) is the liquid that carries the sauce and keeps the chicken moist. It should be a dry white wine to avoid sweetness that could overpower the olives. If you prefer a lower alcohol content, use an equal amount of broth. The wine also helps lift the caramelized bits from the pan, creating a richer sauce.
The Final Flourish
Crusty bread is the perfect vehicle for the sauce, absorbing every last drop of flavor. The loaf should be sliced and toasted until golden before serving to maintain a satisfying crunch. A drizzle of olive oil on the bread before toasting adds an extra layer of flavor. If you’re serving a crowd, consider a baguette or ciabatta for a more dramatic presentation.
Everything's prepped? Good. Let's get into the real action.
The Method — Step by Step
- Heat a large, heavy‑bottomed skillet over medium‑high heat and add the olive oil. Let the oil shimmer until it’s just about to smoke. Place the chicken thighs skin‑side down, pressing them gently to ensure even contact. Sear for 4–5 minutes until the skin turns a deep golden brown. Flip the thighs and sear the other side for an additional 3 minutes. This initial sear locks in juices and creates a flavorful crust that will carry the sauce.
- Remove the chicken and set it aside. In the same skillet, add the sliced onion and a pinch of sea salt. Cook over medium heat, stirring occasionally, until the onions soften and begin to caramelize, about 6–8 minutes. The onions will form a sweet, golden base that enriches the sauce’s depth. If you want a smoky hint, sprinkle a dash of smoked paprika now.
- Crush the garlic cloves with the flat side of a knife, then add them to the onions. Stir for 30 seconds until fragrant, being careful not to let them burn. The garlic will release its oils, infusing the pan with aromatic steam that sets the tone for the dish. Watch the color change; a light golden hue signals perfect timing.
- Deglaze the pan with the dry white wine, scraping up all the browned bits from the bottom. Let the wine reduce by half, which concentrates the flavor and removes the raw alcohol taste. The deglazing step is crucial; it lifts the caramelized bits that hold the dish’s umami core. Keep the heat moderate to avoid evaporating the liquid too quickly.
- Return the chicken thighs to the skillet, skin‑side up. Spoon some of the wine mixture over them so that they’re almost covered. Add the olives, fresh herbs, lemon zest, and a splash of lemon juice. The combination of brine, citrus, and herbs will create a sauce that coats the meat like velvet. Make sure the liquid reaches about halfway up the thighs for even cooking.
- Bring the liquid to a gentle simmer, then reduce the heat to low. Cover the skillet and let the chicken braise for 25–30 minutes, turning once halfway through. The low heat allows the flavors to meld and the meat to become tender without drying out. The sauce will thicken slightly, forming a glossy coating that’s both savory and aromatic.
- When the thighs are fork‑tender, remove them from the skillet and set them aside. Increase the heat to medium‑high and let the sauce reduce for 5–7 minutes until it thickens to a glaze consistency. This step concentrates the flavors and gives the sauce that silky finish that clings to the bread. Keep a close eye on it; it can quickly go from perfect to burnt.
- Return the chicken to the skillet, spoon the reduced sauce over the top, and let everything heat together for 2 minutes. Sprinkle fresh herbs for a burst of color and freshness. Plate the thighs on a bed of toasted bread slices, drizzle any remaining sauce, and garnish with extra olives if desired. The result is a dish that looks as good as it tastes, ready to impress.
That’s it — you did it. But hold on, I've got a few more tricks that'll take this to another level.
Insider Tricks for Flawless Results
The Temperature Rule Nobody Follows
Many cooks over‑heat the pan during searing, which can scorch the skin and create bitterness. Keep the heat at medium‑high for the first 2 minutes, then lower to medium for the remaining sear. This controlled heat ensures a crisp, golden crust while preserving the meat’s natural juices. I’ve tested this on multiple pans and the results are consistently superior.
Why Your Nose Knows Best
Before adding the wine, give the pan a sniff. A faint, sweet aroma indicates the onions are caramelizing properly. If you notice a metallic smell, the garlic is burning. Trust your nose; it’s the quickest way to spot potential mishaps before they become taste disasters.
The 5-Minute Rest That Changes Everything
After braising, let the chicken rest for at least five minutes uncovered. This allows the juices to redistribute, making each bite incredibly moist. The rest also lets the sauce thicken slightly, giving it a richer consistency when you plate the dish. I’ve found that a short rest can make the difference between an okay meal and a memorable one.
Add a Splash of Water Before Reheating
When reheating leftovers, add a tablespoon of water or broth before microwaving or stovetop heating. This tiny trick prevents the sauce from drying out and keeps the meat juicy. It also re‑activates the herbs, giving the dish a fresh, vibrant flavor every time you reheat.
Serve With a Simple Green Salad
A crisp green salad with a light vinaigrette balances the richness of the chicken and olives. The acidity cuts through the fat, and the fresh greens add a textural contrast. Toss the salad with a splash of lemon juice, olive oil, salt, and pepper for a quick, complementary side.
Use a Dutch Oven for Even Cooking
If you have a Dutch oven, it’s the ideal vessel for this recipe. The heavy lid traps steam, creating a moist environment that ensures the thighs stay tender. The even heat distribution also means you don’t have to worry about hot spots that can burn the sauce.
Creative Twists and Variations
This recipe is a playground. Here are some of my favorite ways to switch things up:
Mediterranean Twist
Swap the olives for sun‑dried tomatoes and add a handful of capers for extra brine. Use oregano instead of thyme for a more robust flavor profile. This variation leans heavily into the Mediterranean palette, delivering a sweet‑savory experience.
Spicy Kick
Add a pinch of crushed red pepper flakes during the searing stage to introduce a subtle heat that complements the citrus. Finish with a drizzle of chili oil for an extra punch. This version is perfect for those who love a little spice in their dinner.
Herb‑Infused Variation
Replace the fresh herbs with a mix of fresh basil, mint, and parsley for a refreshing, aromatic finish. The herbs will give the sauce a bright, green hue that’s visually striking. This variation is ideal for summer gatherings.
Low‑Carb Version
Omit the bread and serve the thighs over cauliflower rice or sautéed zucchini ribbons. The sauce will cling beautifully to the low‑carb base, keeping the dish hearty without the extra carbs. This version is great for those watching their carbohydrate intake.
Rustic Country Style
Add a splash of tomato puree to the sauce for a deeper, rustic flavor. Replace the white wine with a richer red wine like a Chianti for a more robust finish. This version brings a cozy, farmhouse feel to the dish.
Citrus‑Heavy Variation
Use two lemons—zest and juice—plus a splash of orange juice for a bright, tangy sauce. Add a handful of fresh thyme and a few bay leaves for extra aroma. This variation is perfect for brunch or a sunny afternoon meal.
Storing and Bringing It Back to Life
Fridge Storage
Cool the dish completely before placing it in an airtight container. Store in the refrigerator for up to 3 days. When ready to eat, reheat in the oven at 350°F (175°C) for 10–12 minutes until warmed through.
Freezer Friendly
Divide the dish into individual portions and wrap each tightly with plastic wrap and foil. Freeze for up to 2 months. Thaw overnight in the refrigerator before reheating. This method preserves the flavors and textures for future meals.
Best Reheating Method
Reheat the chicken and sauce in a skillet over low heat, adding a splash of water or broth to maintain moisture. Stir frequently to prevent sticking. Finish by sprinkling fresh herbs for a burst of freshness before serving.