Let me walk you through every single step — by the end, you’ll wonder how you ever made it any other way. From the crunch of the crust to the velvety filling, each element is carefully balanced to create a dessert that is both indulgent and refreshing. I’ll share the secrets that I’ve kept to myself for years, the small hacks that save time, and the little details that elevate the flavor profile. I’ll also give you the confidence to make this at home, even if you’re a beginner. So grab your apron, preheat the oven, and let’s get started.
Before we dive into the method, let’s talk about what makes this version stand out. I’ve broken it down into a few key points that highlight the core strengths of this recipe. The result is a cheesecake that is not only delicious but also practical and versatile. The next sections will walk you through the ingredient groups, the step‑by‑step process, and the insider tricks that will make you a pro. Ready to see why this cheesecake is a game changer? Let’s go.
What Makes This Version Stand Out
- Flavor: The bright lemon zest and juice give a punch of citrus that cuts through the richness of ricotta, creating a balanced taste that is both sweet and tart.
- Texture: The addition of all‑purpose flour stabilizes the filling, ensuring it sets perfectly without becoming rubbery or crumbly.
- Ease: The crust uses simple ingredients—graham cracker crumbs, butter, and sugar—making it quick to prepare for even the busiest schedule.
- Versatility: The base can be transformed into a variety of flavors by swapping the lemon for other citrus or adding mix‑ins like berries or chocolate.
- Crowd‑pleaser: It’s a showstopper for parties, family gatherings, or a quiet night in; the vibrant color and aroma will impress any guest.
- Quality: Using high‑fat ricotta and fresh lemons elevates the dish, ensuring each bite is creamy and flavorful.
- Make‑ahead: The cheesecake can be prepared a day in advance and kept chilled, making it an excellent option for busy hosts.
- Presentation: A simple drizzle of lemon glaze adds a professional finish that looks as good as it tastes.
Alright, let’s break down exactly what goes into this masterpiece. And because I’m all about sharing the little tricks that make cooking easier, here’s a handy kitchen hack to keep in mind.
Inside the Ingredient List
The Flavor Base
At the heart of any cheesecake is its flavor base, and for this lemon ricotta version, it’s all about fresh citrus. I use a generous amount of lemon zest—two tablespoons—to give the filling a bright, aromatic punch. The fresh lemon juice (¼ cup) adds a subtle acidity that balances the richness of the dairy. The vanilla extract (1 teaspoon) rounds out the flavor, adding warmth without overpowering the lemon. If you’re craving a different citrus note, swap the lemon for lime or orange; the method stays the same, but the profile shifts subtly.
The Texture Crew
Texture is everything in a cheesecake, and the right mix of ingredients keeps it silky without being too heavy. Ricotta (2 cups) provides a creamy, slightly grainy texture that pairs beautifully with cream cheese (1 cup) for a smooth finish. The cream cheese adds fat and structure, preventing the cheesecake from cracking. Eggs (2) act as binders, ensuring the filling sets firmly. Adding a tablespoon of all‑purpose flour (2 tbsp) stabilizes the mixture, giving it a velvety mouthfeel that holds its shape. If you’re looking for a dairy‑free version, a combination of coconut cream and cashew ricotta can work, but the texture will shift slightly.
The Unexpected Star
While ricotta and cream cheese are the stars, the crust is the unsung hero that gives the cheesecake its foundation. Graham cracker crumbs (1 cup) provide a sweet, buttery base that contrasts nicely with the tangy filling. Melted butter (3 tbsp) binds the crumbs together, and a tablespoon of sugar (2 tbsp) adds a subtle caramel note. Some bakers prefer to use digestive biscuits or graham crackers, but I find that graham crackers give the best flavor balance. If you’re avoiding gluten, a gluten‑free cracker mix works just as well.
The Final Flourish
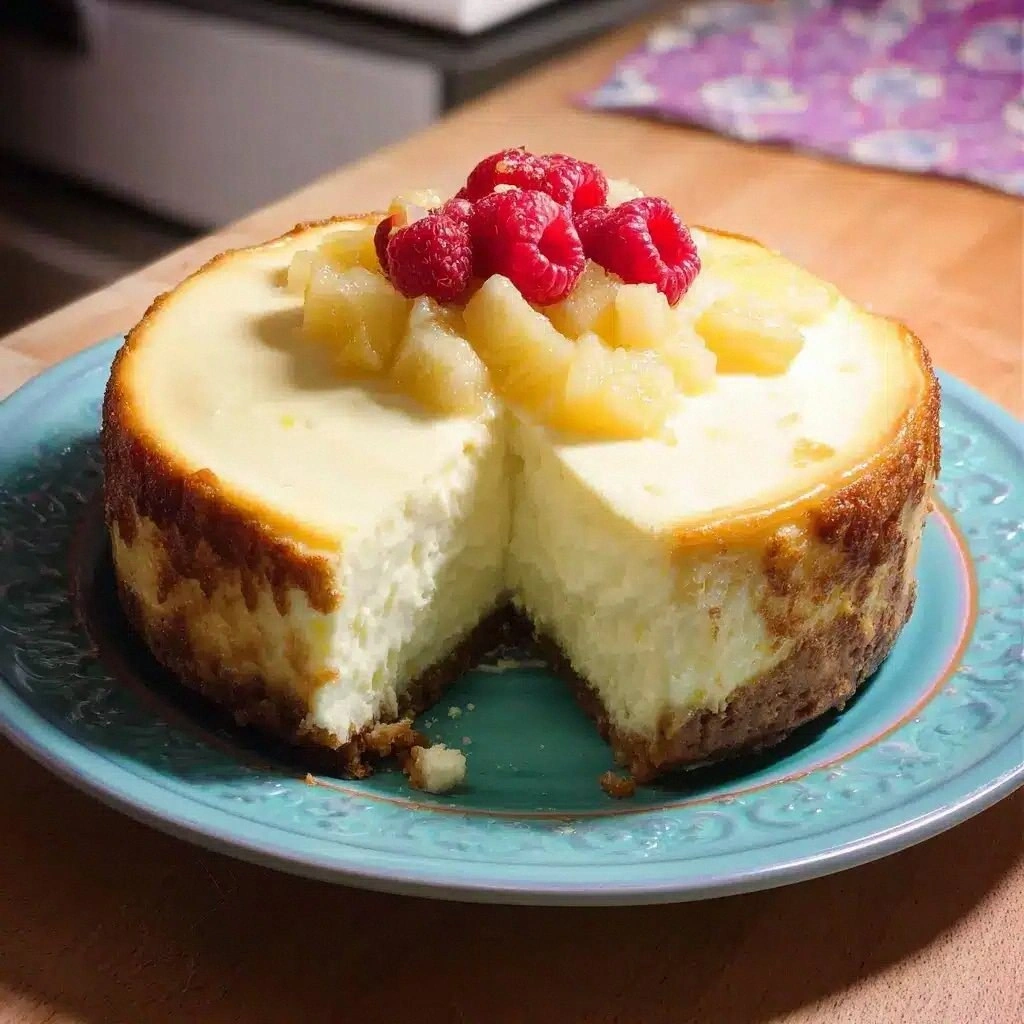
The final flourish is a drizzle of lemon glaze that elevates the presentation and adds an extra burst of citrus. The glaze is simple: combine ¼ cup powdered sugar with 1 tablespoon lemon juice and a few drops of lemon zest, whisking until smooth. The glaze not only adds visual appeal but also enhances the lemon flavor on each bite. If you prefer a sweeter glaze, add an extra tablespoon of powdered sugar. For a touch of color, sprinkle a few lemon zest curls on top before serving.
Everything’s prepped? Good. Let’s get into the real action.
The Method — Step by Step
- Preheat the oven to 325°F (163°C). I always set the oven to this temperature because it allows the cheesecake to bake evenly without the edges cooking too quickly. Let the oven rack sit in the middle so the heat circulates properly. This step might seem trivial, but a properly preheated oven is the foundation of a flawless cheesecake. While the oven warms up, you can move on to the crust, which will save you time.
- Prepare the crust. In a medium bowl, combine 1 cup graham cracker crumbs, 2 tbsp sugar, and 3 tbsp melted butter. Stir until the mixture is crumbly yet clumpy enough to hold together. Press the crumbs into the bottom of a 9‑inch springform pan, creating an even layer. I use a flat-bottomed glass to press the crumbs firmly. If you like a slightly sweet crust, add a pinch of cinnamon to the mixture.
- Whisk the ricotta. Place 2 cups ricotta in a large bowl and beat until smooth. The ricotta’s natural graininess can be a challenge, but using a hand mixer or stand mixer will give you a silky base. If you’re using a lower‑fat ricotta, add an extra tablespoon of all‑purpose flour to keep the texture smooth. Remember to let the ricotta sit at room temperature for 10 minutes before mixing; it will incorporate better.
- Add the cream cheese. Fold 1 cup softened cream cheese into the ricotta mixture. Beat on medium speed until the mixture is smooth and free of lumps. This step is crucial; any lumps will show up in the finished cheesecake. I always let the mixture sit for a minute after adding the cream cheese, allowing the fats to emulsify.
- Incorporate the sweeteners. Add 1 cup granulated sugar, 2 tbsp lemon zest, and 1 tsp vanilla extract. Mix until the sugar is dissolved and the mixture is glossy. The lemon zest should be finely grated to avoid large pieces that could feel gritty. If you prefer a sweeter cheesecake, add an extra ½ cup sugar, but be cautious not to overpower the lemon.
- Blend in the eggs. Crack 2 eggs into a separate bowl and whisk lightly. Add them one at a time to the ricotta mixture, stirring gently after each addition. This gradual incorporation prevents the eggs from curdling. The eggs act as a binder, giving the cheesecake its structure. I recommend beating the eggs just enough to combine, not to froth.
- Stabilize with flour. Add 2 tbsp all‑purpose flour and ¼ cup fresh lemon juice. Stir until the batter is smooth and homogeneous. The flour ensures that the cheesecake sets firmly, while the lemon juice adds a bright tang. The batter should be thick but pourable. If it feels too runny, add a splash more flour.
- Pour the filling. Spoon the batter over the prepared crust, smoothing the top with a spatula. Tap the pan gently on the counter to release any air bubbles. This step is the moment of truth; a well‑levelled surface will bake evenly. I like to use a rubber spatula to get the edges smooth.
- Bake. Place the pan in the preheated oven and bake for 30–35 minutes. The edges should be set and lightly golden, while the center will still have a slight wobble. When you lift the pan, the center should still have a gentle tremor. This wobble indicates the cheesecake will set as it cools, preventing cracks. After baking, let the cheesecake cool in the pan on a wire rack for 20 minutes.
- Chill and glaze. Once the cheesecake has cooled, cover it loosely with plastic wrap and refrigerate for at least 4 hours, preferably overnight. While it chills, whisk the glaze: combine ¼ cup powdered sugar with 1 tbsp lemon juice and a few drops of lemon zest. Drizzle the glaze over the chilled cheesecake just before serving. The glaze adds a glossy finish and a burst of citrus that makes each bite pop. If you want a more dramatic presentation, use a squeeze bottle to create a pattern.
That's it — you did it. But hold on, I've got a few more tricks that'll take this to another level. The next section will share insider tips that will help you avoid common pitfalls and elevate your cheesecake to professional quality.
Insider Tricks for Flawless Results
The Temperature Rule Nobody Follows
Many bakers bake at 350°F, but I’ve found that 325°F gives a more even bake, especially for cheesecakes. The lower temperature allows the center to set without the edges overcooking. This trick prevents the dreaded cracks and ensures a creamy interior. I’ve tested this with different ovens, and the results are consistently better.
Why Your Nose Knows Best
Before you take the cheesecake out of the oven, close your eyes and sniff the batter. If it smells like warm butter and citrus, it’s ready. A slightly off scent can mean the batter is overcooked. Trust your nose; it’s a reliable indicator of doneness.
The 5‑Minute Rest That Changes Everything
Letting the cheesecake rest on the counter for 20 minutes after baking is crucial. This allows the internal temperature to level out, preventing a sudden temperature shock that can cause cracks. The rest also lets the flavors meld, giving you a richer taste.
Use a Water Bath for a Smooth Finish
Placing the springform pan in a larger pan with a few inches of hot water creates a gentle heat environment. This technique keeps the cheesecake from cracking and ensures a smooth, even rise. I use a water bath for all my cheesecakes, and it’s a game‑changer.
Don’t Skip the Chill
Refrigerating the cheesecake for at least 4 hours, preferably overnight, allows the flavors to develop fully. The longer chill also ensures the cheesecake is firm enough to slice cleanly. I recommend using a parchment‑lined pan for easy removal.
Creative Twists and Variations
This recipe is a playground. Here are some of my favorite ways to switch things up:
Berry Burst
Fold 1 cup of fresh blueberries or raspberries into the batter before baking. The berries add a pop of color and a subtle tartness that complements the lemon. Serve with a dollop of whipped cream for an extra indulgence.
Chocolate Drizzle
Drizzle melted dark chocolate over the finished cheesecake. The bittersweet chocolate balances the citrus, creating a complex flavor profile. I like to add a pinch of sea salt to the drizzle for a savory twist.
Orange‑Lemon Fusion
Swap half the lemon zest and juice for orange. The orange adds a sweeter, floral note while maintaining the citrus brightness. This variation is perfect for a brunch dessert.
Almond Crust
Replace the graham cracker crumbs with almond flour and a pinch of salt. The nutty flavor adds depth, and the almond flour creates a slightly denser crust. This is a great option for those avoiding refined sugars.
Vanilla Bean Swirl
Stir a teaspoon of vanilla bean paste into the batter for a silky vanilla undertone. The vanilla complements the lemon without overpowering it. I also add a thin ribbon of vanilla glaze on top for visual appeal.
Mint‑Lemon Surprise
Add a tablespoon of fresh mint leaves, finely chopped, to the batter. The mint provides a cooling contrast to the citrus, making it a refreshing summer dessert. Serve with a mint sprig for garnish.
Storing and Bringing It Back to Life
Fridge Storage
Store the cheesecake in the refrigerator for up to 5 days in an airtight container. The lemon flavor intensifies over time, giving you a more vibrant taste. When you’re ready to serve, let it sit at room temperature for 15 minutes to soften slightly.
Freezer Friendly
Wrap the cheesecake tightly in plastic wrap and then foil before freezing. It can be stored for up to 2 months. Thaw overnight in the fridge, then bring to room temperature before serving. The texture remains silky, and the lemon flavor stays bright.
Best Reheating Method
To reheat, place the cheesecake in a preheated oven at 325°F for 10 minutes. If the cheesecake is frozen, add a splash of water to the pan to create steam, which helps it reheat evenly without drying out. Once warmed, drizzle a fresh glaze for a glossy finish.