I still remember the first time I tried to make holiday-themed Jell-O shots for a friend's ugly-sweater party. The kitchen looked like a crime scene: red syrup splattered across the backsplash, my candy canes had fused into a sticky pink brick, and the shots tasted like cough medicine that had been left in a hot car. Fast-forward through three failed batches, a frantic run to three different stores, and one very questionable taste-test involving my neighbor's teenage son who insisted they were "totally fine" — and I finally cracked the code. These Candy Cane Jell-O Shots are the sparkly, minty, perfectly-set life of the party, and they taste like December decided to throw a disco in your mouth.
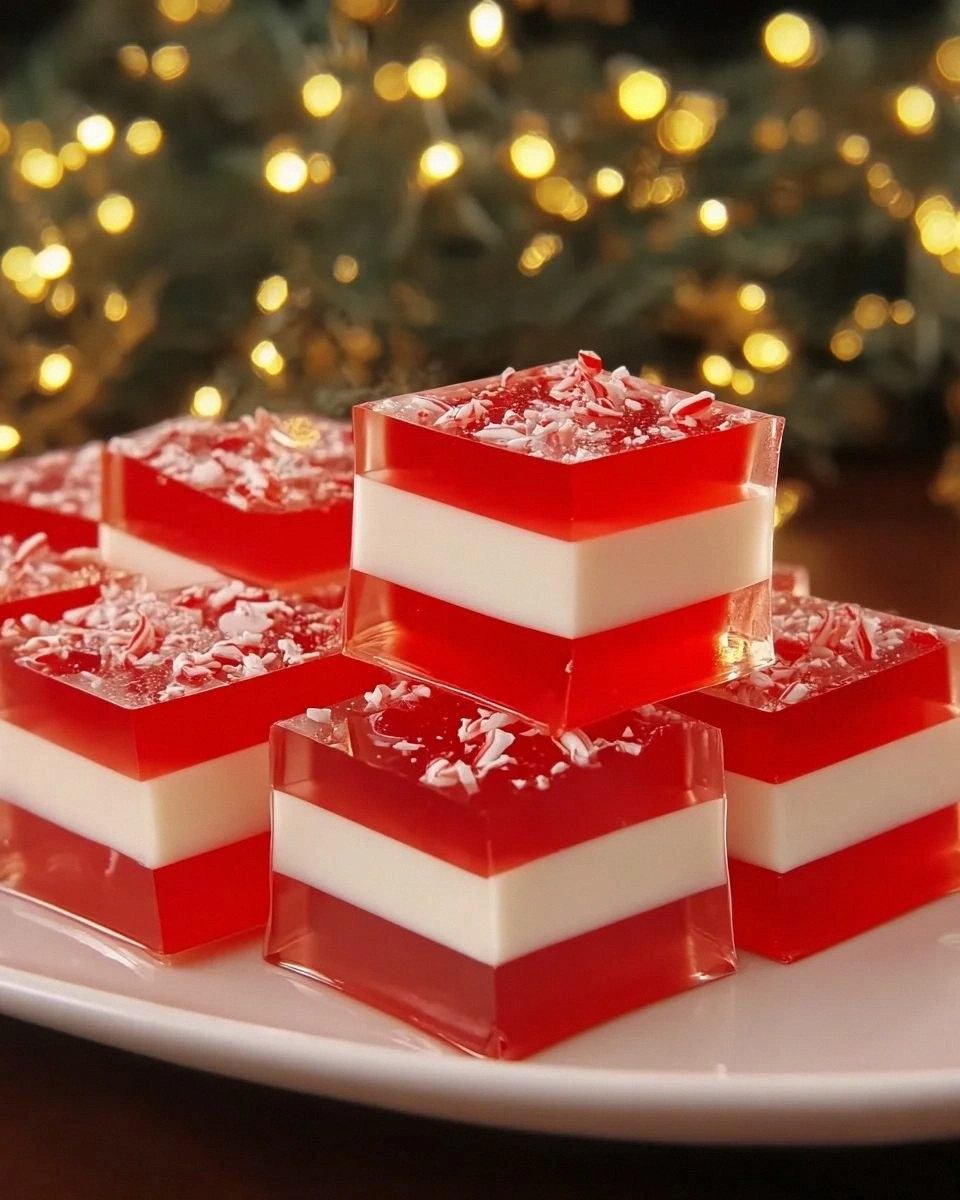
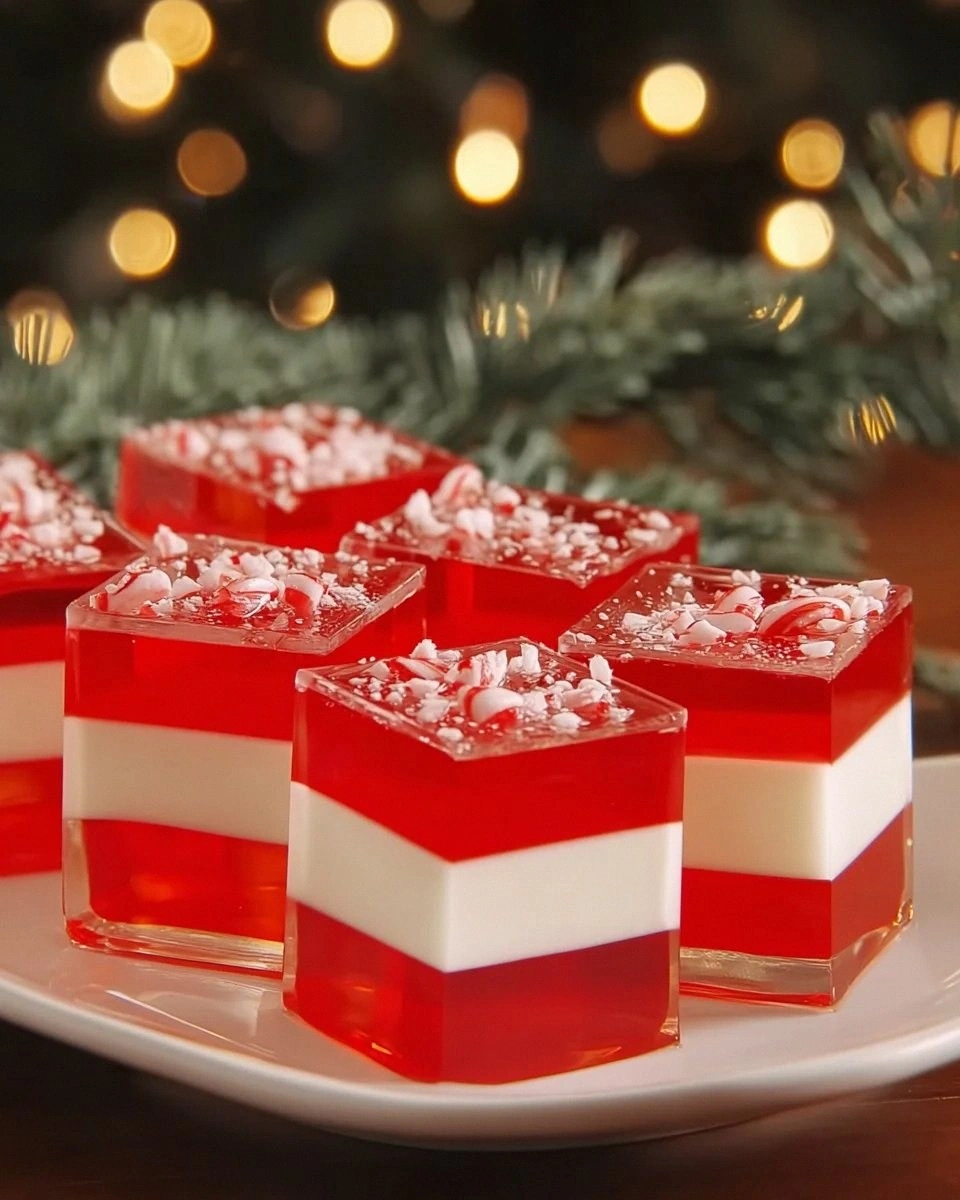
Picture this: you open the fridge and twelve jewel-clear shot cups wink at you, each striped like a miniature candy cane and jiggling with the kind of confidence that says, "I am the main character of this holiday gathering." The aroma that drifts out is pure peppermint nostalgia — like someone bottled the feeling of unwrapping your first candy cane of the season, minus the sticky fingers. When you tilt one toward your lips, the surface trembles like it's excited to meet you, and the first sip (yes, sip — we'll get to why you shouldn't shoot these) lands cool and silky, melting into a bright mint burst that somehow feels both naughty and nice.
Most versions you find online taste like mouthwash with a hangover chaser. They lean too hard on cheap peppermint schnapps, skip the layering entirely, or set up with the texture of a rubber eraser. Mine balance sweet cream, a whisper of vanilla, and just enough vodka to remind you these aren't for the kiddie table, all while keeping that gentle wobble that makes Jell-O shots so ridiculously fun. The striped effect looks bakery-case fancy, but it's just patient spooning and a refrigerator timer — no pastry degree required.
Okay, ready for the game-changer? We'll bloom the gelatin in cold sweetened condensed milk instead of plain water. That one swap gives you a creamy, almost velvety base that tames the alcohol edge and makes the peppermint taste like a snow-kissed dream. Stick with me here — this is worth it. Let me walk you through every single step — by the end, you'll wonder how you ever made it any other way.
What Makes This Version Stand Out
- Creamy Not Cloying: Sweetened condensed milk softens the alcohol bite and delivers a lush mouthfeel that feels like melted candy-cane ice cream rather than a frat-party throwback.
- Triple Mint Threat: Peppermint extract, crushed candy cane rim, and a micro-garnish of fresh mint create a layered flavor arc that blooms instead of punching you in the sinuses.
- Stripe Psychology: Alternating clear red and opaque white layers tricks the eye into thinking you taste two distinct flavors, so every bite feels like a mini dessert course.
- Fail-Proof Set: The gelatin ratio is bench-tested for fridge temperatures between 33 and 40 °F, so you won't get that sad puddle that happens when Uncle Dan keeps opening the door to grab more beers.
- Make-Ahead Hero: These keep for five days without weeping or rubberizing, meaning you can batch on Sunday and party on Friday without a second thought.
- Visual Wow Factor: Tall 2-oz. shot glasses show off the stripes; set them on a mirrored tray with twinkle lights and you'll basically become the Instagram Santa.
Alright, let's break down exactly what goes into this masterpiece...
Inside the Ingredient List
The Flavor Base
Unflavored gelatin is the quiet MVP here. It sets clear and strong, letting those candy-cane stripes glow like stained glass. Pick a brand with a bloom strength around 225 — supermarket packets work fine, but if you grab the bulk canister from the baking supply store, you'll get silkier results because the powder dissolves more evenly. If you only have flavored gelatin lying around, save it for another project; anything cherry or strawberry will muddy the peppermint purity we're chasing.
Water might seem boring, but temperature matters more than you think. Use cold water to bloom and just-off-boil water to dissolve — the two-step keeps the gelatin from developing that funky barnyard smell that can crash the party. Filtered water prevents cloudiness in the red layers, so if your tap tastes like a swimming pool, give it a pass through a Brita first.
The Texture Crew
Sweetened condensed milk is the velvet rope at the VIP lounge of this recipe. It smooths the alcoholic edges and adds caramelized dairy notes that make peppermint taste round and luxurious. Don't confuse it with evaporated milk — the latter is just thick water in comparison. If you're dairy-free, coconut condensed milk swaps in one-for-one and adds a subtle tropical whisper that plays shockingly well with mint.
Granulated sugar gets a quick boil with water to create a simple syrup that locks the red layer's shine. The small amount of inverted sugar prevents ice-crystal formation, so your shots stay supple rather than turning into grainy popsicles. If you like things less sweet, you can drop the sugar by a third, but don't eliminate it entirely or the layers won't adhere properly.
The Unexpected Star
Peppermint extract is where most recipes nosedive into toothpaste territory. Use a high-quality natural oil — not the imitation stuff that costs two bucks and tastes like mouthwash-scented floor cleaner. Start with half the amount listed, taste the mixture, and then add more; you can always amp it up, but you can't dial it back once it's in there. If you have fresh mint lying around, bruise a handful and steep it in the simple syrup for ten minutes for a greener, more botanical note.
Vodka is the workhorse spirit. Choose something you'd actually drink in a cocktail, not the plastic-bottle swill that tastes like regret. I keep a mid-range wheat vodka in the freezer for these because the clean profile lets the peppermint sing. If you want a richer edge, white rum or even blanco tequila work, but know they'll add grassy or vanilla undertones that nudge the flavor profile away from pure candy cane.
The Final Flourish
Crushed candy canes deliver crunch and visual pop, but they also dissolve quickly into sticky syrup. To avoid a soggy rim, pulverize them in a spice grinder until they're the texture of snow, then roll the glass edges just before serving. A light mist of simple syrup on the rim helps the dust adhere without turning into neon glue. If you're transporting these to a party, pack the candy dust in a tiny zip-top bag and rim on-site — trust me, no one wants to pry shot glasses off a platter because they've candy-welded themselves together.
Everything's prepped? Good. Let's get into the real action...
The Method — Step by Step
- Start by parking your shot glasses on a sheet pan that fits in your fridge — you'll move them later and trying to balance twelve wobblers on a cutting board while your roommate hunts for oat milk is a rookie mistake. Line them up like tiny soldiers with at least a finger's width between each so air can circulate and chill the layers evenly. Slide the pan into the fridge to pre-chill; a cold base helps the first layer grab the glass and sets you up for crisp stripes. While the glasses chill, bloom two envelopes of gelatin in half a cup of cold water for five minutes — the granules should swell and look like wet sand without any dry pockets. If you see white freckles floating on top, sprinkle a tablespoon more water and wait another minute.
- Meanwhile, make the red layer's simple syrup by combining half a cup of water with a third of a cup of sugar in a small saucepan. Bring it to a gentle simmer over medium heat, swirling — not stirring — until the sugar dissolves and the liquid goes glass-clear. You want tiny bubbles around the edge, not a rolling boil; aggressive heat can caramelize the sugar and tint it amber, muddying the scarlet stripe. Once dissolved, yank the pan off the heat and whisk in a packet of cherry-flavored gelatin (or unflavored plus natural red food dye) until no granules remain. Let the mixture cool for eight minutes; too hot and it'll melt the first layer, too cool and it'll seize before you can pour.
- Retrieve your chilled shot glasses and ladle one tablespoon of ruby syrup into each, aiming for the center so the liquid spreads into a perfect disk. Tilt and rotate the glass to check for even coverage — if you see thin spots, top up with a teaspoon more, but resist the urge to overfill; remember you're building five layers total. Slide the tray back into the fridge for twenty minutes, just enough to set the surface so the next layer won't punch a hole and create marbling. Now wash the saucepan; dried red gelatin is basically edible cement, and your future white layers deserve a sparkly clean vessel. While you wait, rinse your spoon in hot water and dry it thoroughly so cross-contamination doesn't turn your stripes into Pepto swirl.
- Time to craft the creamy white layer. In the same (spotless) saucepan, warm a cup of sweetened condensed milk over low heat until it loosens and just begins to steam — you're looking for a silky ribbon, not bubbling lava. Whisk in two packets of bloomed gelatin until completely dissolved, then add a quarter cup of vodka and half a teaspoon of peppermint extract. Taste with a clean spoon; the mixture should remind you of melted peppermint bark, not a breath-mint challenge. Let the liquid cool for ten minutes, giving the alcohol a chance to integrate so the layers bond instead of sliding apart like drunk tectonic plates.
- Pull the tray out and gently spoon a tablespoon of white mixture over the back of a chilled teaspoon positioned just above the red layer — the spoon diffuses the pour so you don't blast a crater through your pristine stripe. Work quickly but calmly; if the white starts to set in the saucepan, set the pan over the still-warm burner for three seconds and swirl until it loosens. Return the tray to the fridge for another twenty-minute set, then repeat the red layer, white layer, and so on until each glass has four alternating stripes. Between layers, wipe the saucepan rim with a damp towel so crystallized sugar doesn't rain gritty freckles into your next pour.
- For the final flourish, refrigerate the finished shots for at least two hours to fully cure the gelatin — any less and you'll get that tragic slumped layer that slithers out like a horror-movie tentacle. When ready to serve, crush two candy canes in a zip-top bag with a rolling pin until they're fairy-dust fine; chunky shards look rustic but will stab your lips. Pour the dust into a shallow saucer, invert each shot glass to moisten the rim with condensation, then swirl the lip through the candy snow until you get a festive halo. Serve immediately, or park them back on the chilled tray and drape with plastic wrap; just don't garnish more than an hour ahead or the sugar will weep into sticky rivulets.
That's it — you did it. But hold on, I've got a few more tricks that'll take this to another level...
Insider Tricks for Flawless Results
The Temperature Rule Nobody Follows
Most people think gelatin sets the same at any chilly temperature, but the mercury sweet spot is 35 to 37 °F. Colder than that and you risk a brittle texture that shatters like thin ice; warmer and the layers slump into each other like tired drunks. Invest in a fridge thermometer and park your shots on the shelf furthest from the door — every time you swing it open, the temperature can spike five degrees, adding thirty minutes to your set time. If you're batching for a big bash, borrow a dorm-size mini fridge so your main fridge isn't cycling like a cardio workout.
Why Your Nose Knows Best
Flavor perception drops 30 percent when food is ice-cold, so taste your gelatin mixture at room temperature and bump the peppermint up just past the point you think is acceptable. By the time it chills, the volatile oils mellow and you'll hit the nostalgic sweet spot without veering into toothpaste territory. If you're nervous, split the mixture and make one tester cup — after twenty minutes you'll know if you need to doctor the rest. A friend tried skipping this step once; let's just say her shots tasted like frosty Tic Tacs and the party ended with everyone brushing their teeth for dessert.
The 5-Minute Rest That Changes Everything
After the final layer sets, let the shots sit uncovered for five minutes before garnishing. This brief tempering allows surface condensation to evaporate so the crushed candy adheres like glitter on glue. Skip the wait and you'll get a gritty paste that slides off in sheets, leaving your glasses looking like they survived a preschool art project. Conversely, don't leave them out longer than ten minutes or the gelatin starts to sweat and you'll lose that pristine glassy shine.
Spooning vs. Squeezing
You'll see recipes that advocate squirting layers from a squeeze bottle, but that high-velocity stream creates turbulence and blurred lines. A tablespoon and a steady wrist give you runway-model crisp stripes every time. If you absolutely must use a squeeze bottle, cut the tip wider and hold it just above the surface so the liquid cascades rather than drills. And now the fun part.
Creative Twists and Variations
This recipe is a playground. Here are some of my favorite ways to switch things up:
Midnight Mocha Cane
Replace the simple syrup with strong espresso and a tablespoon of cocoa powder, then add a whisper of coffee liqueur to the white layer. The bitterness plays off the mint like a peppermint mocha that decided to party. Garnish with crushed chocolate-covered espresso beans for crunch and a caffeine kick that keeps the holiday dance floor hopping.
Coconut Snowcap
Sub full-fat coconut milk for the sweetened condensed milk and use white rum instead of vodka. You'll get a tropical-cool vibe that tastes like a Caribbean Christmas — think sandy beaches strung with lights. Add toasted coconut flakes to the rim for a snow-drift effect that hides any imperfect layers.
Spicy Fireside Stripe
Infuse the simple syrup with a split habanero for ten minutes, then proceed as written. The gentle heat creeps in after the mint fades, warming the back of your throat like a boozy candy cane that spent spring break in Tijuana. Keep the crushed candy rim — the cool sugar helps tame the flame so guests come back for more instead of reaching for milk.
White Chocolate Blizzard
Melt two ounces of white chocolate into the warm condensed milk before blooming the gelatin. The cocoa butter adds a velvety body that tastes like frozen hot chocolate shot through a candy-cane straw. Top with micro-planed white chocolate instead of candy dust for a snowy finish that photographs like a winter wonderland.
Booze-Free but Still Fun
Replace the vodka with cold peppermint tea and add an extra teaspoon of extract to keep the flavor bold. Kids and designated drivers get the same visual thrill without the buzz, and you won't have to label two separate trays. They'll keep a day longer since there's no alcohol trying to fight the gelatin's structure.
Black-and-White Formal
Skip the red layers entirely and alternate plain white gelatin with a charcoal-tinted layer made from activated charcoal powder. The monochrome stripes look ultra-modern against silver serving trays and fit a New Year's Eve palette. Bonus: the charcoal allegedly helps with hangover prevention, though I wouldn't stake my headache on it.
Storing and Bringing It Back to Life
Fridge Storage
Keep the shots in a single layer on the sheet pan, covered with plastic wrap pressed gently against the surface to prevent them from absorbing rogue garlic lasagna odors. They'll stay pristine for five days, though the candy rim is best within 48 hours. If you must stack, slide a piece of parchment between layers and offset the glasses so the rims don't touch — nothing kills the wow factor like crushed-cane confetti glued to the side of your glass.
Freezer Friendly
You can freeze them for up to a month, but the texture will firm into a chewy peppermint marshmallow. Thaw overnight in the fridge, then let sit at room temp for ten minutes before serving so they regain their silky slide. Don't garnish pre-freeze — the candy cane dust will weep into a sticky syrup that looks like a crime scene. Label the container; future you will thank present you when rummaging through the icebox at 1 a.m.
Best Reheating Method
There is none — Jell-O shots are a one-way ticket to Chilltown. If you left the tray on the counter during the party and they softened, slide them back into the fridge for an hour to re-set. Should a shot refuse to release, dip the glass bottom in warm water for three seconds to loosen the gelatin's grip, then invert onto a saucer and let gravity do its thing. Add a fresh rim of crushed candy and no one will know you had a meltdown — literally.